background image

– 25 –

STANDBY

POWER

SLEEP

ZZZ...

PRESET

10

Canceled

20

30

60

90

120

TIMER
/CLOCK

CANCEL

DEMO

Recording Timer

7:00

6:30

Sleep Timer

7:30

does not work.

Recording Timer

AM 6:00

7:30

7:00

6:30

Daily Timer

AM 6:00

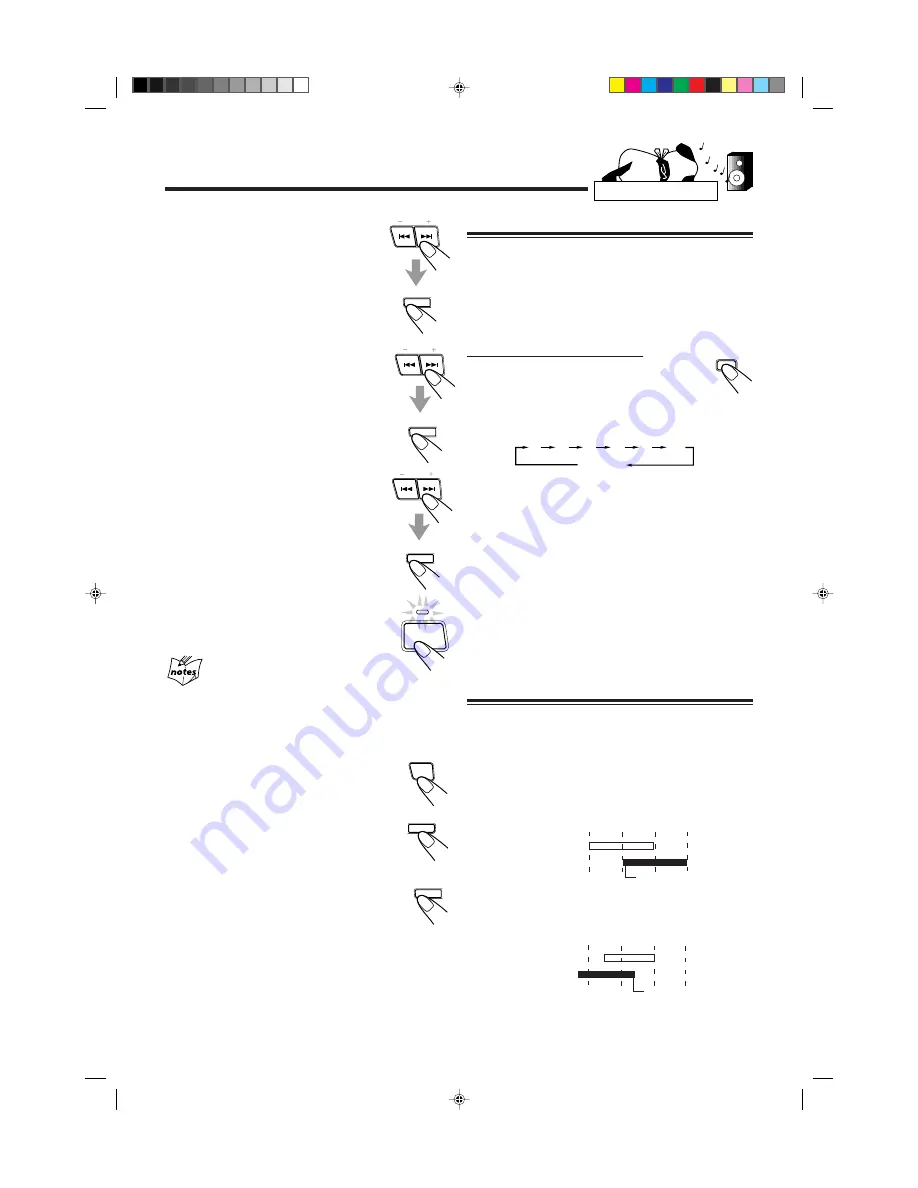
Using Sleep Timer

With Sleep Timer, you can fall asleep to music.
You can set Sleep Timer when the unit is turned on.

How Sleep Timer actually works

The unit automatically turns off after the specified time
length passes.

On the remote control ONLY:

1

Press SLEEP.

The time length until the shut-off time appears
and the SLEEP indicator starts flashing on the display.
• Each time you press the button, the time length changes

as follows:

2

Wait for about 5 seconds after specifying the
time length.

The SLEEP indicator stops flashing and remains lit.

To check the remaining time until the shut-off time, press
SLEEP once so that the remaining time until the shut-off time
appears for about 5 seconds.

To change the shut-off time, press SLEEP repeatedly until
the desired time length appears on the display.

To cancel the setting, press SLEEP repeatedly so that the
SLEEP indicator goes off.
• Sleep Timer is also canceled when you turn off the unit.

Timer Priority

Since each timer can be set separately, you may wonder what
happens if the setting for these timers overlaps.
Here are examples.

• Recording Timer has priority over Daily Timer and

Sleep Timer.
If Daily Timer is set to come on while Recording Timer is
operating, Daily Timer will not come on at all.

If Recording Timer is set to come on while Sleep Timer is
operating, Sleep Timer will not work (the SLEEP indicator
does not go off).

4

Set the on-time you want the unit
to turn on.

1) Press 

4

 or 

¢

 to set the hour, then

press SET.

2) Press 

4

 or 

¢

 to set the minute, then

press SET.
“OFF TIME” appears for 2 seconds, then
the unit enters off-time setting mode.

5

Set the off-time you want the unit
to turn off (on standby).

1) Press 

4

 or 

¢

 to set the hour, then

press SET.

2) Press 

4

 or 

¢

 to set the minute, then

press SET.
The unit enters preset station selecting
mode.

6

Select the preset station.

1) Press 

4

 or 

¢

 to select the band

(“TUNER FM” or “TUNER AM”), then
press SET.

2) Press 

4

 or 

¢

 to select a preset channel

number, then press SET.
The REC indicator stops flashing and
remains lit. The settings you have done are
shown on the display in sequence.

7

Press POWER to turn off the unit
(on standby) if necessary.

If you want to listen to another source
while recording

Press REC START/STOP to stop recording. Without stopping it, you
cannot change the source.

To turn on or off Recording Timer after its setting is
done

1

Press TIMER/CLOCK repeatedly until
“REC” appears on the display.

2

To turn off the Recording Timer, press
CANCEL.
The REC indicator goes off from the display.
The Recording Timer is canceled, but the
setting for the Recording Timer remains in
memory.

To turn on the Recording Timer, press SET.
The REC indicator lights up on the display.
The settings you have done are shown on the
display in sequence for your confirmation.

SET

SEA CONTROL

SET

SEA CONTROL

does not work.

PRESET

PRESET

SET

SEA CONTROL

SET

SEA CONTROL

EN20-28.MX-J70[J]/f

99.2.9, 1:34 PM

25

Summary of Contents for CA-MXJ70

Page 1: ...SS99SL COMPACT COMPONENT SYSTEM SP MXJ77 SP MXJ77 CA MXJ70 S A BASS CENTER MODE DELAY TIME FM MODE SHIFT PRO LOGIC 3 STEREO TEST TONE TAPE A TAPE B REC PAUSE CENTER LEVEL REAR LEVEL BALANCE FADE MUTING RM SMXJ70J REMOTE CONTROL SLEEP SOUND MODE R L SP DSC99SL SP DSS99SL POWER STANDBY CD1 CD1 CD2 CD3 CD2 CD3 PLAY EXCHANGER COMPACT DIGITAL AUDIO COMPU PLAY CONTROL PHONES PANEL OPEN CLOSE TAPE CD AUX...

Page 2: ...intended to alert the user to the presence of important operating and maintenance servicing instructions in the literature accompanying the appliance CAUTION For U S A This equipment has been tested and found to comply with the limits for a Class B digital device pursuant to part 15 of the FCC Rules These limits are designed to provide reasonable protection against harmful interference in a reside...

Page 3: ... 2 Sides Top Back No obstructions should be placed in the areas shown by the dimensions below 3 Bottom Place on the level surface Maintain an adequate air path for ventilation by placing on a stand with a height of 10 cm 3 15 16 in or more CA MXJ70 CA MXJ70 G 2 10 cm 3 15 16 in 1 cm 7 16 in 1 cm 7 16 in 15 cm 5 15 16 in 15 cm 5 15 16 in 15 cm 5 15 16 in 15 cm 5 15 16 in 15 cm 5 15 16 in Side view ...

Page 4: ...ficient distance between the unit and the TV Keep the speakers away from the TV to avoid interference with TV DO NOT install the unit in a location near heat sources or in a place subject to direct sunlight excessive dust or vibration We would like to thank you for purchasing one of our JVC products Before operating this unit read this manual carefully and thoroughly to obtain the best possible pe...

Page 5: ...ng in a Preset Station 13 Playing Back CDs 14 Loading CDs 14 Playing Back the Entire Discs Continuous Play 14 Basic CD Operations 14 Programming the Playing Order of the Tracks Program Play 15 Playing at Random Random Play 16 Repeating Tracks or CDs Repeat Play 16 Prohibiting Disc Ejection Tray Lock 16 Playing Back Tapes 17 Playing Back a Tape 17 Locating the Beginning of a Song Music Scan 17 Usin...

Page 6: ...SE REC START STOP DUBBING REVERSE MODE CD REC START DECK A B PRESET PRO LOGIC 3 STEREO PROGRAM RANDOM TUNING EDIT S A BASS REPEAT SET CANCEL SOUND MODE TIMER CLOCK DEMO SEA CONTROL i h j k l z x c v o a s d f g Location of the Buttons and Controls Become familiar with the buttons and controls on your unit Powered Rolling Panel Press PANEL OPEN CLOSE to open the panel To close the panel press the b...

Page 7: ...20 22 a DUBBING button 21 s CD REC START button 21 22 Continued d DECK A B button 17 f TIMER CLOCK button 10 23 g SET button 10 23 SEA CONTROL button 12 h 7 stop button 14 17 j TUNING buttons 13 1 fast left fast right buttons 12 15 17 k PRO LOGIC 3 STEREO button 19 l PROGRAM RANDOM button 15 16 21 EDIT button 22 z REPEAT button 16 x S A BASS Signal Adaptive Bass button and lamp 11 c SOUND MODE but...

Page 8: ...on 10 e SLEEP button 25 r Number buttons 13 15 Sound control buttons 11 18 t FM MODE button 13 y forward search fast right button 15 17 u CD 6 button 14 Pressing this button also turns on the unit i 7 stop button 14 17 o FM AM button 13 Pressing this button also turns on the unit VOLUME button 10 19 S A BASS CENTER MODE DELAY TIME FM MODE SHIFT PRO LOGIC 3 STEREO TEST TONE TAPE A TAPE B REC PAUSE ...

Page 9: ...tment when you are not going to use the remote control for an extended period of time Otherwise it will be damaged from battery leakage R6P SUM 3 AA 15F Connecting Antennas FM antenna FM antenna supplied Outdoor FM antenna not supplied Continued 7 16 in 10 mm Extend the FM antenna supplied horizontally If reception is poor connect the outdoor antenna Connect the outdoor antenna Before attaching a ...

Page 10: ...nnecting cords and the AC power cord AM antenna Vinyl covered wire not supplied AM loop antenna supplied Connecting Speakers You can connect a pair of front speakers and one subwoofer To connect front speakers Right speaker Left speaker Black Red 1 Press and hold the clamp of the speaker terminal on the rear of the unit 2 Insert the end of the speaker cord into the terminal Match the polarity of t...

Page 11: ...nt You can connect both analog and digital equipment DO NOT connect any equipment while the power is on DO NOT plug in any equipment until all connections are complete To connect an analog component Be sure that the plugs of the audio cords are color coded White plugs and jacks are for left audio signals and red ones for right audio signals To input ANTENNA CD OPTICAL DIGITAL OUTPUT AUX GND GND AM...

Page 12: ...connect audio equipment with an optical digital input terminal You can record CD sound onto the connected digital equipment Connect an optical digital cord not supplied between the optical digital input terminal on the other equipment and the CD OPTICAL DIGITAL OUTPUT terminal NOW you can plug in the unit and other connected equipment FINALLY To optical digital input Before connecting the other eq...

Page 13: ... POWER so that the STANDBY lamp goes off The Powered Rolling Panel opens automatically To turn off the unit on standby press POWER again so that the STANDBY lamp lights up The Powered Rolling Panel also closes A little power is always consumed even while the unit is on standby To switch off the power supply completely unplug the AC power cord from the AC outlet When you unplug the AC power cord or...

Page 14: ...level gradually decreases to 0 To restore the sound press the button again Adjusting the Front Speaker Output Balance If the sounds you hear from the front right and left speakers are unequal you can adjust the speaker output balance On the remote control ONLY 1 Press and hold SHIFT 2 Press BALANCE L R button Pressing BALANCE L decreases the right channel output Pressing BALANCE R decreases the le...

Page 15: ...CLUB HALL or STADIUM before starting the procedure below On the unit ONLY 1 Press and hold SEA CONTROL until SEA CONT appears on the display 2 Adjust the SEA pattern 1 Press 4 or to select the frequency range to adjust LOW MID HIGH 2 Press 1 or to adjust the level 3 to 3 of the selected frequency range 3 Repeat steps 1 and 2 to adjust the level of the other frequency ranges 3 Press SEA CONTROL aga...

Page 16: ...before shipment This is not a malfunction You can preset the stations you want into memory by following the presetting method There is a time limit in doing the following steps If the setting is canceled before you finish start from step 1 again 1 Tune in the station you want to preset See Tuning in a Station above 2 Press SET 3 Press PRESET to select a preset number 4 Press SET again The tuned st...

Page 17: ...2 Press one of the disc number buttons CD 1 CD 2 and CD 3 for the disc you want to play CD play starts from the first track of the selected disc Pressing CD 6 instead of the disc number buttons starts playing back if a CD is on the trays To stop during play press 7 To remove the disc press 0 for the corresponding disc tray CD playback sequence When 3 CDs are loaded on the disc trays they are playe...

Page 18: ...ntil PROGRAM appears on the display If a program has been stored in memory the program is called up Each time you press the button CD play mode changes as follows 3 Press one of the disc number buttons CD 1 CD 2 and CD 3 to select the disc number you want to play 4 Select a track from the CD selected in the above step On the unit Press 4 or to select the track number then press SET On the remote c...

Page 19: ...o eject CDs LOCKED appears to inform you that the Tray Lock is in use To check the program contents Before playing you can check the program contents by pressing 1 4 or on the remote control Shows the programed tracks in the programed order 1 4 Shows them in the reverse order To modify the program Before play you can erase the programed tracks shown on the display by pressing CANCEL Each time you ...

Page 20: ... Reverse Mode indicator on the display lights up like To cancel Reverse Mode press the button again so that the Reverse Mode indicator on the display lights up like When Reverse Mode is on with cassettes in both decks A and B After the reverse 2 side of the tape finishes playing the tape in the other deck starts playing Locating the Beginning of a Song Music Scan You can use Music Scan to locate t...

Page 21: ...he center speaker OFF Select this mode when shut off the center channel signals Dolby Surround has been developed to reproduce the important elements of the acoustic surround at home To listen to the sound of video software bearing the mark DOLBY SURROUND which includes the same encoded surround information as found in Dolby Stereo films the unit can provide you with Dolby Surround decoder There a...

Page 22: ...ust the rear speaker output level when using Dolby 3 Stereo DELAY1 DELAY2 DELAY4 DELAY3 DELAY TIME LEFT Left front speaker SURROUND Rear speakers CENTER Center speaker RIGHT Right front speaker CENTER LEVEL REAR LEVEL TEST TONE TEST TONE 8 Press TEST TONE again to stop the test tone 9 Release SHIFT Enjoying Playback with Dolby Surround You can use the settings you have already stored in memory On ...

Page 23: ...START STOP IMPORTANT It should be noted that it may be unlawful to re record pre recorded tapes records or discs without the consent of the owner of copyright in the sound or video recording broadcast or cable programme and in any literary dramatic musical or artistic embodied therein The recording level is automatically set correctly so it is not affected by the VOLUME control Thus during recordi...

Page 24: ...resume recording press TAPE 2 3 To remove the cassette press EJECT 0 for deck B To record on both sides Reverse Mode Press REVERSE MODE so that the Reverse Mode indicator lights up as When using the Reverse Mode for recording start recording in the forward 3 direction first Otherwise recording will stop when recording is done only on one side reverse of the tape To cancel Reverse Mode press the bu...

Page 25: ...appear 2 1 9 13 10 14 11 8 12 5 Put a recordable cassette of appropriate length into deck B 6 Press REVERSE MODE so that the Reverse Mode indicator lights up as Without turning on the Reverse Mode recording will stop when the front side of the tape is recorded 7 Press CD REC START The indicator lights up on the display Deck B starts recording then about 10 second later the CD player starts playing...

Page 26: ...MER CLOCK again ON TIME appears for 2 seconds then the unit enters on time setting mode PRESET PRESET PRESET TIMER CLOCK TIMER CLOCK CD TUNER FM TUNER AM TAPE AUX DAILY DAILY DAILY 3 Set the on time you want the unit to turn on 1 Press 4 or to set the hour then press SET 2 Press 4 or to set the minute then press SET OFF TIME appears for 2 seconds then the unit enters off time setting mode 4 Set th...

Page 27: ...your confirmation If the unit is turned on when the timer on time comes Daily Timer does not work Using Recording Timer With Recording Timer you can make a tape of a radio broadcast automatically How Recording Timer actually works The unit automatically turns on tunes into the specified station sets the volume level to 0 and starts recording when the on time comes the indicator flashes just before...

Page 28: ...me on at all If Recording Timer is set to come on while Sleep Timer is operating Sleep Timer will not work the SLEEP indicator does not go off 4 Set the on time you want the unit to turn on 1 Press 4 or to set the hour then press SET 2 Press 4 or to set the minute then press SET OFF TIME appears for 2 seconds then the unit enters off time setting mode 5 Set the off time you want the unit to turn o...

Page 29: ...ulty in recording To clean the heads capstans and pinch rollers Use a cotton swab moistened with alcohol To demagnetize the heads Turn off the unit and use a head demagnetizer available at electronics and record shops Heads Capstans Pinch rollers Handling discs Remove the disc from its case by holding it at the edge while pressing the center hole lightly Do not touch the shiny surface of the disc ...

Page 30: ...sc is scratched or dirty The AC power cord is not plugged in Trays are locked The disc is placed upside down Power supply from the AC power cord has been cut off while the tape was running Small tabs on the back of the cassette are removed The built in microprocessor may malfunction due to external electrical interference The path between the remote control unit and the remote sensor on the unit i...

Page 31: ...n standby Dimensions approx 265 x 315 x 341 mm W H D 107 16 x 127 16 x 137 16 in Mass approx 9 5 kg 20 9 lbs Supplied accessories See page 6 Speaker section Front speakers SP MXJ77 Type 3 way bass reflex type Magnetically shielded Speaker units Woofer 16 cm 6 5 16 cone x1 Midrange 5 cm 2 cone x1 Tweeter 2 cm 13 16 dome x1 Power handling capacity 120 watts Impedance 6 ohms Frequency range 40 Hz 28 ...

Page 32: ...107 Little Falls Road Fairfield NJ 07004 2105 973 808 9279 5665 Corporate Avenue Cypress CA 90630 0024 714 229 8011 13 Cummings Park Woburn MA 01801 781 376 9100 705 Enterprise Street Aurora IL 60504 8149 630 851 7855 10700 Hammerly Suite 110 Houston TX 77043 713 935 9331 890 Dubuque Avenue South San Francisco CA 94080 1804 650 871 2666 1500 Lakes Parkway Lawrenceville GA 30243 5857 770 339 2522 2...

Page 33: ... provided with the products or if the model or serial number has been altered tampered with defaced or removed 2 Initial installation and installation and removal for repair 3 Operational adjustments covered in the Owner s Manual normal maintenance video and audio head cleaning 4 Damage that occurs in shipment due to act of God and cosmetic damage 5 Signal reception problems and failures due to li...

Page 34: ...VICTOR COMPANY OF JAPAN LIMITED 0399MWMMDWJEM EN J VC MX J70 J COVER f 99 2 9 1 35 PM 2 ...

Reviews: