background image

4

Getting Started

Getting Started

Getting Started

Getting Started

FS-SD550(J)/ GNT0008-001A/ English

CAUTION:

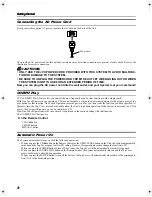
• Make all connections before plugging the System into an AC power outlet.

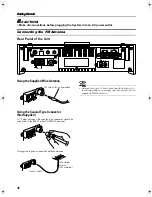
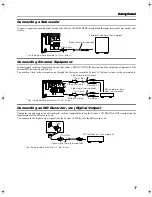
Connecting the FM Antenna

Rear Panel of the Unit

Using the Supplied Wire Antenna 

Using the Coaxial Type Connector 
(Not Supplied)

A 75-ohm antenna with coaxial type connector should be
connected to the FM 75-ohm COAXIAL terminal.

If reception is poor, connect the outdoor antenna. 

• Before attaching a 75 ohm coaxial lead (the kind with a 

round wire going to an outdoor antenna), disconnect the 
supplied FM Wire Antenna. 

SUB WOOFER

CD DIGITAL OUT

ANTENNA

AM EXT

FM(75    )
COAXIAL

AM LOOP

OUT

IN

MD / AUX

SPEAKERS IMPEDANCE 4        16

R

AC IN

L

FM wire antenna (supplied)

Coaxial cable

FM outdoor 
antenna 
(Not supplied)

FS-SD5_01E.book  Page 4  Tuesday, February 13, 2001  12:02 PM

Summary of Contents for CA-FSSD550

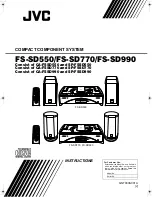
Page 1: ...AHB PRO CD PROGRAM DOOR SLIDE AUTO PRESET REPEAT RANDOM BASS TREBLE CANCEL UP SET DOWN MD AUX FM AM VOLUME CD FADE MUTING For Customer Use Enter below the Model No and Serial No which are located either on the rear bot tom or side of the cabinet Retain this information for future reference Model No Serial No INSTRUCTIONS GNT0008 001A J FS SD550 FS SD770 FS SD990 Consist of CA FSSD550 and SP FSSD55...

Page 2: ...use harmful interference to radio communications However there is no guarantee that interfer ence will not occur in a particular installation If this equipment does cause harmful interference to radio or television recep tion which can be determined by turning the equipment off and on the user is encouraged to try to correct the interference by one or more of the following measures Reorient or rel...

Page 3: ... the same for many different functions e g setting the volume is given in the section Basic Operations and not repeated under each function The names of buttons controls and display messages are written in all capital letters e g FM AM NO DISC System functions are written with an initial capital letter only e g Normal Play Use the table of contents to look up specific information you require We ha...

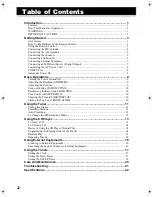
Page 4: ...the Volume 9 Fade out Muting FADE MUTING 10 Reinforcing the Bass Sound AHB PRO 10 Tone Control BASS TREBLE 10 Showing the Time CLOCK DISPLAY 10 Sliding the Top Cover DOOR SLIDE 10 Using the Tuner 11 Tuning In a Station 11 Presetting Stations 12 Auto Presetting 12 To Change the FM Reception Mode 12 Using the CD Player 13 To Insert a CD 13 To Unload a CD 14 Basics of Using the CD Player Normal Play ...

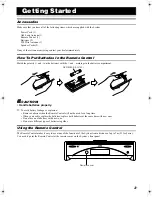
Page 5: ...N Handle batteries properly To avoid battery leakage or explosion Remove batteries when the Remote Control will not be used for a long time When you need to replace the batteries replace both batteries at the same time with new ones Do not use an old battery with a new one Do not use different types of batteries together Using the Remote Control The Remote Control makes it easy to use many of the ...

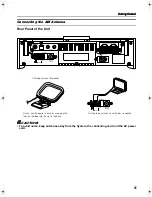
Page 6: ...plied A 75 ohm antenna with coaxial type connector should be connected to the FM 75 ohm COAXIAL terminal If reception is poor connect the outdoor antenna Before attaching a 75 ohm coaxial lead the kind with a round wire going to an outdoor antenna disconnect the supplied FM Wire Antenna SUB WOOFER CD DIGITAL OUT ANTENNA AM EXT FM 75 COAXIAL AM LOOP OUT IN MD AUX SPEAKERS IMPEDANCE 4 16 R AC IN L F...

Page 7: ...the System the connecting cord and the AC power cord SUB WOOFER CD DIGITAL OUT ANTENNA AM EXT FM 75 COAXIAL AM LOOP OUT IN MD AUX SPEAKERS IMPEDANCE 4 16 R AC IN L Attach the AM loop to its base by snapping the tabs on the loop into the slot in the base AM loop antenna Supplied ANTENNA AM EXT FM 75 COAXIAL AM LOOP Turn the loop until you have the best reception ...

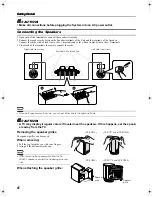
Page 8: ...the cords Since both speakers are the same you can put either one to the right or left side CAUTION A TV may display irregular colors if located near the speakers If this happens set the speak ers away from the TV Removing the speaker grilles The speaker grilles can be moved When removing 1 Pull the top forwards you with your fingers 2 Also pull the bottom towords you When removing the speaker gri...

Page 9: ...rd not supplied between the System s CD DIGITAL OUT terminal and the input terminal of the MD recorder etc You can record the digital output signal from the System s CD Player to the MD recorder etc SUB WOOFER CD DIGITAL OUT ANTENNA AM EXT FM 75 11mm Max COAXIAL AM LOOP OUT IN MD AUX Powered Subwoofer not supplied Signal cord not supplied Use the plug whose diameter is 11mm or less 11mm Max SUB WO...

Page 10: ...on for you then starts the function you have specified At the same time the Top Cover moves backward to allow the Unit s top button operation If the System is not ready no CD in place the System still powers on so you can insert a CD How One Touch Operation works in each case is explained in the section dealing with that function The COMPU PLAY buttons are Automatic Power On The System automatical...

Page 11: ...trol the brightness of the backlighting changes as fol lows Bright Dark back to the beginning When the System is Turned Off STANDBY MODE Each time you press the DIMMER button on the Remote Control the brightness of the backlighting changes as fol lows No backlighting Dark backlighting back to the beginning When the System is turned off again after power on the brightness in Standby mode will be re...

Page 12: ...evel low frequency range level between 6 and 6 0 Flat 1 Press the BASS button on the Remote Control 2 Press the UP or DOWN button on the Remote Control to adjust the bass level TREBLE Control You can adjust the treble level high frequency range level between 6 and 6 0 Flat 1 Press the TREBLE button on the Remote Control 2 Press the UP or DOWN button on the Remote Control to adjust the treble level...

Page 13: ...e frequency changes down or up automatically un til a station is found OR Preset Tuning using the Remote Control Possible only after presetting stations Select the desired preset number using the UP DOWN and button on the Remote Control After 1 second the display will show the preset number s band and frequency Example Press the UP button until the preset number 12 P12 appears Preset Tuning using ...

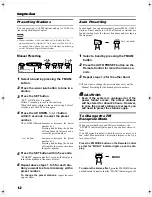
Page 14: ...each sta tion you want to store in memory with a preset number To change the preset stations repeat the same steps as above Auto Presetting In each band you can automatically preset FM 30 AM 15 stations Preset numbers will be allocated as stations are found starting from the lowest frequency and moving up the frequency 1 Select a band by pressing the FM AM button 2 Press the AUTO PRESET button on ...

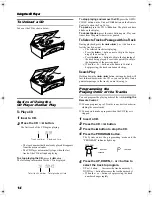
Page 15: ...PEN CLOSE button on the Unit or the CD 0 button on the Remote Control The Top Cover opens 2 Place a CD with its label side up as shown below Press down on the CD s center until you hear a click 3 Press the OPEN CLOSE button or CD 0 button again to close the Top Cover To close the Top Cover and play the CD you can just press the CD 8 button You can place an 8 cm 3 CD without an adaptor If the CD ca...

Page 16: ...n once to skip to the begin ning of the next track Press the 4 or button to skip to the beginning of the track being played Press twice quickly to skip to the beginning of the previous track When the or button on the Remote Control is kept pressing the track continuously skips Search Play Holding down the 4 or button during playback will fast forward backwards the CD so you can quickly find a part...

Page 17: ... the CD Player is stopped Each time you press the CANCEL button the last track in the program is deleted To add new tracks to the end of the program repeat above steps 5 to 7 Random Play The tracks will play in no special order when you use this mode 1 Press the RANDOM button on the Remote Control The RANDOM indicator lights up on the display 2 Press the CD 8 button The tracks are played in random...

Page 18: ...t another source For operation of the external equipment refer to its In structions Recording the System s Source to External Equipment You can record the System s source to external equipment which is connected to the MD AUX IN OUT or CD DIGI TAL OUT terminals of the System such as cassette deck or MD recorder etc First make sure that the external equipment is properly connected to the System See...

Page 19: ...on The selected time is set and the seconds start counting from 0 CAUTION If there is a power failure the clock loses its setting after about 20 minutes AM 12 00 blinks on the display and the clock must be reset The clock may gain or lose one to two minutes per month Setting the Daily Timer Once you have set the Daily Timer the timer will be acti vated at the same time every day The Timer indicato...

Page 20: ...listen to The display changes as shown below TUNERÔCDÔ back to the beginning 4 Setting the volume level 1 Press the TIMER button The current volume setting blinks on the display 2 Press the or 4 button to select the volume level The current volume level will be used 0 to 50 When the timer is turned on the Volume will be automatically set to the selected level 5 Press the TIMER button The timer set...

Page 21: ...time you want the source to play before shutting off Each time you press the SLEEP button it changes the number of minutes shown on the display in this sequence 10 20 30 60 90 120 Cancelled back to the beginning The selected number of minutes for the Sleep Timer will stop blinking five seconds later and the display returns to the original one before setting the Sleep Timer The display is dimmed Th...

Page 22: ...etc could de grade sound Open the Top Cover and clean the lens as shown Use a blower available from a camera store to blow dust off the lens If there are fingerprints etc on the lens gently wipe clean with a cotton swab Moisture Condensation Only CDs bearing this mark can be used with this System How ever continued use of irregular shape CDs heart shape octago nal etc can damage the System Remove ...

Page 23: ...positioned Reconnect the antenna securely Change the position and direction of the AM Loop Antenna Extend FM Wire Antenna to the best reception position The CD skips The CD is dirty or scratched Clean or replace the CD The CD does not play The CD is upside down Put the CD in with the label side up Unable to operate the Remote Control The path between the Remote Con trol and the sensor on the Unit ...

Page 24: ...SD770 SD990 Dimensions 300mm 75mm 215mm W H D 11 13 16 3 8 1 2 Mass Approx 3 0kg 6 7 lbs Speaker Specifications each unit FS SD550 Speakers 8 cm cone Impedance 4 ohms Dimensions 109mm 217mm 165mm W H D 4 5 16 8 9 16 6 1 2 Mass 1 5kg 3 4 lbs FS SD770 Speakers 8 cm cone Impedance 4 ohms Dimensions 120mm 246mm 162mm W H D 4 3 4 9 11 16 6 7 16 Mass 1 4kg 3 1 lbs FS SD990 Speakers 8 cm cone Impedance 4...

Page 25: ...OCATIONS 10 New Maple Avenue Pine Brook NJ 07058 9641 973 396 1000 5665 Corporate Avenue Cypress CA 90630 0024 714 229 8011 13 Cummings Park Woburn MA 01801 781 376 9100 705 Enterprise Street Aurora IL 60504 8149 630 851 7855 10700 Hammerly Suite 110 Houston TX 77043 713 935 9331 890 Dubuque Avenue South San Francisco CA 94080 1804 650 871 2666 1500 Lakes Parkway Lawrenceville GA 30243 5857 770 33...

Page 26: ...y attachment not provided with the products or if the model number or serial number has been altered tampered with defaced or removed 2 Initial installation and installation and removal for repair 3 Operational adjustments covered in the Owner s Manual normal maintenance video and audio head cleaning 4 Damage that occurs in shipment due to act of God and cosmetic damage 5 Signal reception problems...

Page 27: ...0201MZMCREHIT EN VICTOR COMPANY OF JAPAN LIMITED ...

Reviews: