background image

5

English

CAUTION: Make all connections before plugging the Unit into an AC power outlet.

Connecting the Speakers

Please refer to instructions for speakers as well when you connect speakers.

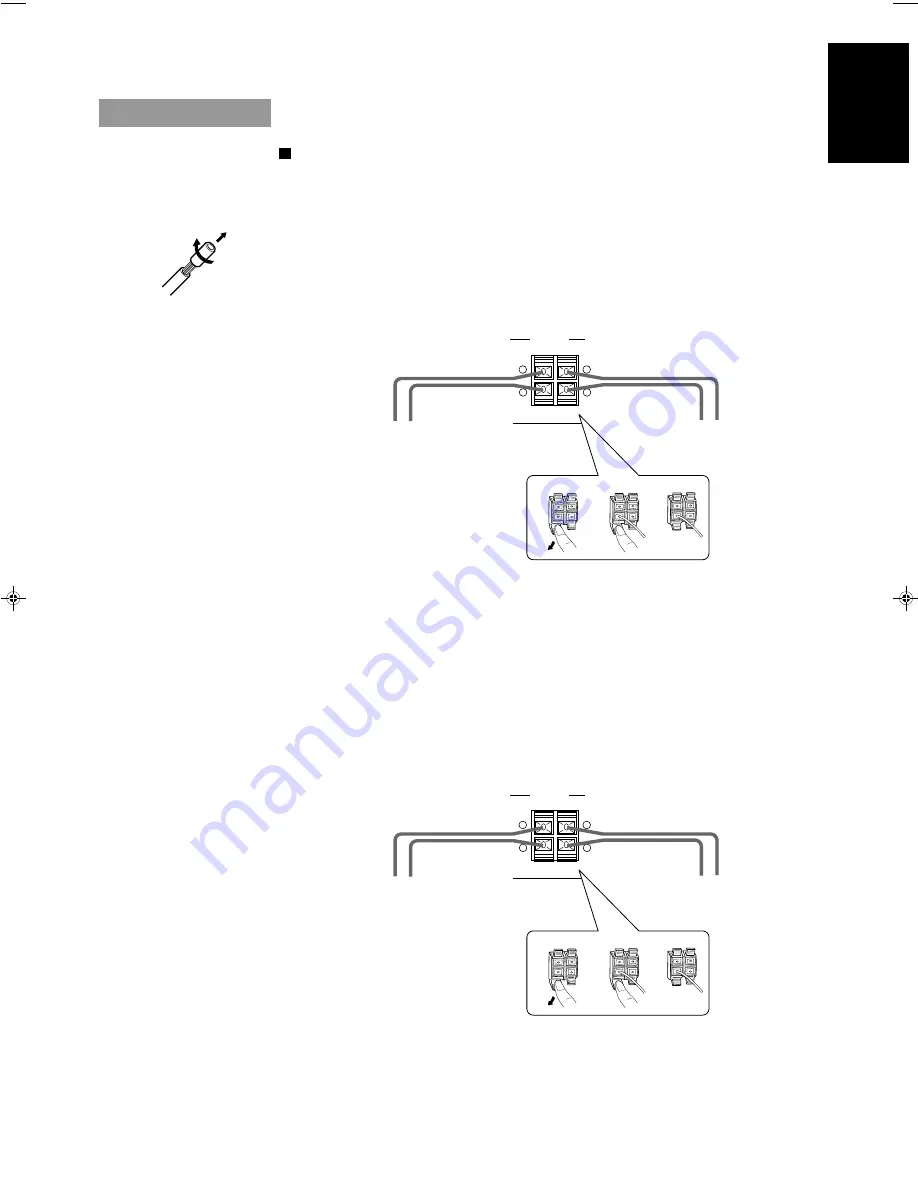
For CA-D551TR———————————————————————

For each speaker, connect one end of the speaker wire to the speaker terminals on the back of the System
and the other end to the speaker.
1. Open each of the terminals and insert the speaker wires firmly (be sure to remove the insulation at the

end of each wire first), then close the terminals.

2. Connect the red (+) and black (–) terminals of the right side speaker to the red (+) and black (–)

terminals marked RIGHT on the System.
Connect the red (+) and black (–) terminals of the left side speaker to the red (+) and black (–)
terminals marked LEFT on the System.

SPEAKERS

RIGHT

LEFT

+

+

Right Speaker

Left Speaker

IMPORTANT: Use speakers with the correct impedance only. The
correct impedance is indicated on the back panel.

CAUTION: If a TV is installed near speakers, the TV may display irregu-
lar colours. In this case, set the speakers away from the TV.

For CA-D451TR or CA-D351TR ———————————————

For each speaker, connect one end of the speaker wire to the speaker terminals on the back of the System.
1. Open each of the terminals and insert the speaker wires firmly, then close the terminals.
2. Connect the red (+) and black (–) terminals of the right side speaker to the red (+) and black (–)

terminals marked RIGHT on the System.
Connect the red (+) and black (–) terminals of the left side speaker to the red (+) and black (–)
terminals marked LEFT on the System.

SPEAKERS

RIGHT

LEFT

+

+

Right Speaker

Left Speaker

IMPORTANT: Use speakers with the correct impedance only. The
correct impedance is indicated on the back panel.

CAUTION: If a TV is installed near speakers, the TV may display irregu-
lar colours. In this case, set the speakers away from the TV.

CA-D351/451TR[E]/EN

97.4.16, 9:39 AM

5

Summary of Contents for /CA-D451TR

Page 1: ...ANWIJZING MANUAK DE INSTRUCCIONES ISTRUZIONI PLAY EXCHANGE SYSTEM DISC DISC DISC DISC 3 TRIPLE TRAY COMPACT DIGITAL AUDIO REPEAT RANDOM DISPLAY MODE PTY EON SELECT SELECT CONTINUE SOUND MODE ACTIVE BASS EX MULTI CONTROL VOLUME EJECT STANDBY STANDBY ON P UP P DOWN TUNING UP TUNING DOWN CD REC START DUBBING START STOP REC DECK A B REVERSE MODE 1BIT DUAL D A CONVERTER PHONES CD TAPE AUX FM AM EJECT P...

Page 2: ... le courant Le commutateur POWER ne coupe jamais complètement la ligne de secteur quelle que soit sa position Le courant peut être télécommandé Opgelet POWER schakelaar Om de stroomtoevoer geheel uit te schakelen trekt u de stekker uit het stopkontakt Anderszaleraltijdeengeringehoeveelheidstroomnaarhet apparaat lopen ongeacht de stand van de POWER schakelaar U kunt het apparaat ook met de afstands...

Page 3: ... toestel als volgt opstellen 1 Voorkant Geen belemmeringen en voldoende ruimte 2 Zijkanten boven onderkant Geen belemmeringen plaatsen in de hieronder aangegeven zones 3 Onderkant Op vlakke ondergrond plaatsen Voldoende ventilatieruimte voorzien door het toestel op een onderstel met een hoogte van 10 cm of meer te plaatsen Precaucion ventilación correcta Para evitar el riesgo de descargas eléctric...

Page 4: ...NTERNO DELL APPARECCHIO CLASS 1 LASER PRODUCT DANGER Invisible laser radiation when open and interlock failed or defeated AVOID DIRECT EXPOSURE TO BEAM e ADVARSEL Usynlig laser stråling ved åbning når sikkerhedsafbrydere er ude af funktion Undgå udsæt telse for stråling d VARNING Osynlig laser strålning när denna del är öppnad och spärren är urkopplad Betrakta ej strålen s VARO Avattaessa ja suo j...

Page 5: ...es a timer for recording broadcasts while you are out and an easy to use Sleep timer How This Manual Is Organized In this manual we have incorporated some special features Basic information that is the same for many different functions is grouped in one place and not repeated in each procedure For instance in the section on playing a CD we do not repeat the information about setting the volume and...

Page 6: ...15 Using the CD Player 16 The Quickest Way To Start a CD Is With the One Touch Operation 17 To Insert Discs 17 Basics of Using the CD Player Normal Play 18 To Play a Disc 18 To Select a Disc Track Or Passage Within a Track 18 Locating a Track With the Remote Control Directly 18 To Change Discs While Playing 18 Continuous Play 19 Programming the Playing Order of the Tracks 19 Random Play 20 Repeati...

Page 7: ...ame time with new ones Don t use an old battery with a new one Don t use different types of batteries together Using the Remote Control The Remote Control makes it easy to use many of the functions of the System from a distance of up to 7m 23 feet away You need to point the Remote Control at the remote sensor on the System s front panel R6P SUM 3 AA 15F PLAY EXCHANGE SYSTEM DISC DISC DISC DISC 3 T...

Page 8: ...parts of the System connecting cord and the AC power cord Connecting the AM MW LW Antenna ANTENNA FM 75 COAXIAL AM LOOP GND AM EXT ANTENNA FM 75 COAXIAL AM LOOP GND AM EXT ANTENNA FM 75 COAXIAL AM LOOP GND AM EXT A B Before attaching a 75 ohm coaxial lead the kind with a round wire going to an outside antenna disconnect the supplied FM Wire Antenna Outside FM Antenna Wire FM Wire Antenna Snap the ...

Page 9: ... IMPORTANT Use speakers with the correct impedance only The correct impedance is indicated on the back panel CAUTION If a TV is installed near speakers the TV may display irregu lar colours In this case set the speakers away from the TV For CA D451TR or CA D351TR For each speaker connect one end of the speaker wire to the speaker terminals on the back of the System 1 Open each of the terminals and...

Page 10: ...lay button for that function What One Touch Operation does for you is to turn the power on then start the function you have specified If the Unit is not ready such as no CD or tape in place the Unit still powers on so you can insert a CD or tape How One Touch Operation works in each case is explained in the section dealing with that function The COMPU PLAY buttons are On the Unit CD 8 button CD Pl...

Page 11: ...e STANDBY indicator goes out The System comes on ready to continue in the mode it was in when the power was last turned off o If the last thing you were doing was listening to a tape in Deck B you are now ready to listen to a tape again in Deck B or you can change to another source o If you were listening to the Tuner last the Tuner comes on playing the station it was last set to Turning the Syste...

Page 12: ...d Modes The System has some preset sound effects that give you control of the way your music sounds so you can tailor it for your room and for the quality of the source We can give you some idea of how each one affects the music but the only way to really tell is to try them yourself o The preset sound modes include modes using surround effects and modes using S E A effects o Sound Mode effects ca...

Page 13: ...ke sure that the optional equipment is properly connected to the System See page 6 1 Set the VOLUME control to 0 2 Press the AUX button When System is in Standby mode the Unit is automatically turned on and AUX appears on the display 3 Start playing the equipment 4 Adjust the VOLUME control to the desired listening level 5 Select a sound effect mode if you wish To Cancel the Setting Change the sou...

Page 14: ...AR 8 DISC DISC VOLUME SHIFT SOUND MODE SLEEP RM SED40TRU REMOTE CONTROL AUX C D DECK CLOCK TIMER PTY EON DISPLAY MODE SET SELECT CD TAPE AUX FM AM Display kHz MHz CONT ALL PRGM REC A BASS EX S MODE SLEEP MONOST CLOCK RANDOM TA NEWS INFO EON Band display Frequency display Preset channel FM AM FM MODE PLAY EXCHANGE SYSTEM DISC DISC DISC DISC 3 TRIPLE TRAY COMPACT DIGITAL AUDIO REPEAT RANDOM DISPLAY ...

Page 15: ... stations you want into memory by following the presetting method 1 Select a band by pressing either the FM AM button 2 Press the TUNING DOWN or TUNING UP button to tune into a station 3 Setting the preset number by pressing the number keys on the Remote Control continuously For preset numbers 1 to 10 Press the number key for the preset number you want to set For preset numbers 11 to 20 Press the ...

Page 16: ...Information RDS can Provide The System can use the following RDS service PS Program Service name Identifies each station by a name TA Traffic Announcement Identification Identifies that a traffic announcement is being broadcast in your area RT Radio Text Allows the RDS station to send text messages that appear on the display of the unit PTY Programme Type Identifies the type of RDS programme This ...

Page 17: ... SELECT are being displayed 2 Press the SELECT or SELECT button to select a PTY When using the Remote Control press the 5 SELECT or 4 SELECT button The display changes with each pressing the button as shown below SELECT Ô TRAFFIC Ô NEWS Ô AFFAIRS Ô INFO Ô SPORT Ô EDUCATE Ô DRAMA Ô CULTURE Ô SCIENCE Ô VARIED Ô POP M Ô ROCK M Ô M O R M Ô LIGHT M Ô CLASSICS Ô OTHER M Ô SELECT 3 Press the PTY EON butt...

Page 18: ...ssing of the button indications will change as follows SELECT Ô TAÔ NEWS Ô INFO Ô OFF Ô SELECT 3 Press the PTY EON button When using the Remote Control press the 8 SET button As soon as your selection is entered the Unit will go into EON Standby reception mode If you want to cancel the EON function select OFF by folowing the steps above When this Unit carries out EON Standby reception the indicati...

Page 19: ... the channels the broadcasting station cannot be found NOTFOUND is displayed alternately on the display The Unit will return to the station to which it was previously tuned When broadcasting of the desired information has been completed the Unit will automatically go back to the station which had previously been tuned to While receiving information on EON Standby reception the station will not cha...

Page 20: ... indicator When the System is being used the display shows other items as well However we have only shown the items described in this section Disc display A red marker lights on the disc display for the disc number you have selected This disc display blinks while a CD is being played The centre of the disc display is not lit while CD Player is checking that there is no disc in the disc tray for th...

Page 21: ...e CD Player is in stop mode Press a DISC button 1 to 3 If there is a CD in the disc tray for the selected disc number the power is automatically turned on and playback starts from the selected CD If there are no CDs in CD Player the power is automatically turned on and NO DISC appears on the display in Normal Play mode The CD Player is set to stop mode o Press the 0 button The power turns on and t...

Page 22: ... time you briefly press and release the 4 P DOWN or P UP button the track changes by one Press and release the P UP button to go ahead one track at a time Press and release the 4 P DOWN button to go back one track at a time Holding down the 4 P DOWN or P UP button during playback will fast forward backwards the CD so you can quickly find a particular passage in the selection you are listening to W...

Page 23: ...ISC 2 DISC 3 back to the beginning To cancel Continuous play press the CONTINUE button again The CONT indicator on the display goes out and Normal Play is resumed When using the Remote Control press the PLAY MODE button while the CD Player is stopped to select a different Play mode The CONT indicator goes out and the next Play mode is selected Programming the Playing Order of the Tracks You can ch...

Page 24: ... button on the unit while a program is playing the play mode changes to that mode Random Play The tracks will play in no special order when you use this mode On the Unit Press the RANDOM button The playback automatically starts from the selected CD RANDOM on the Play mode indicator lights up You can press the RANDOM button while a CD is playing to switch to Random play mode On the Remote Control 1...

Page 25: ...ctronic lock is on the trays cannot be opened even if the 0 button is pressed This function can only be accessed by using the buttons on the Unit itself Locking the Electronic Lock 1 Put the System s power into STANDBY mode 2 While pressing the 7 button press the 0 button for DISC 1 s tray on the Unit LOCK ON appears on the display to let you know that the trays have been locked When the CD Player...

Page 26: ...thout changing any settings The use of tapes longer than 120 minutes is not recommended since characteristic deterioration may occur and these tapes easily jam in the pinch rollers and the capstans One Touch Play By pressing the TAPE button or the 2 or 3 button on the Remote Control the Unit will come on TAPE appears in the display and if a tape is in the deck it will start to play If no tape is l...

Page 27: ...posite direction to that in which the tape is playing Searching stops at the beginning of the current selection and the current selection starts automatically To Find the Beginning of the Next Selection Press the 4 P DOWN or P UP button or the 1 or button on the Remote Control during play o Make sure that you press the 4 P DOWN or P UP button or the 1 or button on the Remote Control in the same di...

Page 28: ...play back copyrighted material without the consent of the copyright owner o When you want to record onto both sides of a tape you can set Reverse mode on to do so However recording automatically stops after recording in the 2 direction in Reverse mode Therefore make sure that the tape direction is 3 when recording with Reverse mode on o The recording level which is the volume at which the new tape...

Page 29: ...n 3 Check the recording direction for the tape Check that the Tape Direction indicator is the same as that for the tape in the tape deck If the directions are different press the 7 button after pressing the TAPE button to set the tape direction When using Reverse Mode to record both sides of a tape check that the Tape Direction indicator is in the forwards 3 direction If the direction indicator is...

Page 30: ...d of the first side at the beginning of the next side To stop at any time during the recording process press the 7 button Note When making SLEEP timer settings while doing CD Direct recording set the time so that there is enough leeway to finish the recording before the power goes off If the time is set to about the length of the CD the power may go off before recording finishes For CD Direct Reco...

Page 31: ...advances or decreases the time in 10 minute intervals 4 Press the 8 SET button The blinking time display changes from a blinking display to a steady display and the clock timer starts from 0 seconds CAUTION If there is a power failure the clock loses its setting The display shows 0 00 and the clock must be reset When the System is being used the display shows other items as well However we have on...

Page 32: ...button The name of the source blinks in the display 7 Press the SELECT 5 or 4 button to select the source The display changes with each press of the button as shown Ô TUNER Ô TUNER REC Ô CD Ô TAPE Ô TUNER Selects the last station you were listening to TUNER REC Records the last station you were listening to CD Plays the last CD you were listening to TAPE Plays the last tape you were listening to I...

Page 33: ...p Timer when the Unit is on and a source is playing To set the SLEEP Timer follow this procedure 1 With the System on and a source playing press the SLEEP button on the Remote Control 2 Set the length of time you want the source to play before shutting off Each time you press this button it changes the number of minutes shown on the display in this sequence 10 20 30 60 90 120 Cancelled back to the...

Page 34: ... turned on for a few hours until the moisture evapo rates unplug the AC power cord and then plug it in again General Notes In general you will have the best performance by keeping your tapes CDs and the mechanism clean Store tapes and CDs in their cases and keep them in cabinets or on shelves Keep the Cassette Deck s tape doors and the CD trays closed when not in use Cassette Tapes If the tape is ...

Page 35: ... not properly extended and positioned The CD is dirty or scratched The path between the Remote Control and the sensor on the Unit is blocked The batteries have lost their charge The main AC power cord is not plugged in The CD is upside down The built in microprocessor has malfunc tioned due to external electrical interference During tape playing the power cord was unplugged Action Check all connec...

Page 36: ...MS CD Automatic Changer CD Capacity 3 discs Dynamic Range 85 dB Signal To Noise Ratio 90 dB Wow And Flutter Unmeasurable Tuner FM Tuner Tuning Range 87 5 108 0 MHz AM Tuner Tuning Range MW 522 1 629 kHz LW 144 288 kHz CA D551TR CA D451TR Dimensions 265 x 295 x 339 mm W H D 10 7 16 x 11 5 8 x 13 3 8 inches Mass 7 1 kg 15 7 lbs CA D351TR Dimensions 265 x 295 x 339 mm W H D 105 7 16 x 11 5 8 x 13 3 8...

Page 37: ...VICTOR COMPANY OF JAPAN LIMITED EN GE FR NL SP IT J VC 0397TNYNATJEM ...

Reviews: