


28
V.IN/A.MONI A.OUT
COUNTER
DV
CTL
TC
UB
CH-1/2
CH-3/4
Y/C
(CPN)
LINE
L
R
MIX
MIX
PHONES
MIC
REMOTE
LOCAL
EJECT
OPERATE
REC LEVEL
CH-2/4
CH-1/3
SHIFT
SET
SELECT
SHIFT
MENU
HOLD
SHIFT
A. DUB
ADVANCE PRESET
REW
STOP
FF
REC
PLAY
PAUSE
ON/OFF
MENU
OVER
OVER
H
M
S
F
AUD LOCK
SP
32k
48k
SLAVE
PB
NDF
SERVO RF
DEW
AUTO OFF
HOLD
CH 2/4
CH 1/3
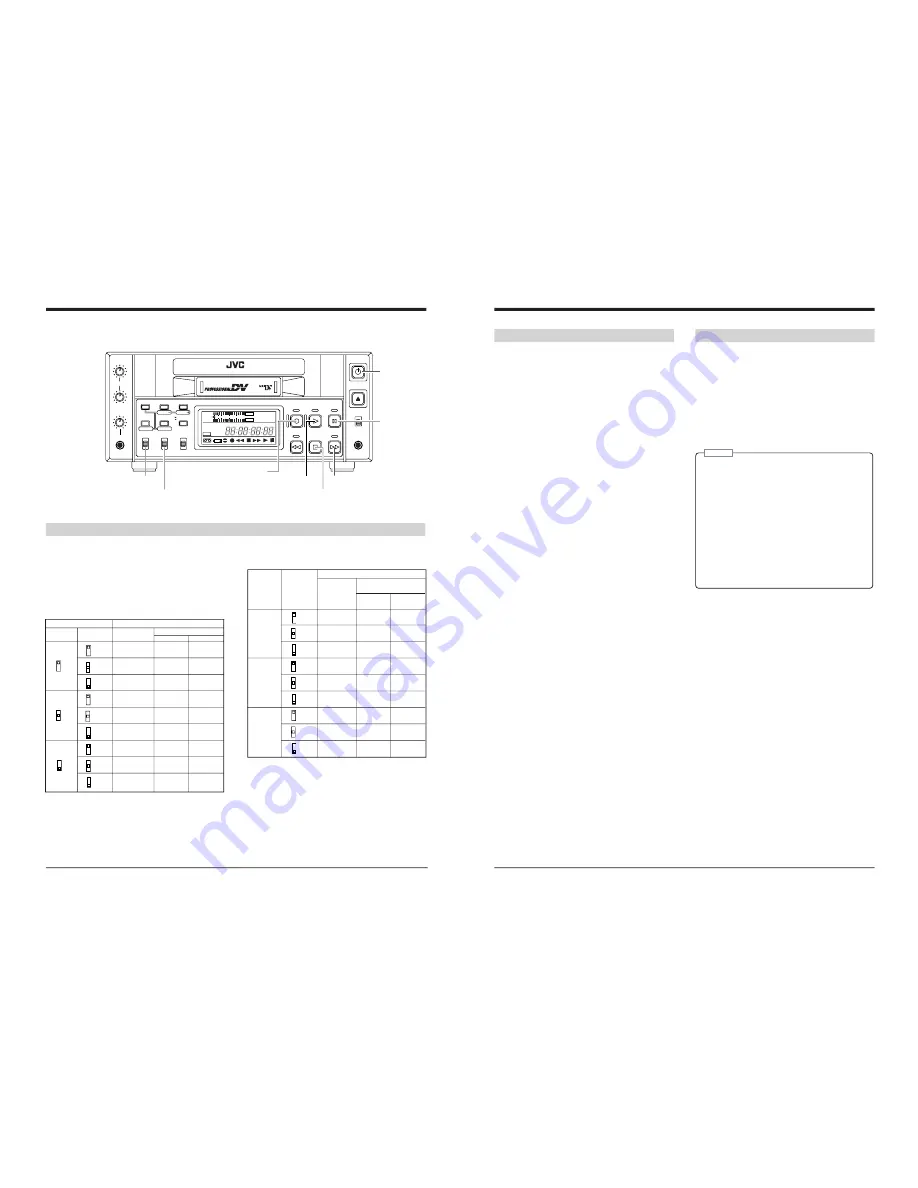
VIDEO CASSETTE RECORDER BR-DV600UA
dB
40 30
20
10
0
7 PLAYBACK
[AUDIO OUTPUT] switch
[PLAY] button
[FF] button
[PAUSE]
button
[REC] button
[STOP] button
[OPERATE]
button
[AUDIO MONITOR] switch
Playback preparation
1
Press the [OPERATE] button to turn the power ON.
2
Insert the cassette into the cassette loading slot.
3
Select the audio output channel.
Select output signals with the switch on the front panel or
menu switch.
5
Selection with the switch on the front panel
• Menu switch setting
No. 054 <SLIDE SW FUNCTION> ......... AUDIO
CH1
CH1
CH2
CH1/3
CH1/3
CH2/4
CH3
CH3
CH4
CH1/2
CH1
CH2
CH1/2/3/4
CH1/3
CH2/4
CH3/4
CH3
CH4
CH2
CH1
CH2
CH2/4
CH1/3
CH2/4
CH4
CH3
CH4
R
L
MIX
CH1/2
MIX
CH3/4
CH1/2
MIX
CH3/4
CH1/2
MIX
CH3/4
AUDIO switch
Connector
MONITOR
OUTPUT
MONITOR OUT
AUDIO OUT
CH1/3
CH2/4
* To switch video input signals, use the No. 108 <VIDEO INPUT SELECT>
menu switch.
5
Selection with the menu switch
• Menu switch setting
No. 054 <SLIDE SW FUNCTION> ......... VIDEO
CH1
CH1
CH2
CH1/3
CH1/3
CH2/4
CH3
CH3
CH4
CH2
CH1
CH2
CH2/4
CH1/3
CH2/4
CH4
CH3
CH4
CH1/2
CH1
CH2
CH1/2/3/4
CH1/3
CH2/4
CH3/4
CH3
CH4
R
L
MIX
CH1/2
MIX
CH3/4
CH1/2
MIX
CH3/4
CH1/2
MIX
CH3/4
Connector
MONITOR
AUDIO OUT
OUT
CH1/3
CH2/4
Menu switch
No. 211
<AUDIO
MONITOR>
AUDIO
OUTPUT
switch
29
Repeat play
1
Set the No. 311 <AUTO PLAY> and No. 312 <AUTO
REW> menu switches to “ON”.
See No. <311 AUTO PLAY> and No. 312 <AUTO
REW> on pages 21 to 22.
2
Press the [PLAY] button to start playback.
At tape end, the tape is rewound automatically and
playback starts again. This operation repeats each time
the tape ends.
3
To stop Repeat Play, press the [STOP] button.
Playback
1
Press the [PLAY] button.
Video and audio signals are output from each output
connector. Other data recorded on the tape is read out
(time code, user bits, etc.)
2
To stop playback, press the [STOP] button.
3
To temporarily stop playback, press the [PAUSE]
button.
• For fast-forward playback, press the [FF] button
during playback.
• For fast reverse playback, press the [REW] button
during playback.
• You can select whether or not to play sound during
fast-forward playback or fast reverse playback with the
No. 212 <AUDIO OUT AT SEARCH> ON/OFF setting.
Notes:
• If audio dubbing is performed repeatedly on a short
section of the tape, there may be some noise when
this section is played back.
• When a tape recorded on a consumer MiniDV VCR is
played back on this unit, the sound level may be low.
• When the Pause mode continues for more than
5 minutes, the Stop mode is automatically engaged
to protect the tape. If tape remaining time is less
than 3 minutes or the unit is being used in a low-
temperature environment, the Stop mode is
engaged within about 3 minutes. The Stop mode is
also engaged automatically if slow playback
continues for more than 1 minute with the remote
controller or reverse slow playback continues for
more than 20 seconds.


