background image

1-22 (No.YA139)

4.7.6 DEFLECTION CIRCUIT ADJUSTMENTS

• The setting (adjustment) using the remote control unit is made on the basis of the initial setting values.
• The setting values which adjust the screen to the optimum condition can be different from the initial setting values.
• When performing deflection circuit adjustment, adjusts PAL signal (fv: 50 Hz) in 4:3 mode and 16:9 mode respectively, and adjust

the NTSC signal (fv: 60 Hz) similarly.

Note:

Proceed to the following adjustment after having completed the adjustments of SUB BRIGHT and SUB PICTURE.

„

 4. DEF

NOTE:

 The value with an asterisk * is variable for adjustment.  The values in parenthesis (      ) are fixed values.

„

 COMPRESS: OFF (4:3)

Adjustment item

Variable range

Initial setting value

4:3

50Hz

Others

4:3

COMPRESS (16:9)

50Hz

60Hz

50Hz

60Hz

1. V-SHIFT

0 ~ 63

-32 ~ +31

0*

0*

0*

0*

2. V-SLOPE

0 ~ 63

-32 ~ +31

0*

0*

0*

0*

3. V-SIZE

0 ~ 63

-32 ~ +31

+15*

0*

-4*

-2*

4. H-CENT

0 ~ 63

-32 ~ +31

+35*

0*

0*

0*

5. H-SIZE

0 ~ 63

-32 ~ +31

+45*

0*

0*

0*

6. TRAPEZ

0 ~ 63

-32 ~ +31

0*

0*

0*

0*

7. EW-PIN

0 ~ 63

-32 ~ +31

-12*

0*

0*

0*

8. COR-UP

0 ~ 63

-32 ~ +31

0*

0*

0*

0*

9. COR-LO

0 ~ 63

-32 ~ +31

0*

0*

0*

0*

10. ANGLE

0 ~ 63

-32 ~ +31

0*

0*

0*

0*

11. BOW

0 ~ 63

-32 ~ +31

0*

0*

0*

0*

12. V-S.CR

0 ~ 63

-32 ~ +31

0*

0*

0*

0*

13. V-LIN

0 ~ 63

-32 ~ +31

0*

0*

0*

0*

14. V-ZOOM

0 ~ 63

-32 ~ +31

(+25)

0

-23*

+3*

15. V-SCROLL

0 ~ 63

-32 ~ +31

(+32)

(0)

(0)

(0)

Item

Measuring 

instrument

Test point

Adjustment part

Description

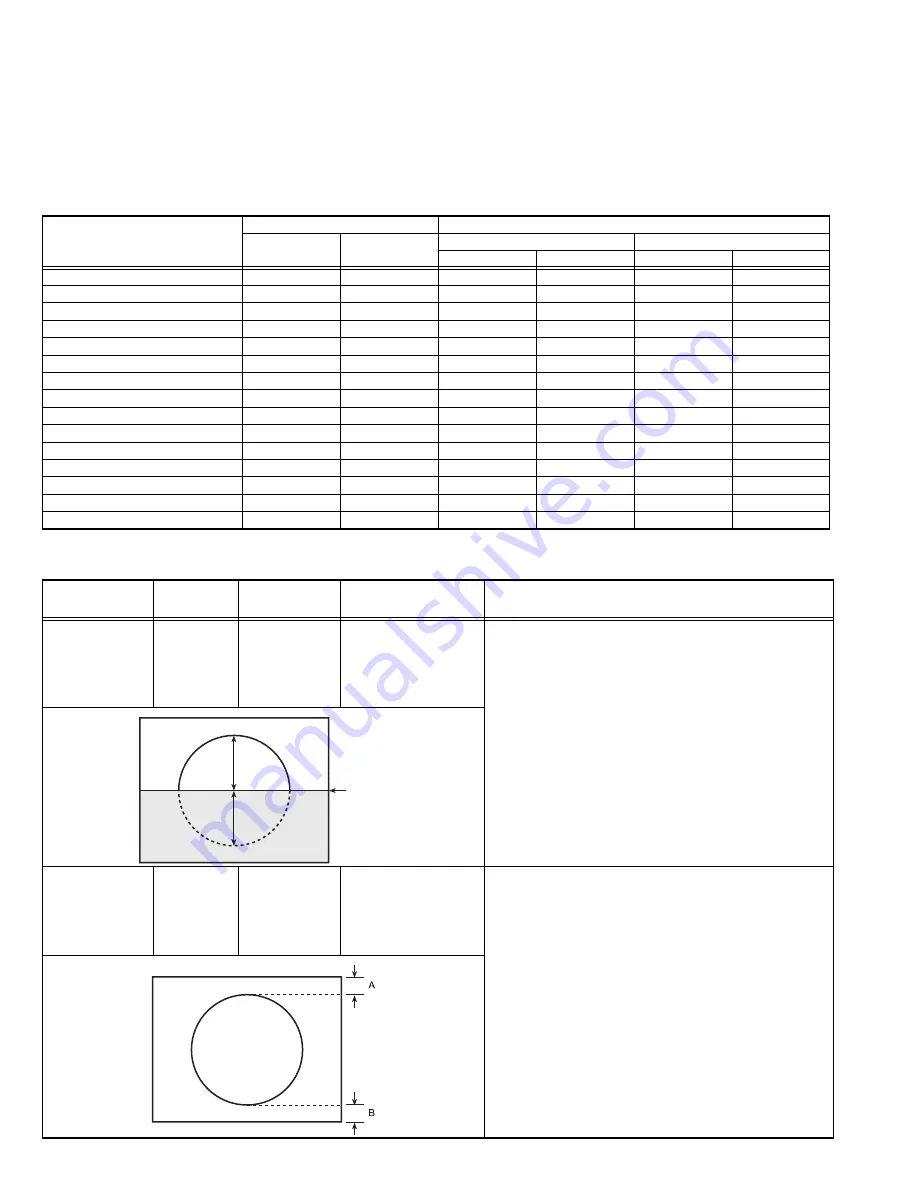
V. SLOPE
adjustment

Signal 
generator

Remote 
control unit

[4. DEF]
2. V-SLOPE

- PAL V. SLOPE -

(1) Receive a PAL circle pattern signal of vertical

frequency 50Hz.

(2) Select 

4. DEF

 from the SERVICE MENU.

(3) Select 

2. V-SLOPE

.

(4) Set the initial setting value of 

2. V-SLOPE

.

(5) Adjust 

2. V-SLOPE

 to make "

A = B

".

(6) Press the [DISPLAY] key twice to return to

SERVICE MENU screen.

- NTSC V. SLOPE -

(1) Receive a NTSC circle pattern signal of vertical

frequency 60Hz.

(2) Make similar adjustment of NTSC V-SLOPE in the

same way as for "PAL V-SLOPE".

V. POSITION
adjustment

Signal 
generator

Remote 
control unit

[4. DEF]
1. V-SHIFT

- PAL V. POSITION -

(1) Receive a PAL circle pattern signal of vertical

frequency 50Hz.

(2) Select 

1. V-SHIFT

.

(3) Set the initial setting value of 

1. V-SHIFT

.

(4) Adjust 

1. V-SHIFT

 to make "

A = B

".

- NTSC V. POSITION -

(1) Receive a NTSC circle pattern signal of vertical

frequency 60Hz.

(2) Make similar adjustment of NTSC V. POSITION in

the same way as for "PAL V. POSITION".

B

A

Blanking 

line

Summary of Contents for AV-29V314

Page 1: ...r Company of Japan Limited No YA139 2004 9 FLAT COLOUR TELEVISION YA139 2004 9 AV 29V514 B TABLE OF CONTENTS 1 PRECAUTION 1 3 2 SPECIFIC SERVICE INSTRUCTIONS 1 4 3 DISASSEMBLY 1 7 4 ADJUSTMENT 1 13 5 TROUBLESHOOTING 1 31 BASIC CHASSIS CW ...

Page 2: ... 25MHz SECAM 3 58MHz 4 43MHz NTSC Aerial Input Terminal 75Ω unbalanced coaxial Power Input AC110V AC240V 50Hz 60Hz Power Consumption 166W Max 109W Avg Picture Tube A68LZU185X 29 inch aspect ratio 4 3 flat square face type tinted Screen Size Visible size 67 6cm Diagonal 55 4cm 41 4cm H V High Voltage 32kV 1 5kV 1 0kV at zero beam current Speaker 6 5cm 13cm Oval type 2 Audio Output 10W 10W Video Aud...

Page 3: ...ments or alternatives approved by the manufacturer of the complete product 7 Do not check high voltage by drawing an arc Use a high voltage meter or a high voltage probe with a VTVM Discharge the picture tube before attempting meter connection by connecting a clip lead to the ground frame and connecting the other end of the lead through a 10kΩ 2W resistor to the anode button 8 When service is requ...

Page 4: ...oom the brightness and or contrast of the picture can be adjusted automatically to make the optimum picture which is easy on the eye Built in OFF TIMER RETURN 2 2 FUNCTIONS REMOTE CONTROL UNIT RM C1281 2H 1 2 3 4 5 6 7 8 9 10 11 12 13 14 15 16 SOUND SYSTEM key COLOUR SYSTEM key FAVORITE CHANNEL keys DISPLAY BACK key MENU OK key Not used SOUND TURBO key PICTURE MODE key SOUND setting key OFF TIMER ...

Page 5: ...utton CHANNEL buttons VOLUME buttons TV VIDEO EXIT buttons Remote control sensor ECO sensor POWER lamp MAIN POWER button 2 3 4 5 6 7 8 9 10 11 12 13 VIDEO 1 INPUT TERMINAL S VIDEO VIDEO AUDIO L MONO AUDIO R COMPONENT VIDEO 2 INPUT TERMINAL Y VIDEO CB CR AUDIO L MONO AUDIO R OUTPUT TERMINAL VIDEO AUDIO L AUDIO R Aerial input terminal 1 V L R R L MONO Y CB CR V V S OVER L R MONO OUTPUT VIDEO 1 COMPO...

Page 6: ... Audio R2 input right signal 58 Y3 Cvbs I S Video Y1 input 59 C1 I S Video C1 input 60 AudioLsL O Audio L output for audio power amplifier 61 AudioLsR O Audio R output for audio power amplifier 62 HP_L O Headphone L 63 HP_R O Headphone R 64 CVBSO PIP O CVBS PIP output 65 SVM O Scan velocity modulation output 66 FbiSo I Flyback input sandcastle output 67 Hout O Horizontal output 68 VssComb GND 69 V...

Page 7: ...ig 2 and pull out the CONTROL BASE in the direction of arrow F as shown in Fig 2 the control base can be removed If necessary take off the wire connectors etc 3 1 5 REMOVING THE SPEAKER Remove the REAR COVER 1 Remove the 2 screws G as shown in Fig 1 2 Withdraw the SPEAKER backward 3 Follow the same steps when removing the other hand SPEAKER 3 1 6 CHECKING THE MAIN PW BOARD To check the back side o...

Page 8: ...PWB 1 2 FRONT CONTROL PWB 2 2 MAIN PWB FBT CHASSIS BASE CONTROL BASE 4 16 A PICTURE TUBE D C AV TERMINAL BOARD FRONT CABINET CHASSIS BASE CONTROL BASE FRONT SIDE E F X2 G SPEAKER X2 G SPEAKER Fig 2 Fig 2 CLAW B CLAW B under side under side REAR COVER ...

Page 9: ...eck whether the setting values of the SYSTEM CONSTANT SET are the same as those indicated in Table 1 If the value is different select the setting item with the MENU key and set the correct value with the MENU key 4 Press the DISPLAY key twice to return to the normal screen 5 Receive channel setting Refer to the OPERATING INSTRUCTIONS and set the receive channels channels preset 6 User setting Chec...

Page 10: ... LANGUAGE E T SOUND STEREO BILINGUAL NO BLUE BACK MUTE NO COLOUR AUTO NO ECO SENSOR YES SURROUND YES PICTURE BOOSTER NO COMPONENT YES PIP NO S INPUT YES Setting item Setting content Setting value YES NO YES NO YES NO E T YES NO YES NO YES NO YES NO STEREO PB MONO YES NO YES NO YES NO YES NO YES NO SINGLE NO PAT MULTI TRIPLE PAL THAI ...

Page 11: ...OUND TURBO OFF AI VOLUME ON FAVORITE CH RED PR01 FAVORITE CH GREEN PR02 FAVORITE CH YELLOW PR03 FAVORITE CH BLUE PR04 AI ECO SENSOR OFF AI ECO DISPLAY ON Setting item Setting value 1 IF 1 VCO 2 DELAY POINT 2 V C 1 SCREEN 2 CUTOFF B G 3 WDR R G B 4 BRIGHT TV VDO 1 2 3 5 CONT TV VDO 1 2 3 TV 16 9 VDO 16 9 6 COLOUR TV VDO1 2 3 DVD 7 TINT TV VDO 1 2 3 8 SHARP Do not adjust 9 Y DELAY Do not adjust 10 T...

Page 12: ...he tweezers and remove the chip part Transistors diodes variable resistors etc 1 Apply extra solder to each lead 2 As shown in the figure push the part with tweezers and alternately melt the solder at each lead Shift and remove the chip part NOTE After removing the part remove remaining solder from the pattern 2 How to install Chip parts Resistors capacitors etc 1 Apply solder to the pattern as in...

Page 13: ...th the remote control unit User mode setting position 4 3 MEASURING INSTRUMENT AND FIXTURES 1 DC voltmeter or Digital voltmeter 2 Oscilloscope 3 Signal generator Pattern generator PAL SECAM NTSC 4 Remote control unit 4 4 ADJUSTMENT ITEMS B1 VOLTAGE FOCUS ADJUSTMENT IF CIRCUIT ADJUSTMENTS IF VCO adjustment DELAY POINT AGC TAKE OVER adjustment VIDEO CIRCUIT ADJUSTMENTS WHITE BALANCE Low light adjust...

Page 14: ...CORD SPEAKER L DEG COIL HVT MAIN PWB ASS Y FRONT CONTROL PWB ASS Y 1 2 FRONT CONTROL PWB ASS Y 2 2 J804 J803 J802 S804 S805 S806 S802 S803 S801 J801 CN00S CN002 R CN001 CNDEG PW W S901 1 8 1 6 LOWER SCREEN 6 1 1 6 1 5 U TU001 J804 J801 J805 J802 J803 IC701 CN001 CN00W CN002 T TP E SPEAKER R ROTATION COIL DEF YOKE CN00X 1 B1 2 NC 3 X RAY2 4 X RAY1 5 GND CN00C 1 5V 2 SCL0 3 SDA0 4 SCL1 5 SDA1 6 GND ...

Page 15: ... entering adjusting the setting values adjustment values of the IF circuit 2 V C For entering adjusting the setting values adjustment values of the VIDEO circuit 3 AUDIO For entering adjusting the setting values adjustment values of the AUDIO circuit 4 DEF For entering adjusting the setting values adjustment values of the DEFLECTION circuit 5 VSM W B For setting the values of STANDARD SOFT BRIGHT ...

Page 16: ... DVO 10 TINT DVD 11 AMP T SHARP 3 AUDIO PAL 1 SCREEN HBC WBC BRI V C 000A 0002 0009 5 VSM W B 1 BRIGHT VSM PRESET BRIGHT 4 DEF 1 V SHIFT DEF FULL 50Hz 1 BRIGHT 2 CONT 3 COLOUR 4 SHARP 5 HUE 1 R DRIVE 2 G DRIVE 3 B DRIVE Setting item 4 3 16 9 1 V SHIFT 2 V SLOPE 3 V SIZE 4 H CENT 5 H SIZE 6 TRAPEZ 7 EW PIN 8 COR UP 9 COR LO 10 ANGLE 11 BOW 12 V S CR 13 V LIN 14 V ZOOM 15 V SCROLL Setting item 1 IF ...

Page 17: ...t the picture is in focus even when the screen gets darkened Item Measuring instrument Test point Adjustment part Description IF VCO check Remote control unit 1 IF 1 VCO CW Note Under normal conditions no adjustment is required 1 Receive a broadcast signal 2 Select 1 IF from the SERVICE MENU 3 Select 1 VCO 4 Check the characters colour of the JUST REFERENCE displayed to yellow 5 Press the DISPLAY ...

Page 18: ...0 15 9 7 12 7 VIDEO 0 15 7 7 7 7 S VIDEO 0 15 9 10 11 11 10 TINT DVD VIDEO S VIDEO 0 63 34 32 32 32 COMPONENT 32 31 2 2 11 AMP T SHARP RF VIDEO 0 63 0 0 0 0 0 0 Item Measuring instrument Test point Adjustment part Description WHITE BALANCE Low light adjustment Signal generator Remote control unit 2 V C 2 CUTOFF B 2 CUTOFF G SCREEN VR In HVT Note Set PICTURE MODE VSM to BRIGHT COMPOSITE WHITE BALAN...

Page 19: ...Select 2 V C from the SERVICE MENU 3 Select 4 BRIGHT 4 Set the initial setting value 5 If the brightness is not best with the initial setting value make fine adjustment until you get the best brightness 6 Press the DISPLAY key twice to return to the normal screen SUB CONTRAST adjustment Remote control unit 2 V C 5 CONT Notes Proceed to the following adjustment after having completed the SUB BRIGHT...

Page 20: ...illoscope Remote control unit TP 47G TP E CRT SOCKET PWB 2 V C 6 COLOUR Method of adjustment using measuring instrument Notes Proceed to the following adjustment after having completed the SUB CONTRAST adjustment Set PICTURE MODE VSM to BRIGHT PAL COLOUR 1 Receive a PAL colour bar signal full field colour bar 75 white 2 Select 2 V C from the SERVICE MENU 3 Select 6 COLOUR 4 Set the initial setting...

Page 21: ...erator Oscilloscope Remote control unit TP 47G TP E CRT SOCKET PWB 2 V C 7 TINT Method of adjustment using measuring instrument Notes Proceed to the following adjustment after having completed the SUB CONTRAST adjustment Set PICTURE MODE VSM to BRIGHT NTSC 3 58 TINT 1 Receive a NTSC 3 58 colour bar signal full field colour bar 75 white 2 Press the COLOUR SYSTEM key to select the NTSC 3 58 colour s...

Page 22: ... 0 9 COR LO 0 63 32 31 0 0 0 0 10 ANGLE 0 63 32 31 0 0 0 0 11 BOW 0 63 32 31 0 0 0 0 12 V S CR 0 63 32 31 0 0 0 0 13 V LIN 0 63 32 31 0 0 0 0 14 V ZOOM 0 63 32 31 25 0 23 3 15 V SCROLL 0 63 32 31 32 0 0 0 Item Measuring instrument Test point Adjustment part Description V SLOPE adjustment Signal generator Remote control unit 4 DEF 2 V SLOPE PAL V SLOPE 1 Receive a PAL circle pattern signal of verti...

Page 23: ...e a PAL circle pattern signal 2 Select 4 H CENT 3 Set the initial setting value of 4 H CENT 4 Adjust 4 H CENT to make C D NTSC H POSITION 1 Receive a NTSC circle pattern signal 2 Make similar adjustment of NTSC H POSITION in the same way as for PAL H POSITION H WIDTH adjustment Signal generator Remote control unit 4 DEF 5 H SIZE PAL H WIDTH 1 Receive a PAL crosshatch signal 2 Select 5 H SIZE 3 Set...

Page 24: ...st 6 TRAPEZ so that the vertical lines at the left and right edges on the screen are in parallel NTSC TRAPEZIUM 1 Receive a NTSC crosshatch signal 2 Make similar adjustment of NTSC TRAPEZIUM in the same way as for PAL TRAPEZIUM V LINEARITY adjustment Signal generator Remote control unit 4 DEF 12 V S CR 13 V LIN PAL V LINEARITY 1 Receive a PAL crosshatch signal 2 Select 12 V S CR 3 Set the initial ...

Page 25: ... a PAL crosshatch signal 2 Select 10 ANGLE 3 Set the initial setting value of 10 ANGLE 4 Adjust 10 ANGLE to optimize the trapezium distortion at the centre of the screen NTSC H PARALLEL 1 Receive a NTSC crosshatch signal 2 Make similar adjustment of NTSC H PARALLEL in the same way as for PAL H PARALLEL H BOW adjustment Signal generator Remote control unit 4 DEF 11 BOW PAL H BOW 1 Receive a PAL cro...

Page 26: ...al amplitude of the image to 305mm NTSC V HEIGHT 1 Receive a NTSC crosshatch signal of vertical frequency 60Hz 2 Make similar adjustment of NTSC V HEIGHT in the same way as for PAL V HEIGHT V SLOPE adjustment Signal generator Remote control unit 4 DEF 2 V SLOPE PAL V SLOPE 1 Receive a PAL circle pattern signal of vertical frequency 50Hz 2 Select 4 DEF from the SERVICE MENU 3 Select 2 V SLOPE 4 Set...

Page 27: ... vertical lines at the left and right edges on the screen are in parallel NTSC TRAPEZIUM PIN 1 Receive a NTSC crosshatch signal 2 Make similar adjustment of NTSC TRAPEZIUM in the same way as for PAL TRAPEZIUM CORNER PIN adjustment Signal generator Remote control unit 4 DEF 8 COR UP 9 COR LO PAL CORNER PIN 1 Receive a PAL crosshatch signal 2 Select 8 COR UP 3 Set the initial setting value of 8 COR ...

Page 28: ... control unit 5 VSM W B 1 BRIGHT 2 CONT 3 COLOUR 4 SHARP 5 HUE 1 R DRIVE 2 G DRIVE 3 B DRIVE 1 Select 5 VSM W B from the SERVICE MENU 2 Select BRIGHT with the MENU OK key 3 Set the value of 1 BRIGHT 5 HUE to the values shown in the table 4 Respectively select the VSM PRESET mode for SOFT and STANDARD 5 Select COOL with the MENU OK key 6 Set the values of 1 R DRIVE 3 B DRIVE to the value shown in t...

Page 29: ...ition them horizontally Fig 2 7 Adjust the gap between two lugs so that the GREEN RASTER will come into the centre of the screen Fig 3 8 Move the deflection yoke forward and fix the position of the deflection yoke so that the whole screen will become green 9 Insert the wedge to the top side of the deflection yoke so that it will not move 10 Input a crosshatch signal 11 Verify that the screen is ho...

Page 30: ...VERGENCE ADJUSTMENT 1 Move the deflection yoke up and down and overlap the lines in the periphery Fig 2 2 Move the deflection yoke left to right and overlap the lines in the periphery Fig 3 3 Repeat 1 and 2 above and make best convergence 4 Adjust XV by XV coil Fig 4 After adjustment fix the wedge at the original position Fasten the retainer screw of the deflection yoke Fix the P C magnets with gl...

Page 31: ...Method of detection State of abnormality B1 over current protection An over current on the low B1 line is detected The main microcomputer detects the possible abnormality at 24 msec intervals and judges the results in every 16 time Of the 16 times if NG is detected more than 9 times it is judged that there is an abnormality When an abnormality has been detected the SUB POWER is turned off While th...

Page 32: ...1 32 No YA139 ...

Page 33: ... No YA139 AV MULTIMEDIA COMPANY VIDEO DISPLAY CATEGORY 12 3 chome Moriya cho kanagawa ku Yokohama kanagawa prefecture 221 8528 Japan Victor Company of Japan Limited WPC Printed in Japan ...

Reviews: