JVC AV-28KT1BUF Instructions Manual Download Page 9

ENGLISH

   - 8 -

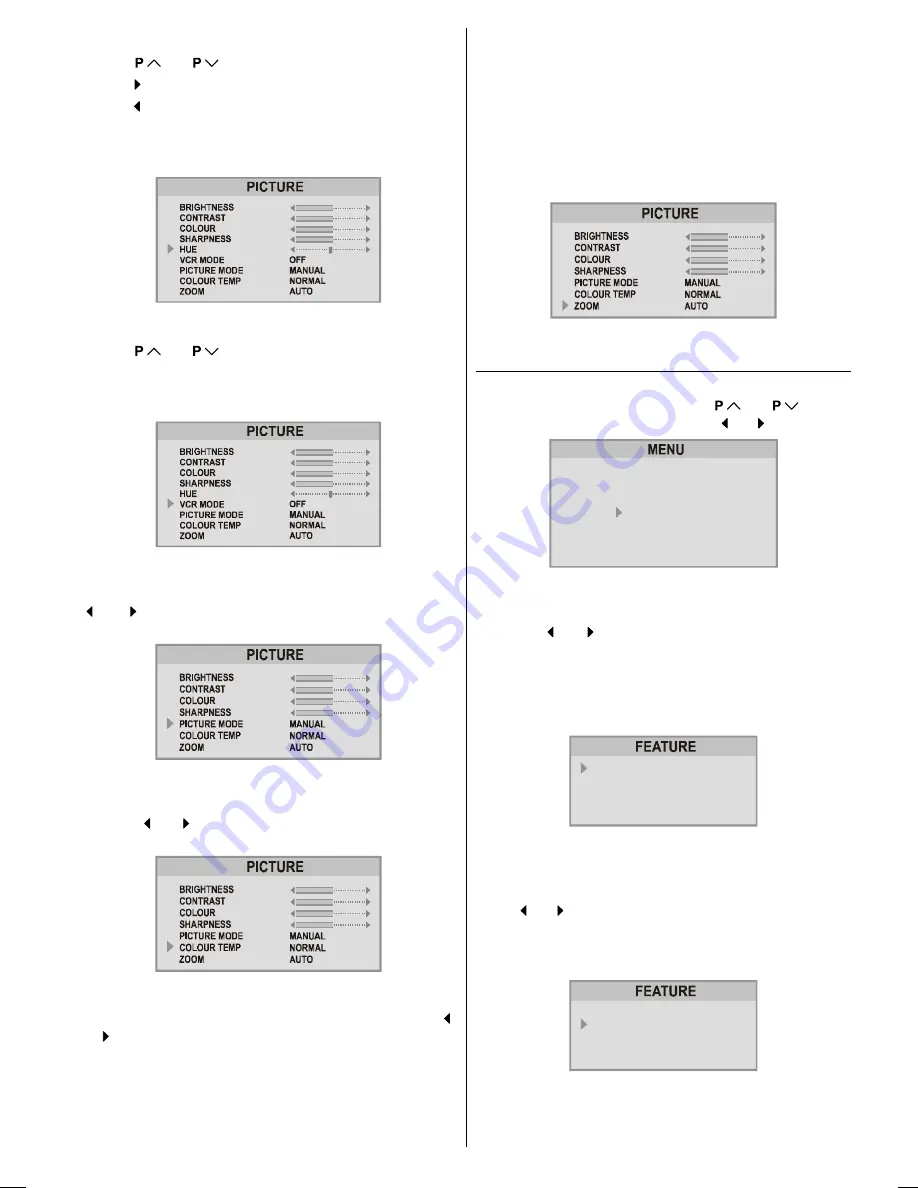
Setting Hue (In AV mode only) :

• Using “

“ or “

” button select Hue.

• Press “ ” button to increase Hue level.
• Press “ ” button to decrease Hue level.
Hue adjust is functional only when NTSC 3.58/4.43 is applied

in AV mode. It does not appear when other colour systems

used.

Setting VCR Mode (In AV mode only) :

• Using “

“ or “

” button select VCR MODE.

• When you watch a picture from your VCR and the picture is

unstable, you may improve it by changing the "

VCR MODE

"

setting from "

ON

" to "

OFF

".

Picture Mode

This item is used to change the picture mode. By pressing

“ ”  or  “ ”  button  you  may  choose  one  of  these  options:

BRIGHT

,

 STANDARD

,

 SOFT

,

 MANUAL

.

Colour Temp

This  item  is  used  to  change  the  Colour Temperature.  By

pressing “ ” or “ ” button you may choose one of these op-

tions: 

COOL, WARM, NORMAL

.

Zoom

This item is used to change the picture size. By pressing “ ”

or “ ” button you may choose one of these options: “

AUTO

”,

“

4:3

” and “

16:9

”.

• 

4:3

 This option forces the picture ratio to 4:3 mode.

•

 16:9 This

 option forces the picture ratio to 16:9 mode.

• 

AUTO 

This allows to change the picture mode automati-

cally, according to the transmission of the selected chan-

nel. For example, your TV is 4:3 mode, but the transmis-

sion of that channel is in 16:9 mode. If you select the AUTO

mode, the TV is switched to 16:9 mode automatically. If the

TV is in 4:3 mode and the picture ratio of the channel is

also 4:3, there will be no affect selecting the picture mode

to AUTO mode.

WSS feature is only used in TV and EXT-3 modes. For the

Zoom selection in EXT-1 and EXT-2 the pin 8 (of Scart) value

is used. In RGB mode the Zoom can be “

AUTO

”, “

4:3

” and

“

16:9

” mode.

Zoom can be set to desired mode by RED button.

Feature Menu

• Press “

MENU

” button, now you are in main menu. In the

main menu, select 

FEATURE

, using “

“ or “

” button.

Then enter the feature menu pressing “ ” or “ ” button.

6281'
3,&785(
)($785(
,167$//
352*5$0

Sleep Timer

The sleep timer is used to turn the TV off after a defined peri-

od. Press “ ” or “ ” button to choose a period of time after

selecting this item. The timer can be programmed between

Off and 120 minutes in steps of 10 minutes. 

(OFF, 010, 020,

030, 040, ......... ,120.)

If sleep timer is activated, at the end of the selected the time,

the TV goes automatically to stand-by mode.

6/((37,0(5

&+,/'/2&.

/$1*8$*(

(;7287387

%/8(%$&.*5281'

2))

2))

(1*/,6+

79

2))

Child lock:

You can disable the control panel buttons (except the POW-

ER button) with this item.
Press “ ” or “ ” button to change the setting to On or Off after

selecting this item.
When you set this item to On, the TV can be operated only

by using the remote control handset.

6/((37,0(5

&+,/'/2&.

/$1*8$*(

(;7287387

%/8(%$&.*5281'

2))

2))

(1*/,6+

79

2))

Warning

: If Child Lock item is set to ON, the TV can not be

operated by VCR.

01-ENG-2835-AK45-C1100UK-4-3-(AV-28KT1&BUF&SUF).p65

28.05.2003, 19:56

8

Summary of Contents for AV-28KT1BUF

Page 1: ...FARBFERNSEHGERÄT TELEVISOR A CORES BEDIENUNGSANLEITUNG INSTRUÇÕES TELEVISEUR COULEUR MANUEL D INSTRUCTIONS KLEURENTELEVISIE GEBRUIKSAANWIJZING TELEVISOR A COLOR MANUAL DE INSTRUCCIONES ITALIANO TELEVISORE A COLORI ISTRUZIONI AV 28KT1BUF AV 28KT1SUF Ak 45 2835 4 3 Grup A AV 28KT1 BUF SUF COVER PAGE 2835 AK45 C1100UK 4 3 AV 28KT1 BUF SUF 50038905 cdr ...

Page 2: ...ceiver 3 Moisture and Water Do not use this equipment in a humid and damp place avoid the bathroom the sink in the kitchen and near the washing machine Do not expose this equipment to rain or water and do not place objects filled with liquids on it as this may be dangerous 4 Cleaning Before cleaning unplug the receiver from the main supply outlet Do not use liquid or aerosol cleaners Use with soft...

Page 3: ... point within an equilateral triangle is intended to alert the user to the presence of important operating and maintenance servicing instructions in the literature accompanying the appliance Stand By Power 0 9 Direct Program STANDARD Button Picture Mode Change Colour Buttons RED Zoom Picture Size Change GREEN Hyper Sound YELLOW Factory Settings in Picture Menu MENU Menu Button Cursor Up Programme ...

Page 4: ...ENGLISH 3 Control Panel Buttons Antenna Connections ...

Page 5: ...remote control handset Remove the battery cover located on the back of the hand set by gently pulling upwards from the indicated part Insert two AA R6 or equivalent type batteries inside Replace the battery cover NOTE Remove batteries from remote control handset when it is not to be used for a long period Otherwise it can be damaged due to any leakage of batteries Switching the TV ON OFF You can o...

Page 6: ...hannels from the TV This means you do not need to set up the programme channels on your VCR manually The T V LINK menu will be displayed when you press the button while PROGRAM menu is displayed or when ever the INSTALL menu operations are performed Press button to start downloading data to VCR If you do not want to do press the STANDARD button to exit the menu When FEATURE NOT AVAILABLE is displa...

Page 7: ...n the remote control handset to select programmes between 0 and 9 TV will switch to the selected program after a short delay For a two digit program number enter the second digit after pressing the first digit within 2 seconds Menu System Your TV has been designed with a menu system Display MENU main menu and enter one of five menus SOUND PICTURE FEATURE INSTALL and PROGRAM 1 Press MENU button to ...

Page 8: ...STEREO 92 80 66 75 1 6281 02 3 5 6281 0212 21 Hyper Sound can be set On or Off also by GREEN button Picture Menu To change picture settings Press MENU button now you are in main menu In the main menu select PICTURE using or button then enter the picture menu pressing or button 6281 3 785 785 167 352 5 0 Note When Picture Mode is not MANUAL BRIGHTNESS CONTRAST and COLOUR options can not be reached ...

Page 9: ...lect the AUTO mode the TV is switched to 16 9 mode automatically If the TV is in 4 3 mode and the picture ratio of the channel is also 4 3 there will be no affect selecting the picture mode to AUTO mode WSS feature is only used in TV and EXT 3 modes For the Zoom selection in EXT 1 and EXT 2 the pin 8 of Scart value is used In RGB mode the Zoom can be AUTO 4 3 and 16 9 mode Zoom can be set to desir...

Page 10: ...the selected programme number s setting will be changed 2 Press or button to select BAND Using or button to select the band in which you want to search a channel 3 Press or button to select SEARCH Press or button to start searching Press button to search forward Press to search backwards If the found channel is not the desired one press or button to start searching again To stop searching before a...

Page 11: ... Downloading the data to VCR on page 5 to transmit the revised programme table data to the VCR If you do not want to transmit press STANDARD but ton to exit the menu Note You can only use this item if you have a decoder connected to a T V LINK compatible VCR to EXT 2 terminal Setting this item to ON by mistake causes the picture sound of a TV channel you are currently viewing to disappear If this ...

Page 12: ... To cancel the AUTO PROGRAM press the STAN DARD button 4 After AUTO PROGRAM is finalized the PROGRAM menu appears again Other Features Sound Mute To cut off the sound of the TV press button The sound will be cut off To cancel mute press or or but ton The volume level will be the same as the level before mute when you cancel mute Information on Screen First pressing the button displays the current ...

Page 13: ...ge Pressing button again will conceal the revealed an swers To Stop Automatic Page Change The teletext page you have selected may contain more infor mation than what is on the screen the rest of the information will be displayed after a period of time Press button to stop the automatic page change Press button again to allow the next page to be dis played To Select a Subcode Page Subcode pages are...

Page 14: ...If you have an equipment such as a Camcorder which has the RCA jacks connect it to the Front AV EXT 3 terminal with the video and audio cables If the equipment has the mono audio jack connect it to the AUDIO L jack Via the ANT aerial socket If your equipment does not have an Euroconnector or RCA jacks connect it to the TV with an aerial cable For details see the manual provided with the equipment ...

Page 15: ...n EXT 1 EXT 1 terminal Euroconnector 21 pin SCART Video input Audio L R inputs and RGB inputs are available TV broadcast outputs Video and Audio L R are available EXT 2 EXT 2 terminal Euroconnector 21 pin SCART Video input S VIDEO Y C input and Audio L R inputs are available Video and Audio L R outputs are available See Setting External Source Output on page 9 T V LINK functions are available See ...

Page 16: ... mission Have you pressed the correct keys on the remote control Try once more Sound Sound is coming from only one of the speakers Is the bal ance set to one direction extreme See SOUND menu Remote Control Your TV no longer responds to the remote control Perhaps the batteries are exhausted If so you can still use the local buttons at the right side of your TV Have you selected the wrong menu Press...

Reviews: