background image

(No.YA316)1-11

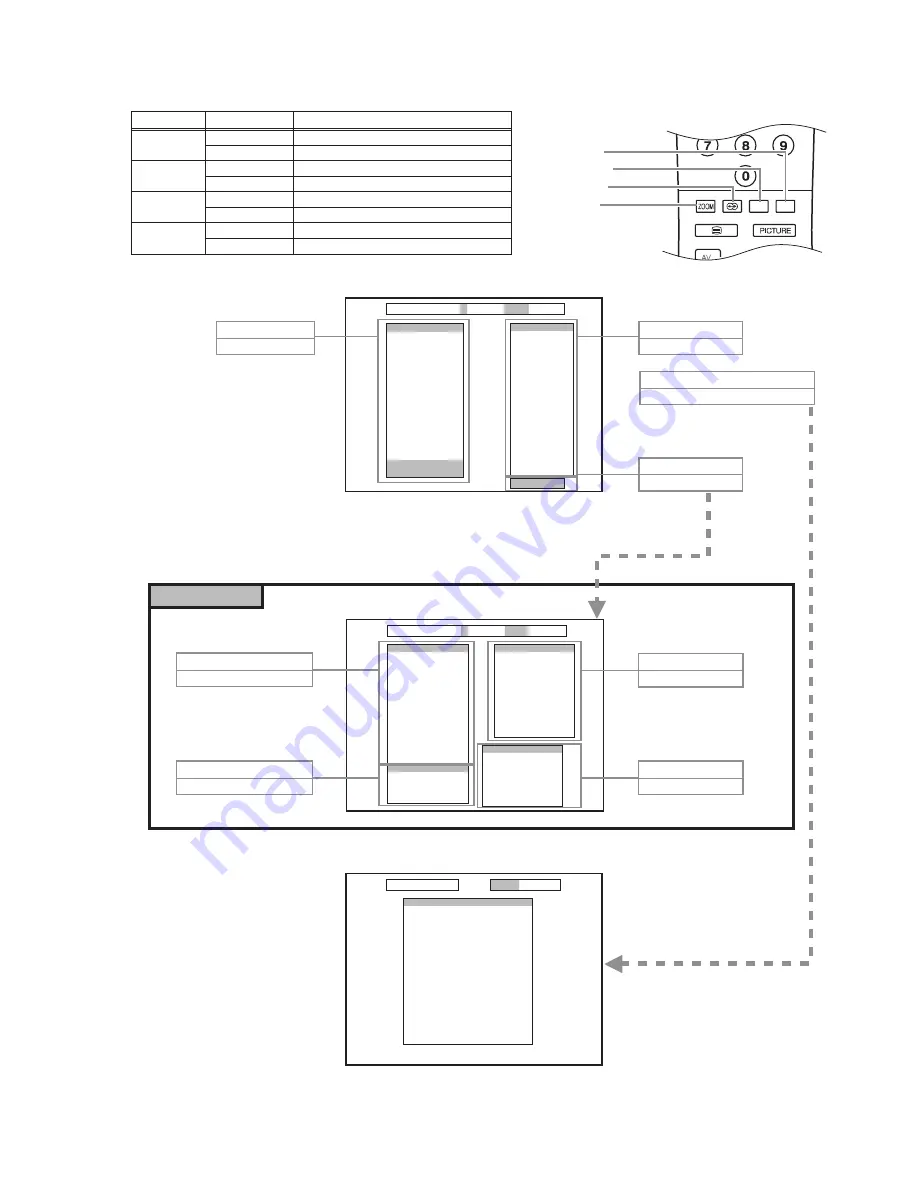
4.5.4 COLOUR KEY FUNCTION AND SCREEN DISPLAY

PRODUCTION            i >STORE    MENU>EXIT

H/V    (FULL  MODE)
  V-SHIFT
  V-SIZE 
  H-SHIFT
  H-SIZE
  S-COR 
  LINRT
  ANGLE
  BOW
  TRAPEZ
  PARAB 
  U.COR
  L.COR
  TILT
  TRPZD
  NTSCHS
  TXTV
  HS04_3
JVC*******
*******

VIDEO
  WdR
  WdG
  WdB 
  CuR
  CuG
  CuB
  G2Cu
  YDP
  AGC
  APSW 
  APS
  T_T 
  T_P
  YDS
  YDN
  EXT3
  DVD
  C.M
  4:3

SERVICE

   
*** 
*** 
*** 
*** 
*** 
*** 
*** 
*** 
*** 
*** 
*** 
*** 
*** 
*** 
*** 
*** 
*** 
***
***


***

 ****

****

***
***
***
***
***
***
***
***
***
***
***
***
***
***

PRODUCTION            i >STORE    MENU>EXIT

ADJUSTMENTS
  PIP CNTRST 
  PIP YDelay
  PIP Frame 
  EHTH SA1
  EHTV SA1
  EHTH SA2
  EHTV SA2
  EHTV THRS
  SVDEL
  TU TYPE
  OSD CONT
  OSD BRI
  TEXT BRI
  TXTCONT
  INIT NVM
Prescaler
  FM
  NICAM
  I2S
  SCART  

OPTIONS
0. HPHONE 
1. CRT 
2. S-VHS
3. f(IF) 
4. Turk 
5. RF
6. FRONT
7. MLAH 
8. VD
9. CTI
: . AVL

   
*** 
*** 
*** 
*** 
*** 
*** 
*** 
*** 
*** 
*** 
***

SYSTEM
0. PAL B/G
1. PAL D/K
2. PAL I 
3. SECAM B/G 
4. SECAM D/K
5. SECAM L/L
6. AUST. 

   
*** 
*** 
*** 
*** 
*** 
*** 
***


***

 ***

*

***
***
***
***
***
***
***
***
***
***
***
***


***
***
***
***
***

P.M.  FACTORY SET

 MENU>  SERVICE

FATORY SETTINGS
  Brightness
  Contrast
  Colour
  Brightness
  Contrast
  Colour
  Brightness
  Contrast
  Colour
  Brightness
  Contrast
  Colour
  WdR
  WdG
  WdB
  WdR
  WdG
  WdB
 

USER
USER
USER
BRIGHT
BRIGHT
BRIGHT
STANDARD
STANDARD
STANDARD
SOFT
SOFT
SOFT
WARM
WARM
WARM
COOL
COOL
COOL

***
***
***
***
***
***
***
***
***
***
***
***
***
***
***
***
***
***

FACTORY SETTINGS

SERVICE MENU 1

Colour key function in the SERVICE MENU

SERVICE MENU 2

RED

 key

select 

H/V

GREEN

 key

select 

VIDEO

GREEN

 key twice

access 

FACTRY SETTINGS

RED

 key

select 

ADJUSTMENT

GREEN

 key

select 

Prescaler

BLUE

 key

select 

SERVICE

BLUE

 key

select 

OPTIONS

YELLOW

 key

select 

SYSTEM

Do Not Adjust

Colour key

Press time

RED

GREEN

YELLOW

BLUE

onece

twice

onece

twice

onece

twice

onece

twice

Select menu

H/V

VIDEO

---

SERVICE (SERVICE MENU 2)

---

---

---

---

colour key location

BLUE

YELLOW

GREEN

RED

Summary of Contents for AV-28ED5BN, AV-28ED5SN

Page 1: ... Victor Company of Japan Limited No YA316 2005 9 COLOUR TELEVISION YA316 2005 5 AV 28ED5BN AV 28ED5SN TABLE OF CONTENTS 1 PRECAUTION 1 3 2 SPECIFIC SERVICE INSTRUCTIONS 1 4 3 DISASSEMBLY 1 5 4 ADJUSTMENT 1 9 5 TROUBLESHOOTING 1 19 ...

Page 2: ...43MHz SECAM 4 40625MHz 4 25MHz NTSC 3 58MHz 4 43MHz Teletext System FLOF Fastext Power Input AC220V AC240V 50Hz Power Consumption 150W Standby 3W Picture Tube Visible size 66 6cm 28 Measured diagonally H 53 3cm V 40 0cm High Voltage 30 0kV at zero beam current Speaker MAIN 5 7cm 16cm oval type 2 TWEETER 5cm 2 Audio Power Output 10W 10W Aerial Input Terminal 75Ω unbalanced coaxial EXT 1 EXT 2 Input...

Page 3: ...lacements or alternatives approved by the manufacturer of the complete product 7 Do not check high voltage by drawing an arc Use a high voltage meter or a high voltage probe with a VTVM Discharge the picture tube before attempting meter connection by connecting a clip lead to the ground frame and connecting the other end of the lead through a 10kΩ 2W resistor to the anode button 8 When service is ...

Page 4: ...sed TV OUT Used LINE OUT 2 AUDIO R input 500mV rms Nominal High impedance Used R1 Used R2 3 AUDIO L output 500mV rms Nominal Low impedance Used TV OUT Used LINE OUT 4 AUDIO GND Used Used 5 GND B Used Used 6 AUDIO L input 500mV rms Nominal High impedance Used L1 Used L2 7 B input 700mV B W 75 Ω Used Not used 8 FUNCTION SW SLOW SW Low 0V 3V High 8V 12V High impedance Used Used 9 GND G Used Used 10 S...

Page 5: ...ll 3 1 7 REMOVING THE POWER SWITCH PWB Remove the REAR COVER 1 Remove the 2 screws G and remove the POWER SWITCH PWB 3 1 8 REMOVING THE LED PWB Remove the REAR COVER Remove the POWER SWITCH PWB 1 Remove the 2 screws H and remove the LED PWB 3 1 9 REMOVING THE SPEAKER and TWEETER Remove the REAR COVER 1 Remove the 4 screws I and remove the SPEAKER 2 Remove the other hand SPEAKER in the same steps 3...

Page 6: ...1 6 No YA316 Fig 1 x4 x4 x4 x2 x2 x2 x2 x8 LED PWB POWER SWITCH PWB TWEETER MAIN PWB BASE FEATURE BOX PWB REAR COVER BACK DOOR CRT SOCKET PWB SPEAKER SIDE CONTROL PWB B A C D E F G H I J x4 x2 ...

Page 7: ...UND 3 INSTALL 4 FEATURE Setting item Setting position POWER Off CHANNEL PR1 Setting item Setting position CHANNEL PR1 ZOOM AUTO Setting item Setting position Picture Mode Standard Brightness Centre Contrast Centre Colour Centre Sharpness Centre Colour Temp Centre Noise reduction OFF Zoom AUTO Setting item Setting position Volume Centre Balance Centre Bass Centre Treble Centre Hyper Sound OFF 3D SO...

Page 8: ...he tweezers and remove the chip part Transistors diodes variable resistors etc 1 Apply extra solder to each lead 2 As shown in the figure push the part with tweezers and alternately melt the solder at each lead Shift and remove the chip part NOTE After removing the part remove remaining solder from the pattern 2 How to install Chip parts Resistors capacitors etc 1 Apply solder to the pattern as in...

Page 9: ...tion or input signal for adjustment 6 Never touch any adjustment parts which are not specified in the list for this adjustment variable resistors transformers condensers etc 7 Presetting before adjustment Unless otherwise specified in the adjustment instructions preset the following functions with the remote control unit 4 2 MEASURING EQUIPMENT 1 DC voltmeter or digital voltmeter 2 Signal generato...

Page 10: ...ting value 4 5 3 HOW TO EXIT SERVICE MODE 1 Press the MENU key PRODUCTION i STORE MENU EXIT H V FULL MODE V SHIFT V SIZE H SHIFT H SIZE S COR LINRT ANGLE BOW TRAPEZ PARAB U COR L COR TILT TRPZD NTSCHS TXTV HS04_3 JVC52 VIDEO WdR WdG WdB CuR CuG CuB G2Cu YDP AGC APSW APS T_T T_P YDS YDN EXT3 DVD C M 4 3 SERVICE SERVICE MENU 1 PRODUCTION i STORE MENU EXIT ADJUSTMENTS PIP CNTRST PIP YDelay PIP Frame ...

Page 11: ... PAL I 3 SECAM B G 4 SECAM D K 5 SECAM L L 6 AUST P M FACTORY SET MENU SERVICE FATORY SETTINGS Brightness Contrast Colour Brightness Contrast Colour Brightness Contrast Colour Brightness Contrast Colour WdR WdG WdB WdR WdG WdB USER USER USER BRIGHT BRIGHT BRIGHT STANDARD STANDARD STANDARD SOFT SOFT SOFT WARM WARM WARM COOL COOL COOL FACTORY SETTINGS SERVICE MENU 1 Colour key function in the SERVIC...

Page 12: ...ntrol unit SCREEN VR On the FBT 1 Press the MUTING and INFORMATION key at the same time to enter the SERVICE MODE 2 Press the BLUE and TELETEXT key respectively to enter screen adjustment from the service mode 3 Adjust the SCREEN VR until the G2 ADJUST OK sign appears Item Measuring instrument Test point Adjustment part Description AGC adjustment Signal generator Remote control unit DC volt meter ...

Page 13: ...if the adjustment becomes improper after some other geometric adjustments are done 7 Press the INFORMATION key to memorize the set value VERTICAL S CORRECTION LINEARITY adjustment Signal generator Remote control unit S COR LINRT 1 Receive a crosshatch signal 2 Enter the SERVICE MODE 3 Press the RED key to enter the H V adjustment group 4 Select S COR 5 Adjust S COR until the size of squares on bot...

Page 14: ...il no white bars on both the left and right sides of the crosshatch will be visible nor screen will be so wide 6 Check and readjust H SIZE item if the adjustment becomes improper after some other geometric adjustments are done 7 Press the INFORMATION key to memorize the set value ANGLE adjustment Signal generator Remote control unit ANGLE 1 Receive a crosshatch signal 2 Enter the SERVICE MODE 3 Pr...

Page 15: ...s especially lines at the sides of the picture frame become parallel to the both sides of picture tubes as close as possible 6 Check and readjust TRAPEZ item if the adjustment becomes improper after some other geometric adjustments are done 7 Press the INFORMATION key to memorize the set value SIDE PIN adjustment Signal generator Remote control unit PARAB 1 Receive a crosshatch signal 2 Enter the ...

Page 16: ... control unit TILT 1 Receive a crosshatch signal 2 Enter the SERVICE MODE 3 Press the RED key to enter the H V adjustment group 4 Select TILT 5 Adjust TILT to rotate the complete raster clockwise and counter clockwise depending on the CRT 6 Check and readjust TILT item if the adjustment becomes improper after some other geometric adjustments are done 7 Press the INFORMATION key to memorize the set...

Page 17: ...em if the adjustment becomes improper after some other geometric adjustments are done 7 Press the INFORMATION key to memorize the set value 4 3 TUBE adjustment Signal generator Remote control unit HS04_3 1 Receive a crosshatch signal 2 Enter the SERVICE MODE 3 Press the RED key to enter the H V adjustment group 4 Select HS04_3 5 Adjust HS04_3 to adjust the proper horizontal size of 4 3 tube 6 Pres...

Page 18: ...EN key to enter the VIDEO adjustment group 4 Select YDP 5 Adjust YDP until the colour transients on the colour bar pattern become as sharper as possible and colours between transients do not mix with each other 6 Press the INFORMATION key to memorize the set value SECAM Y DELAY adjustment Signal generator Remote control unit YDS 1 Receive a SECAM colour bar signal 2 Enter the SERVICE MODE 3 Press ...

Page 19: ... No YA316 1 19 SECTION 5 TROUBLESHOOTING This service manual does not describe TROUBLESHOOTING ...

Page 20: ... No YA316 AV MULTIMEDIA COMPANY VIDEO DISPLAY CATEGORY 12 3 chome Moriya cho kanagawa ku Yokohama kanagawa prefecture 221 8528 Japan Victor Company of Japan Limited VPT Printed in Japan ...

Reviews: