background image

8

Remote control buttons and functions

ECO SENSOR button

You can adjust this TV so that the screen
automatically adjusts to the optimum
contrast according to the brightness of your
room. This function reduces eye strain and
the power consumption of this TV.

Press this button to select the desired
mode.

DIGITAL ECO SENSOR DISPLAY:

The ECO SENSOR function switches on. In
this mode, the clover mark indicating the
brightness of your room is displayed for
several seconds each time the brightness
changes. The number of clover marks
displayed on screen increases as your room
becomes darker.

DIGITAL ECO SENSOR:

The ECO SENSOR function switches on.
However, in this mode, the clover mark will
not be displayed.

DIGITAL ECO SENSOR OFF:

The ECO SENSOR function switches off.

PICTURE MODE button

You can select one of three picture
adjustment settings as you like.

Press this button to select a mode.

BRIGHT:

Heightens contrast and sharpness.

STANDARD:

Standardizes picture adjustments.

SOFT:

Softens contrast and sharpness.

• Pressing this button returns all the picture set-

tings in “

MENU 4

” to their default settings.

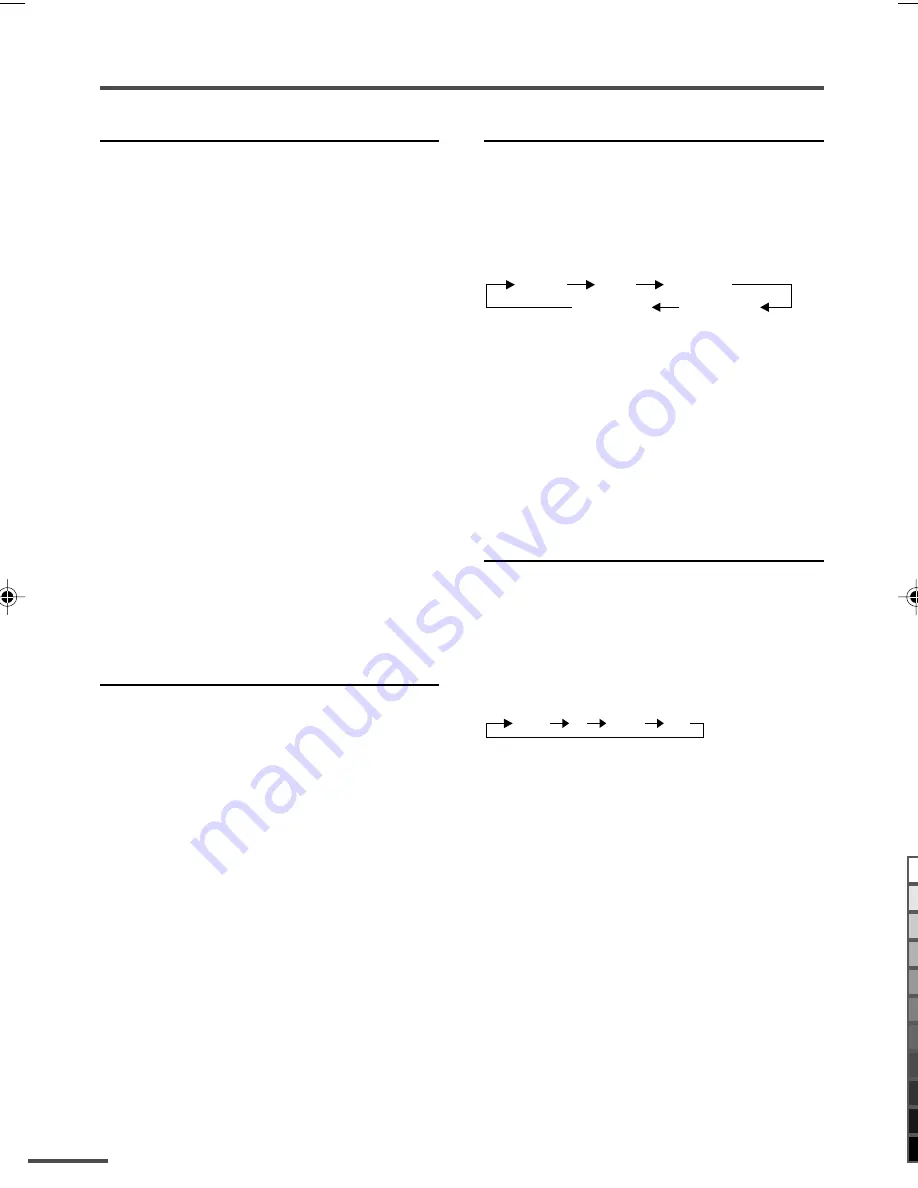
COLOUR SYSTEM button

If the picture is not clear or no colour
appears, change the current colour system
to another colour system.

Press this button to select the colour
system.

AUTO  

PAL

SECAM

NTSC3.58

NTSC4.43

AUTO:

Automatic colour system selection.

• For the colour systems in each country or

region, see the table“Broadcasting systems” on
the back cover.

• If the picture is not normal in the AUTO mode,

change the AUTO mode to another colour
system.

SOUND SYSTEM button

If the sound is not clear even when the
picture appears normal, change the
current sound system to another sound
system.

Press this button to select the sound
system.

B/G

I

D/K

M

• For the sound systems in each country or re-

gion, see the table “Broadcasting systems” on
the back cover.

• You cannot select any sound system when in a

VIDEO mode.

 LCT0935-001B-H

6/29/01, 4:42 PM

8

Black

Summary of Contents for AV-21LS, AV-25LS, AV-29LS, AV-34LS, AV-21LX, AV-25LX, AV-29LX, AV-29LX1, AV-34LX, AV-21LXB, AV-25LXB, AV-29LXB

Page 1: ...YSTEM button 8 SOUND SYSTEM button 8 button 9 SUPER BASS button 9 MUTING button 9 DISPLAY button 9 OFF TIMER button 9 RETURN button 10 CHANNEL SCAN button 10 Viewing teletext programmes 11 12 Using the TV s menus 13 Basic operation 13 INPUT 14 PICTURE TILT 14 VNR 14 COMPRESS 16 9 14 AUTO SHUTOFF 15 CHILD LOCK 15 BLUE BACK 15 VIDEO 2 SET 16 Picture Adjustments 16 Sound Adjustments 16 MONO SURROUND ...

Page 2: ... distances shown in the diagram Do not allow objects or liquid into the cabinet openings In the event of a fault unplug the TV and call a service technician Do not attempt to repair it by yourself or remove the rear cover The surface of the TV screen is easily damaged Be very careful with it when handling the TV Should the TV screen become soiled wipe it with a soft dry cloth Never rub it forceful...

Page 3: ...ROL UNIT DISPLAY MENU POWER CHANNEL VOLUME SYSTEM COLOUR OFF TIMER TV VIDEO PICTURE MODE CHANNEL SCAN ECO SENSOR SOUND MUTING RETURN 1 2 3 4 5 6 7 8 0 9 RM C356 REMOTE CONTROL UNIT DISPLAY SUPER BASS MENU POWER CHANNEL VOLUME SYSTEM COLOUR OFF TIMER TV VIDEO PICTURE MODE CHANNEL SCAN ECO SENSOR SOUND MUTING RETURN 1 2 3 4 5 6 7 8 0 9 2 Insert the batteries into the remote control Correctly insert ...

Page 4: ...an S VIDEO cable and enjoy the high quality picture of the S VIDEO signal Y C signal In that case do not connect it to the TV with a video cable If you connect the VCR to the TV only with an aerial cable you should preset the video channel from the VCR to the AV channel channel number 0 on this TV See MANUAL CH PRESET on page 18 and preset it manually VIDEO 1 INPUT OUTPUT COMPONENT VIDEO 2 INPUT R...

Page 5: ...omponent video signals Also it cannot output any signals when the TV is turned off Connect components outputting a component signal Y CB CR signal such as a DVD player to the VIDEO 2 terminal and set VIDEO 2 SET function to COMPONENT See page 16 The following illustrations are for the AV 29LS Your TV s front and rear pannels may not look exactly like the illustrations L MONO V R IN VIDEO 3 Headpho...

Page 6: ...functions to perform the ini tial settings For details see pages 17 and 19 2 Press the MENU M buttons to select language 3 Press the MENU T buttons to select AUTO CH PRESET 4 Press the MENU M buttons to start the AUTO CH PRESET function ON SEARCH is displayed on the screen When all the TV channels that can be received on your TV have been preset the display goes out and the AUTO CH PRESET function...

Page 7: ...L m button Up down selection cannot be selected for channels to which the SKIP has been set to YES See page 19 Press the Number buttons to enter the channel number If you want to enter a two digit number press the button to select the two digit mode then enter the channel num ber 3 Press the VOLUME M button to adjust the sound 4 To turn your TV off press the POWER button We recommend that you pres...

Page 8: ...like Press this button to select a mode BRIGHT Heightens contrast and sharpness STANDARD Standardizes picture adjustments SOFT Softens contrast and sharpness Pressing this button returns all the picture set tings in MENU 4 to their default settings COLOUR SYSTEM button If the picture is not clear or no colour appears change the current colour system to another colour system Press this button to se...

Page 9: ...n Press this button to turn the SUPER BASS function on or off To use this function you must first mount the Twin Port Bass Blaster Unit packaged with the TV on top of the TV For details see page 20 MUTING button You can turn the sound off instantly Press this button To turn the sound on press this button again DISPLAY button You can continuously display the current channel number or VIDEO mode on ...

Page 10: ...nnel alternately by pressing this button To cancel the Return Channel setting Press this button and hold until the message RETURN PLUS CANCELLED appears If no channel is set to the Return Channel You can view the channel selected right before the current channel by pressing this button CHANNEL SCAN button You can quickly view all TV channels programmes that you can view on your TV and search for t...

Page 11: ...r the TV TEXT button If you have trouble receiving teletext broad casts consult your local dealer or the tele text station Using the List Mode You can store the numbers of your favourite teletext pages in the List mode and call them up quickly using the coloured buttons To store the page numbers 1 Press the MODE button to engage the List mode The stored page numbers are displayed at the bottom of ...

Page 12: ...t page its page number appears in the upper left of the screen 3 Press the CANCEL button to view the teletext page Pressing the CANCEL button cannot change the teletext mode to the TV mode INDEX You can return to the index page instantly Press the INDEX button In the List mode Returns to the page number displayed in the lower left area of the screen SUBPAGE Some teletext pages include sub pages th...

Page 13: ...isplay off To operate a menu using the buttons on the front panel of the TV refer to Operating menus on page 22 DISPLAY MENU POWER CHANNEL VOLUME DISPLAY button MENU t buttons MENU m buttons Basic operation 1 Press the MENU T buttons One of the 5 menus is displayed MENU 1 INPUT TV VNR ON COMPRESS 16 9 ON PICTURE TILT 00 SELECT BY EXIT BY OPERATE BY D I SPLA Y 2 Repeatedly press the MENU T buttons ...

Page 14: ...XIT BY OPERATE BY D I SPLA Y 2 Continue pressing MENU M until the picture becomes level VNR You can reduce picture noise 1 Press MENU T to display the MENU 1 menu then select VNR MENU 1 INPUT TV VNR ON COMPRESS 16 9 ON PICTURE TILT 00 SELECT BY EXIT BY OPERATE BY D I SPLA Y 2 Press MENU M to select ON To cancel the VNR function select OFF COMPRESS 16 9 This function converts a normal picture 4 3 a...

Page 15: ...ating the TV without parental consent 1 Press MENU T to display the MENU 2 menu then select CHILD LOCK MENU 2 AUTO SHUTOFF ON CHILD LOCK ON BLUE BACK ON VIDEO 2 SET COMPONENT SELECT BY EXIT BY OPERATE BY D I SPLA Y 2 Press MENU M to select ON To cancel the CHILD LOCK function select OFF The CHILD LOCK function is canceled when you turn the power off BLUE BACK You can mute the sound and change the ...

Page 16: ...signals is input Press the MENU m buttons to select COMPONENT Picture Adjustments You can adjust the picture as you like 1 Press MENU T to display the MENU 4 menu MENU 4 TINT COLOUR BRIGHT CONT SHARP SELECT BY EXIT BY OPERATE BY D I SPLA Y 2 Press MENU T to select an item and press MENU M to adjust it TINT Reddish Greenish COLOUR Lighter Deeper BRIGHT Darker Brighter CONT Lower Higher SHARP Softer...

Page 17: ... and VIDEO mode can be set separately For example you can set it to be off in TV mode and on in VIDEO mode If you set the AI VOLUME func tion while viewing a TV channel the setting is registered as the setting for TV mode If you set the AI VOLUME function while viewing images from a VIDEO terminal the setting is registered as the setting for VIDEO mode AUTO CH PRESET You can automatically preset a...

Page 18: ...ted channel number If the TV channel you want to preset is not displayed repeat step 4 until the TV finds the TV channel you want to preset To stop the MANUAL CH PRESET function press any button other than the VOLUME m button If the picture is not clear Fine tune the TV channel 1 Press MENU t to select FINE MANUAL FINE SKIP NO SOUND SYSTEM B G EXIT SELECT BY PR 1 VL PROGRAM BY EXIT BY FINE BY VOL ...

Page 19: ...SOUND SYSTEM B G EXIT SELECT BY PR 1 VL PROGRAM BY EXIT BY YES NO BY VOL D I SPLA Y 4 Press MENU M to select the channel you want to skip 5 Press VOLUME M to select YES The channel is set to be skipped To cancel the SKIP function select NO 6 Repeat steps 4 and 5 if you want to set another channel to skip LANGUAGE You can select the language for the on screen display 1 Press MENU T to display the M...

Page 20: ...e Twin Port Bass Blaster Unit Do not move the TV with the Twin Port Bass Blaster Unit mounted on top of the TV Before you move the TV be sure to remove the Twin Port Bass Blaster Unit Do not move the TV by holding the Twin Port Bass Blaster Unit Twin Port Bass Blaster Unit VIDEO 1 INPUT OUTPUT COMPONENT VIDEO 2 INPUT BASS SPEAKER OUT R R R CR V MONO L V Y V L MONO L CB 1 Place the Twin Port Bass B...

Page 21: ...NT VIDEO 2 INPUT 5 4 3 1 S OVER V MONO L V Y V L MONO L CB R R R CR VIDEO 1 INPUT OUTPUT COMPONENT VIDEO 2 INPUT V MONO L V Y V L MONO L CB R R R CR 4 OUTPUT terminal 5 Aerial socket 5 VOLUME m buttons 6 TV VIDEO button 7 POWER lamp 8 Main power button TV buttons and parts Front AV 29 series and AV 34 series AV 21 series and AV 25 series Rear 7 8 3 2 1 6 4 5 L MONO V R IN VIDEO 3 1 2 3 4 5 7 8 ...

Page 22: ...If the TV has no TV VIDEO button select the VIDEO mode with the INPUT function in MENU 1 Operating menus You can operate functions in menus using the front control buttons on the TV 1 Press MENU y to display a menu 2 Press MENU y repeatedly to display the menu you want to use 3 Press MENU y to select the desired function or item 4 Press MENU M or VOLUME M to carry out the desired operation For det...

Page 23: ...age 9 Poor picture Press the COLOUR SYSTEM button to select an other colour system see page 8 Adjust the picture settings see page 16 Is a component signal output device such as a DVD player connected correctly see page 5 Is the VIDEO 2 SET function setting correct see page 16 If noise snow totally blocks out the picture check the following Have the TV and aerial been connected properly Has the ae...

Page 24: ...e power cord to the AC outlet 4 5 Initial setting 5 Basic operation 6 Remote control buttons and functions 7 ECO SENSOR button 7 PICTURE MODE button 7 COLOUR SYSTEM button 7 SOUND SYSTEM button 7 button 9 MUTING button 8 DISPLAY button 8 OFF TIMER button 8 RETURN button 9 CHANNEL SCAN button 9 Using the TV s menus 10 Basic operation 10 INPUT 11 PICTURE TILT 11 VNR 11 COMPRESS 16 9 11 AUTO SHUTOFF ...

Page 25: ...he event of a fault unplug the TV and call a service technician Do not attempt to repair it by yourself or remove the rear cover The surface of the TV screen is easily damaged Be very careful with it when handling the TV Should the TV screen become soiled wipe it with a soft dry cloth Never rub it forcefully Never use any cleaner or detergent on it When you don t use this TV for a long period of t...

Page 26: ...e TV use the L MONO jack If you connect the VCR to the TV only with an aerial cable you should preset the video channel from the VCR to the AV channel channel number 0 on this TV See MANUAL CH PRESET on page 15 and preset it manually VIDEO 1 INPUT OUTPUT COMPONENT VIDEO 2 INPUT R R R CR VIDEO 1 INPUT OUTPUT COMPONENT VIDEO 2 INPUT V R MONO L V Y V R L R MONO L CB CR To RF output To video output VC...

Page 27: ...ls Also it cannot output any signals when the TV is turned off Connect components outputting a component signal Y CB CR signal such as a DVD player to the VIDEO 2 terminal and set VIDEO 2 SET function to COMPONENT See page 13 The following illustrations are for the AV 29LH Your TV s front and rear pannels may not look exactly like the illustrations L MONO V R IN VIDEO 3 Headphones Camcorder or TV ...

Page 28: ...functions to perform the ini tial settings For details see pages 14 and 16 2 Press the MENU M buttons to select language 3 Press the MENU T buttons to select AUTO CH PRESET 4 Press the MENU M buttons to start the AUTO CH PRESET function ON SEARCH is displayed on the screen When all the TV channels that can be received on your TV have been preset the display goes out and the AUTO CH PRESET function...

Page 29: ... 16 Press the Number buttons to enter the channel number If you want to enter a two digit number press the button to select the two digit mode then enter the channel num ber 3 Press the VOLUME M button to adjust the sound 4 To turn your TV off press the POWER button We recommend that you press the Main power button on the TV to turn the main power off if you do not plan to use your TV for a long t...

Page 30: ...as you like Press this button to select a mode BRIGHT Heightens contrast and sharpness STANDARD Standardizes picture adjustments SOFT Softens contrast and sharpness Pressing this button returns all the picture set tings in MENU 4 to their default settings COLOUR SYSTEM button If the picture is not clear or no colour appears change the current colour system to another colour system Press this butto...

Page 31: ...cancel the multi sound function MUTING button You can turn the sound off instantly Press this button To turn the sound on press this button again DISPLAY button You can continuously display the current channel number or VIDEO mode on the screen Press this button To turn the display off press this button again When selecting a VIDEO mode with no signal indication of the VIDEO mode becomes fixed on ...

Page 32: ...ently view to the Return Channel and you can view that channel at any time with one touch To set the channel to the Return Channel 1 Select the channel you want to set to the Return Channel 2 Press this button and hold until the message RETURN PLUS PRO GRAMMED appears When you turn off the TV the Return Chan nel setting is cancelled To view the Return Channel Press this button You can view two cha...

Page 33: ...isplay off To operate a menu using the buttons on the front panel of the TV refer to Operating menus on page 18 DISPLAY MENU POWER CHANNEL VOLUME DISPLAY button MENU t buttons MENU m buttons Basic operation 1 Press the MENU T buttons One of the 5 menus is displayed MENU 1 INPUT TV VNR ON COMPRESS 16 9 ON PICTURE TILT 00 SELECT BY EXIT BY OPERATE BY D I SPLA Y 2 Repeatedly press the MENU T buttons ...

Page 34: ...EXIT BY OPERATE BY D I SPLA Y 2 Continue pressing MENU M until the picture becomes level VNR You can reduce picture noise 1 Press MENU T to display the MENU 1 menu then select VNR MENU 1 INPUT TV VNR ON COMPRESS 16 9 ON PICTURE TILT 00 SELECT BY EXIT BY OPERATE BY D I SPLA Y 2 Press MENU M to select ON To cancel the VNR function select OFF COMPRESS 16 9 This function converts a normal picture 4 3 ...

Page 35: ...ating the TV without parental consent 1 Press MENU T to display the MENU 2 menu then select CHILD LOCK MENU 2 AUTO SHUTOFF ON CHILD LOCK ON BLUE BACK ON VIDEO 2 SET COMPONENT SELECT BY EXIT BY OPERATE BY D I SPLA Y 2 Press MENU M to select ON To cancel the CHILD LOCK function select OFF The CHILD LOCK function is canceled when you turn the power off BLUE BACK You can mute the sound and change the ...

Page 36: ...EXIT BY OPERATE BY D I SPLA Y 2 Press MENU T to select an item and press MENU M to adjust it TREBLE Weaker Stronger BASS Weaker Stronger BALANCE Left Right VIDEO 2 SET Set the VIDEO 2 SET correctly according to the video signal input from the external device connected to the VIDEO 2 terminal If this setting is incorrect images will not be displayed 1 Press MENU T to display the MENU 2 menu then se...

Page 37: ...ed as the setting for TV mode If you set the AI VOLUME function while viewing images from a VIDEO terminal the setting is registered as the setting for VIDEO mode AUTO CH PRESET You can automatically preset all TV channels that can be received by your TV to channels 1 Press MENU T to display the MENU 3 menu then select AUTO CH PRESET MENU 3 AUTO CH PRESET MANUAL CH PRESET LANGUAGE ENGLISH SELECT B...

Page 38: ...lected channel number If the TV channel you want to preset is not displayed repeat step 4 until the TV finds the TV channel you want to preset To stop the MANUAL CH PRESET function press any button other than the VOLUME m button If the picture is not clear Fine tune the TV channel 1 Press MENU t to select FINE MANUAL FINE SKIP NO SOUND SYSTEM B G EXIT SELECT BY PR 1 VL PROGRAM BY EXIT BY FINE BY V...

Page 39: ...SOUND SYSTEM B G EXIT SELECT BY PR 1 VL PROGRAM BY EXIT BY YES NO BY VOL D I SPLA Y 4 Press MENU M to select the channel you want to skip 5 Press VOLUME M to select YES The channel is set to be skipped To cancel the SKIP function select NO 6 Repeat steps 4 and 5 if you want to set another channel to skip LANGUAGE You can select the language for the on screen display 1 Press MENU T to display the M...

Page 40: ... 4 CHANNEL m buttons 1 VIDEO 1 INPUT terminal 2 COMPONENT VIDEO 2 INPUT terminal 3 OUTPUT terminal 4 Aerial socket 4 3 2 1 VIDEO 1 INPUT OUTPUT COMPONENT VIDEO 2 INPUT V MONO L V Y V L MONO L CB R R R CR 7 8 3 2 1 6 4 5 L MONO V R IN VIDEO 3 5 VOLUME m buttons 6 TV VIDEO button 7 POWER lamp 8 Main power button 1 2 3 4 5 7 8 ...

Page 41: ...f the TV has one See page 6 If the TV has no TV VIDEO button select the VIDEO mode with the INPUT function in MENU 1 Operating menus You can operate functions in menus using the front control buttons on the TV 1 Press MENU y to display a menu 2 Press MENU y repeatedly to display the menu you want to use 3 Press MENU y to select the desired function or item 4 Press MENU M or VOLUME M to carry out t...

Page 42: ...e 8 Poor picture Press the COLOUR SYSTEM button to select an other colour system see page 7 Adjust the picture settings see page 13 Is a component signal output device such as a DVD player connected correctly see page 4 Is the VIDEO 2 SET function setting correct see page 13 If noise snow totally blocks out the picture check the following Have the TV and aerial been connected properly Has the aeri...

Page 43: ...meter Sound multiplex systems A2 or NICAM B G I DK Design and specifications subject to change without notice Broadcasting systems Area Country or Region System Colour Sound Bahrain Kuwait Oman Qatar United Arab Emirates Yemen etc PAL B G Indonesia Malaysia Singapore Thailand India etc China Vietnam etc PAL D K Hong Kong etc PAL I Islamic Republic of Iran Lebanon Saudi Arabia etc SECAM B G Philipp...

Page 44: ... the AC outlet 5 5 Initial setting 6 Basic operation 7 Remote control buttons and functions 8 ECO SENSOR button 8 PICTURE MODE button 8 COLOUR SYSTEM button 8 SOUND SYSTEM button 8 MUTING button 8 DISPLAY button 9 OFF TIMER button 9 CHANNEL SCAN button 9 RETURN button 9 Viewing teletext programmes 10 11 Using the TV s menus 12 Basic operation 12 INPUT 13 PICTURE TILT 13 VNR 13 COMPRESS 16 9 13 AUT...

Page 45: ...en installing this TV leave spaces for ventilation around the TV more than the minimum distances shown in the diagram Do not allow objects or liquid into the cabinet openings In the event of a fault unplug the TV and call a service technician Do not attempt to repair it by yourself or remove the rear cover The surface of the TV screen is easily damaged Be very careful with it when handling the TV ...

Page 46: ...eries Notes Use AA R6 UM 3 dry cell batteries If the remote control does not work properly fit new batteries The supplied batteries are for testing not regular use RM C355 REMOTE CONTROL UNIT TEXT DISPLAY MENU POWER CHANNEL VOLUME SYSTEM COLOUR REVEAL HOLD INDEX STORE MODE SIZE SUBPAGE CANCEL OFF TIMER TV VIDEO PICTURE MODE CHANNEL SCAN TV TEXT ECO SENSOR SOUND MUTING RETURN 1 2 3 4 5 6 7 8 0 9 ...

Page 47: ...e TV use the L MONO jack If you connect the VCR to the TV only with an aerial cable you should preset the video channel from the VCR to the AV channel channel number 0 on this TV See MANUAL CH PRESET on page 17 and preset it manually VIDEO 1 INPUT OUTPUT COMPONENT VIDEO 2 INPUT R R R CR VIDEO 1 INPUT OUTPUT COMPONENT VIDEO 2 INPUT V R MONO L V Y V R L R MONO L CB CR To RF output To video output VC...

Page 48: ...ideo signals Also it cannot output any signals when the TV is turned off Connect components outputting a component signal Y CB CR signal such as a DVD player to the VIDEO 2 terminal and set VIDEO 2 SET function to COMPONENT See page 15 The following illustrations are for the AV 2908TEE Your TV s front and rear pannels may not look exactly like the illustrations L MONO V R IN VIDEO 3 Headphones Cam...

Page 49: ...functions to perform the ini tial settings For details see pages 16 and 18 2 Press the MENU M buttons to select language 3 Press the MENU t buttons to select AUTO CH PRESET 4 Press the MENU M buttons to start the AUTO CH PRESET function ON SEARCH is displayed on the screen When all the TV channels that can be received on your TV have been preset the display goes out and the AUTO CH PRESET function...

Page 50: ...has been set to YES See page 18 Press the Number buttons to enter the channel number If you want to enter a two digit number press the button to select the two digit mode then enter the channel num ber 3 Press the VOLUME M button to adjust the sound 4 To turn your TV off press the POWER button We recommend that you press the Main power button on the TV to turn the main power off if you do not plan...

Page 51: ...ghtens contrast and sharpness STANDARD Standardizes picture adjustments SOFT Softens contrast and sharpness Pressing this button returns all the picture set tings in MENU 4 to their default settings COLOUR SYSTEM button If the picture is not clear or no colour appears change the current colour system to another colour system Press this button to select the colour system AUTO PAL SECAM NTSC3 58 NTS...

Page 52: ...n the screen Press this button To turn the display off press this button again When selecting a VIDEO mode with no signal indication of the VIDEO mode becomes fixed on the screen OFF TIMER button You can set the TV to automatically turn off after a set time Press this button to select the period of time You can set the period of time to a maximum of 120 minutes in 10 minute increments 1 minute bef...

Page 53: ...EXT button If you have trouble receiving teletext broad casts consult your local dealer or the tele text station Using the List Mode You can store the numbers of your favourite teletext pages in the List mode and call them up quickly using the coloured buttons To store the page numbers 1 Press the MODE button to engage the List mode The stored page numbers are displayed at the bottom of the screen...

Page 54: ...t page its page number appears in the upper left of the screen 3 Press the CANCEL button to view the teletext page Pressing the CANCEL button cannot change the teletext mode to the TV mode INDEX You can return to the index page instantly Press the INDEX button In the List mode Returns to the page number displayed in the lower left area of the screen SUBPAGE Some teletext pages include sub pages th...

Page 55: ...menus This TV has a number of functions you can operate using the menus To use all your TV s functions fully you need to understand how to use the menus 4 Press the MENU M buttons to change function settings Example MENU 2 AUTO SHUTOFF OFF CHILD LOCK OFF BLUE BACK ON VIDEO 2 SET COMPONENT SELECT BY EXIT BY OPERATE BY D I SPLA Y MENU 2 AUTO SHUTOFF ON CHILD LOCK OFF BLUE BACK ON VIDEO 2 SET COMPONE...

Page 56: ...N PICTURE TILT 00 SELECT BY EXIT BY OPERATE BY D I SPLA Y 2 Press MENU M to select ON To cancel the COMPRESS 16 9 function select OFF INPUT You can view images from VCRs or other devices connected to your TV 1 Press MENU T to display the MENU 1 menu then select INPUT MENU 1 INPUT TV VNR ON COMPRESS 16 9 ON PICTURE TILT 00 SELECT BY EXIT BY OPERATE BY D I SPLA Y 2 Press MENU M to select VIDEO 1 VID...

Page 57: ... the TV without parental consent 1 Press MENU T to display the MENU 2 menu then select CHILD LOCK MENU 2 AUTO SHUTOFF ON CHILD LOCK ON BLUE BACK ON VIDEO 2 SET COMPONENT SELECT BY EXIT BY OPERATE BY D I SPLA Y 2 Press MENU M to select ON To cancel the CHILD LOCK function select OFF The CHILD LOCK function is canceled when you turn the TV s main power off BLUE BACK You can mute the sound and change...

Page 58: ...signals is input Press the MENU m buttons to select COMPONENT Picture Adjustments You can adjust the picture as you like 1 Press MENU T to display the MENU 4 menu MENU 4 TINT COLOUR BRIGHT CONT SHARP SELECT BY EXIT BY OPERATE BY D I SPLA Y 2 Press MENU T to select an item and press MENU M to adjust it TINT Reddish Greenish COLOUR Lighter Deeper BRIGHT Darker Brighter CONT Lower Higher SHARP Softer...

Page 59: ... can be set separately For example you can set it to be off in TV mode and on in VIDEO mode If you set the AI VOLUME func tion while viewing a TV channel the setting is registered as the setting for TV mode If you set the AI VOLUME function while viewing images from a VIDEO terminal the setting is registered as the setting for VIDEO mode AUTO CH PRESET You can automatically preset all TV channels ...

Page 60: ...lected channel number If the TV channel you want to preset is not displayed repeat step 4 until the TV finds the TV channel you want to preset To stop the MANUAL CH PRESET function press any button other than the VOLUME m button If the picture is not clear Fine tune the TV channel 1 Press MENU t to select FINE MANUAL FINE SKIP NO SOUND SYSTEM B G EXIT SELECT BY PR 1 VL PROGRAM BY EXIT BY FINE BY V...

Page 61: ...SOUND SYSTEM B G EXIT SELECT BY PR 1 VL PROGRAM BY EXIT BY YES NO BY VOL D I SPLA Y 4 Press MENU M to select the channel you want to skip 5 Press VOLUME M to select YES The channel is set to be skipped To cancel the SKIP function select NO 6 Repeat steps 4 and 5 if you want to set another channel to skip LANGUAGE You can select the language for the on screen display 1 Press MENU T to display the M...

Page 62: ...R lamp 8 Main POWER button 7 8 3 2 1 6 4 5 L MONO V R IN VIDEO 3 1 VIDEO 1 INPUT terminal 2 COMPONENT VIDEO 2 INPUT terminal 3 OUTPUT terminal 4 Aerial socket 4 3 2 1 VIDEO 1 INPUT OUTPUT COMPONENT VIDEO 2 INPUT V MONO L V Y V L MONO L CB R R R CR 1 Headphone jack 2 VIDEO 3 terminal 3 MENU button 4 CHANNEL m buttons 1 2 3 4 5 7 8 ...

Page 63: ...f the TV has one See page 7 If the TV has no TV VIDEO button select the VIDEO mode with the INPUT function in MENU 1 Operating menus You can operate functions in menus using the front control buttons on the TV 1 Press MENU y to display a menu 2 Press MENU y repeatedly to display the menu you want to use 3 Press MENU y to select the desired function or item 4 Press MENU M or VOLUME M to carry out t...

Page 64: ...aerial s direction or replace it with an aerial with better directionality When a white and bright still image such as a white dress is displayed on the screen the white part may look as if it is coloured When the image disappears from the screen the unnatural colours will also disappear The picture is tilted AV 2908TEE and AV 3408TEE only A picture may be tilted due to the influence of the earth ...

Page 65: ...r Teletext system FLOF Fastext WST World Standard Text Design and specifications subject to change without notice Broadcasting systems Area Country or Region System Colour Sound Bahrain Kuwait Oman Qatar United Arab Emirates Yemen etc PAL B G Indonesia Malaysia Singapore Thailand India etc East China Vietnam etc PAL D K Hong Kong etc PAL I Islamic Republic of Iran Lebanon Saudi Arabia etc SECAM B ...

Page 66: ......

Reviews: