Setting the time and date
When receiving a DAB+ or FM station in sufficient quality, the time is set automatically. Depending
on the reception strength, this process takes some time. If no corresponding station is available, you
can also set the time manually.
1. Turn on the radio and press the
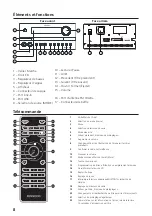
<CLOCK>
button on the remote control.
2. Then use
<TRACK SKIP FORWARD>
or
<TRACK SKIP BACKWARD>
to select hours, minutes,
day, month and year, and press
<OK>
button to confirm each.
3. When
“SAVED”
appears on the display, the time and date have been saved.
Setting the sleep timer
The sleep timer is used to automatically turn off the radio after a preset period of time. To set it,
please proceed as follows:
1. Turn on the radio and press the
<SLEEP>
button on the remote control.
2. Press the button repeatedly to set the power off time as follows:
“OFF, 15, 30, 45, 60, 90 minutes”
.
An active sleep timer is indicated by
“SLEEP”
on the bottom line of the display.
With
“SLEEP OFF”
an active timer is switched off.
3. By pressing the
<SLEEP>
key briefly, the remaining running time of the timer is displayed.
Setting the alarm clock
With this device, 2 different alarm times can be set. These alarm times can be programmed for the
following time blocks:
“Daily” / “Once” / “Weekends” / “Weekdays”
.
To set the alarm time, please proceed as follows:
1. Turn on the radio and press
<ALARM>
button on the remote control.
2.
“ALARM 1”
will be displayed. You can now set up the alarm time 1 or press the buttons.
<TRACK SKIP FORWARD>
or
<TRACK SKIP BACKWARD>
to switch to alarm time 2
(
“ALARM 2”
).
3. After confirming with
<OK>
key, please do the following steps:
-
“ON TIME”
: setting hours and minutes, confirm the selection each time.
-
“DURATION”
: setting the alarm duration in minutes (
“15, 30, 45, 60, 90”
).
-
“SOURCE”
: Then select
DAB, FM, CD, USB or BUZZER
as the source and confirm.
-
“DEFAULT”
or select another memory location and confirm. With
“DEFAULT”
, the currently set
station is used. This menu item only appears if the source
DAB
or
FM
has been selected.
- In the next menu, select and confirm the frequency with
“DAILY” / “ONCE” / “WEEKENDS” /
“WEEKDAYS”
and confirm. If set to
“ONCE”
, please enter the desired date.
- Then select and confirm the wakeup volume with
<VOL+>
and
<VOL->
buttons.
- Select
“ALARM ON”
or
“ALARM OFF”
and confirm.
The alarm time is now stored and
“TIMER”
appears in standby at the bottom right of the display.
To set the 2nd alarm time, proceed in the same way. To delete a set alarm, select
“ALARM OFF”
in
the last step of the setting, or press and hold the
<ALARM>
key for 2 seconds. The alarm clock will
turn on at the specified time for the set duration, with
“TIMER”
flashing on the display.
When the alarm is active, the alarm signal can be interrupted for 9 minutes by pressing the
<OK>
key.
17

