9
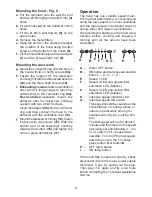
Mounting the hood - Fig. 6
a. Put the template onto the wall (1) and
drill two Ø12mm (2) and two Ø 8 mm (3)
holes.
b. Fit two hooks (4) on the drilled Ø 12mm
holes.
c. Fit two Ø 8mm wall dowels (5) on the
upper holes.
d. Remove the metal filters
e. Hang the hood on the hooks and adjust
the position of the hood using the two
screws on the bottom of the hooks (6).
f. Fix the hood definitively with two washers
(7) and two screws 5x45 mm (8).
Mounting the duct work
g. Mount the connector ring onto the hole in
the hood with two 3,5x9,5 screws (9a).
h. Fasten the support for the telescopic
chimney (11) with the three screw anchors
(10) and the three 5x45 screws (12).
i. Exhausting version: fasten a ventilation
duct, which is long enough to reach the
outside (13), to the connector ring (9a).
Recirculation version: mount the
deflector onto the telescopic chimney
support with two 2,9x9,5 screws.
Insert the adaptor (9b) into the connector
ring and then connect the hood to the
deflector with the ventilation duct (13).
j. Mount the telescopic chimney (14), fasten
it above with two screws (15), slide the
bottom part of the telescopic chimney
towards the bottom (16) and fasten the
hood in place definitively (17).
Operation
The hood has one variable speed motor.
For the best performance, we recommend
using the low speeds in normal conditions
and the high speeds in particular cases of
strong odour and vapour concentration.
We recommend starting up the hood a few
minutes before cooking and keeping it
running until all the odours have been
eliminated.
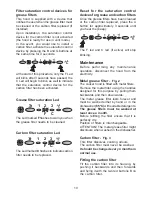
A -
Motor OFF button
B -
ON button and motor speed selection
button 1 - 2 - 3 - 1 - 2 - . . . .
E -
Speed 1 LED
F -
Speed 2 LED and grease filter
saturation LED (flashes)
C -
Speed 3 LED and carbon filter
saturation LED (flashes)
D -
Intensive speed indicator LED
G -
Intensive speed ON switch
This speed should be used when the
concentration of cooking fumes or
odours is particularly strong (for
example when frying, cooking fish
etc.).
The fast speed will run for about 5
minutes and then return to the speed
previously set automatically (1, 2 or
3), or switch off if no speed was
selected. To turn off the fast speed,
before the end of the 5 minutes,
press button A or button B.
H -
OFF lamp button
I
-
ON lamp button
If the hood fails to operate correctly, briefly
disconnect it from the mains power supply
for almost 5 sec. by pulling out the plug.
Then plug it in again and try once more
before contacting the Technical Assistance
Service.
B
E
F
C
D G
A
H
I
O
O
1
2
3
I
F
C


