25
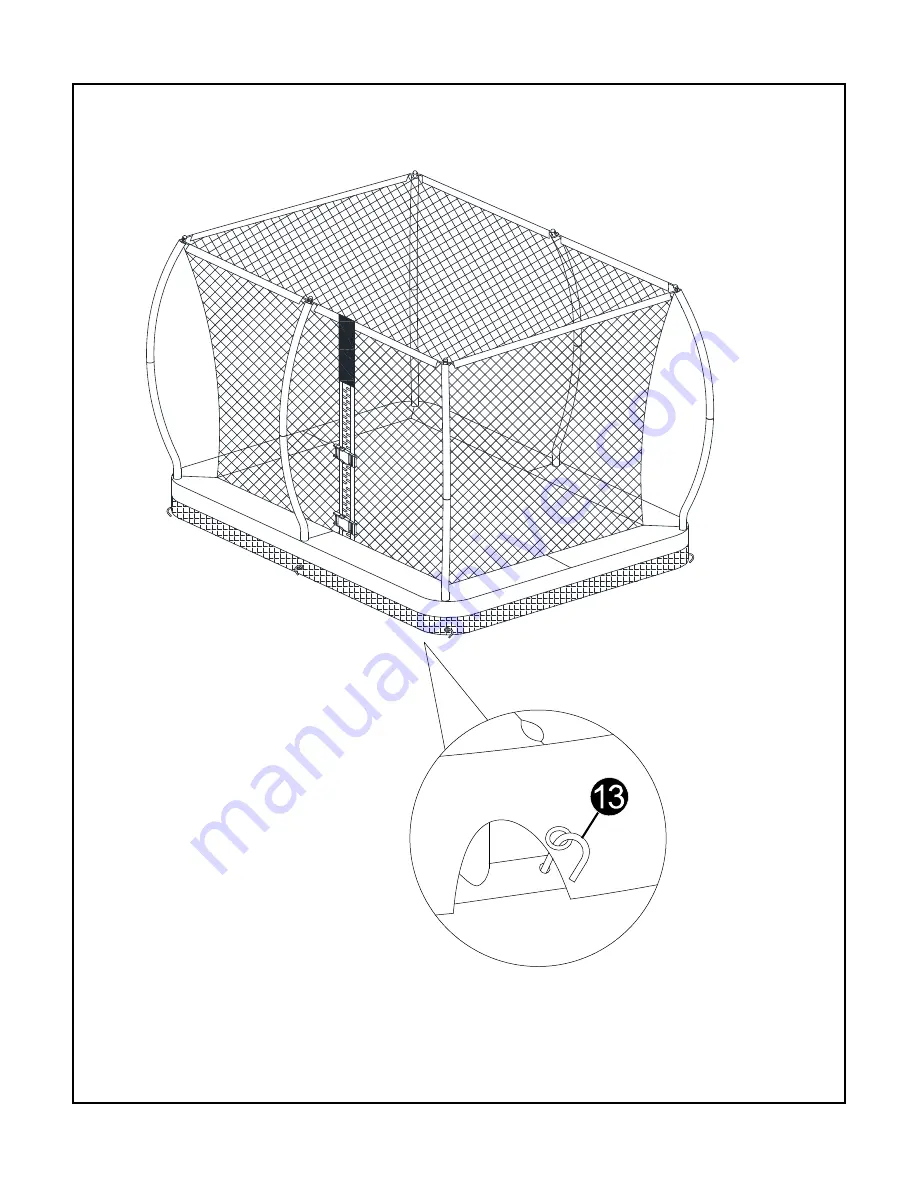
STEP 13
Insert Anchor Set (# 13) to holes in Frame Pad and Leg Base to fix the trampoline.
Page 1: ...NDERSTAND THE INSTRUCTIONS IN THIS MANUAL BEFORE ASSEMBLING AND USING THIS TRAMPOLINE SAVE THIS MANUAL FOR FUTURE REFERENCE MAXIMUM WEIGHT OF THE USER SHALL NOT EXCEED 220LBS 100KG DO NOT ALLOW MORE T...
Page 2: ...s fences and other play areas Maintain a clear space on all sides of the trampoline Do not allow children to play or jump on the trampoline when it s windy or during tornado season Wind can lift up th...
Page 3: ...ecome dislodged during play Check all coverings for bolts and sharp edges and replace them if necessary If self locking nuts are used it should be noted that these are only suitable for one assembly a...
Page 4: ...use trampoline in gusty or severe wind Person in charge and responsible for use of the trampoline shall make users aware of practice specified on this manual Person in charge shall be a qualified adu...
Page 5: ...and Pad Enclosure net and pad are prone to wear and tear like tires on a car Gradual deterioration of the material will occur the speed of which will depend on the level of exposure to UV rays airbor...
Page 6: ...f you are just beginning you may want to wear long sleeve shirts and pants to protect against scrapes and abrasions until you master correct landing positions and form Do not wear hard sole shoes such...
Page 7: ...ng how to jump on a trampoline If you do you will increase the risk of getting injured by landing on the frame springs or off the trampoline completely because you might lose control of your jump A co...
Page 8: ...disassembled to prevent unauthorized use or covered with a heavy tarp that can be locked or secured with lock or chains The supervisor is also responsible to ensure that the safety placard is placed o...
Page 9: ...uctions A complete discussion and demonstration of body mechanics and trampoline guidelines should occur between the supervisor and student as well THE BASIC BOUNCE KNEE BOUNCE SEAT BOUNCE 1 Start fro...
Page 10: ...ble the product PRIOR TO ASSEMBLING Please refer to next page for parts descriptions and numbers The assembly steps use these descriptions and numbers as reference for your convenience Make sure that...
Page 11: ...10 Working Drawing Please refer to the following figure to dig a pit Long Side View Short Side View...
Page 12: ...il with Leg Sockets A 2 4 Top Rail with Leg Sockets B 2 5 Top Rail with Leg Sockets C 2 6 Top Rail with Leg Sockets D 2 7 Leg Base A 2 8 Leg Base B 2 9 Galvanized Springs 58 10 Large Cap used on Leg B...
Page 13: ...ith Foam 6 C Plastic Cap 6 D Small Spring Lock Washer 6 E Self Locking Screw 18 F Enclosure Safety Instruction Placard 1 G Cord 6 H Enclosure Netting 1 I Wrench 1 J Cable Wire Sets 1 TOOLS REQUIRED FO...
Page 14: ...ine frame 2 Top Rail with Leg Sockets A 3 2 Top Rail with Leg Sockets B 4 2 Top Rail with Leg Sockets C 5 2 Top Rail with Leg Sockets D 6 2 Leg Base A 7 2 Leg Base B 8 Lay out all the parts on dry fla...
Page 15: ...Top Rail with Leg Sockets B 4 and Top Rail with Leg Sockets C 5 as shown Secure the Leg Base B 8 to the ASSEMBLED Top Rails with Leg Sockets by using Self Locking Screw 12 Small Spring Lock washer 11...
Page 16: ...Top Rail with Leg Sockets A 3 and Top Rail with Leg Sockets D 6 as shown Secure the Leg Base A 7 to the ASSEMBLED Top Rails with Leg Sockets by using Self Locking Screw 12 Small Spring Lock washer 11...
Page 17: ...16 STEP 4 Insert Large Cap 10 to Leg Base...
Page 18: ...k one end of the Spring 9 into the Triangle Ring on the Mat 1 Holding the Spring Loading Tool 15 underhand pull the other end of the Spring and lock it into the hole on the frame as shown in STEP 5 Hi...
Page 19: ...e fully covered Next line up the elastic straps to the Top Rail and wrap First tie a knot and then a one sided bow as shown in STEP 6 Finally wrap the inner elastic straps around the triangle ring and...
Page 20: ...Trampoline Enclosure Assembly STEP 7 Insert Lower Frame Tube with Foam B to holes in Top Rail with Leg Sockets and secure them by using Self Locking Screw E Small spring Lock washer D as shown in STEP...
Page 21: ...20 STEP 8 list the cable wires as below There are 10 Cable Wires J needed to form the enclosure top frame 4 STYLE A 6 STYLE B Thread Nut STYLE A STYLE B STYLE B 10FT SIDE 7 5FT SIDE...
Page 22: ...he Cable Wires and securely tighten using the Wrench I Please ensure that the cable wires are securely fastened together using the Wrench Failing to do so may increase the chance of injury due to the...
Page 23: ...ed cable wires into the sleeves of the netting as shown below Make sure the zipper door of the enclosure netting is positioned on the side where you intend to enter the trampoline IMPORTANT Slowly gui...
Page 24: ...y Allen Wrench 14 and then attach the assembled Plastic Cap C and Upper Frame Tube with Foam A to the Cable Wire as shown in STEP 11 Repeat in the same manner for all of the plastic caps and frame tub...
Page 25: ...24 STEP 12 Connect the Upper Frame Tube with Foam A to the Lower Frame Tube with Foam B by using Self Locking Screw E as shown in STEP 12...
Page 26: ...25 STEP 13 Insert Anchor Set 13 to holes in Frame Pad and Leg Base to fix the trampoline...
Page 27: ...STEP 14 Secure the trampoline netting to the trampoline frame using the Cord G Lift up the frame pad and tie one end of the cord to any one of the triangle rings on the trampoline mat as shown in STEP...
Page 28: ...ure Netting H and secure the entrance by connecting the Buckles as shown in STEP 15 Hanging Trampoline Safety Instruction Placard 16 and Enclosure Safety Instruction Placard F Disassembly of the Tramp...
Page 29: ...ing parts A number of conditions could arise that may increase your chances of getting injured Please be aware of Punctures frays tears or holes worn in the bed or frame padding Missing improperly pos...
Page 30: ...Protect it against unauthorized use If a trampoline ladder is used the supervisor should remove it from the trampoline when leaving the area to prevent unsupervised access by children under 6 years o...
Page 31: ...ould be used Do not just secure the legs of the trampoline to the ground because they can pull out of the frame sockets For further information or additional instructional materials on skill training...