background image

B

Dear Customer!

The assembly of your new greenhouse requires no 

technical knowledge. However, it is important that 

the assembly instructions are followed strict-ly. The 

assembly instruction is a combination of text and 

illustrations. The profiles are packed in separate 

numbered packs corresponding to the order in the 

assembly instruction. Erect one pack at a time. All 

nuts, bolts and fittings are contained in a Box.  

Each pack is specified in separate lists of 

components. 

Each pack is specified in separate lists of 

components. 

All detailed illustrations are marked with symbols:

seen from inside          seen from outside.

Precautions.

• 

Assembly must only be carried out in dry and 

calm weather.

• 

Always use working gloves while glazing. 

Greenhouse glass has sharp edges, especially 

if the glass breaks.

• 

Assistants and especially children must be 

warned that broken glass is an element of 

danger. Pick up broken glass at once and 

remove it with care.

• 

We recommend to use protective glasses 

while fixing the spring wire clips.

• 

Place the ladder on a level support.

• 

It is essential to have an assistant.

References

The column marked              indicates the page(s) on 

which the component is used.

Page 13: 

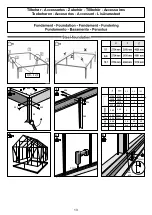
Foundation

No base is included with this product. However, an 

original base is available separately. This base is easy 

to construct and will guarantee you a stable base for 

your greenhouse. 

If you construct your own base, the specified 

measurements must be external measurements.

The holes must be dug out to below the frost line 

(800 mm). Place the assembled base with anchor 

legs over the holes so the anchor legs fit into the 

holes; it takes about 75 litres of concrete to fill up 

the holes.

Make sure the base is completely level and square. 

To square the base, make sure the two diagonal 

measurements are identical.

The width of the front and back gables must also be 

identical.

Tools

The mounting of the greenhouse requires the tools 

shown on page 12.

Page 13:

(Fastening to the base).

When constructing your own base you have to drill 

holes (7 mm) in the ground frame between all the 

vertical frames, the greenhouse is then fastened to 

the base with screws (A). 

Using an original base the greenhouse is fastened to 

each vertical bar as shown on drawing B.

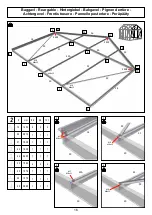
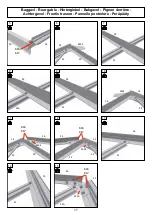
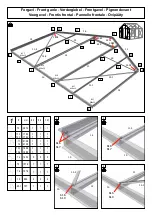
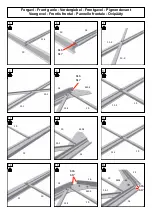
Page 14-21:

Place the components as shown on the illustration 

and assemble in the order shown in the pictures. Do 

not tighten the nuts completely until the front gable 

construction has been assembled.

Page 22-25:

For an easier assembly we recommend that you 

soap the screws for the doors  /windows.

Fitting of glass/polycarbonate

Important before glazing! 

Make sure that gables and sides are level and 

square, and that door(s) and window(s) are 

functioning perfectly. 

Best order of assembly:

1) Windows - 2) Roof - 3) Doors - 4) Gables - 

5) Sides

Page 27-29:

Glazing (illustration 1 to 8)

Degrease the sheets and frames with spirit.

Start glazing from below, one glass at a time. 

Apply a 3 mm silicone line on the vertical frames 

where indicated (dotted lines on the illustration). 

(A 3 mm line of silicone is sufficient to obtain 

maximum attachment). If you do use more than 

recommended, you can buy extra tubes. 

Spring wire clips and glassholders are to be fitted as 

shown.

X = Spring wire clips, > = Glassholders

In case of broken glass carefully pull it outwards and 

loosen the silicone by means of a sharp craft knife.

Clean the profile completely before inserting a new 

pane of glass.

Page 29-30:

Mounting of polycarbonate 

Illustration 1 shows the 3 types of plastic mouldings. 

The illustrations at page 31 show where to mount 

them. The type indication states the length in mm. 

A possible adjustment is made by means of a fine-

tooth saw. 

NB! To reduce the formation of algae the 

polycarbonate sheets must not come into contact 

with the ground. Rest them on a piece of cardboard.

A-lists are mounted as shown on page 31. Put the 

sheet into the bottom list, bend the sheet slightly 

outwards and put it in the top list.

M-lists are mounted as shown on page 31. Place the 

upper part of the list under the alu. profile in the 

whole length of the sheet and hereafter click on the 

list from above.

Sealing of the polycarbonate sheets

The sheets may be sealed against insects. Close the 

top end off with alu-tape or silicone. The bottom 

only with  airstrip tape to let condensation out 

(available at your local dealer).

Now your greenhouse is completely assembled. 

However, please notice the following:

Maintenance

• 

Grease doors (hinges and lock or doortrack).

• 

Clean the gutter for leaves, etc.

• 

Adjustment of windows.

• 

Replacement of broken glass.

• 

Clean the greenhouse with disinfectant before 

and after the growing season.

Winter Protection

In areas with occurrence of snow we recommend 

the following winter protection:

• 

Support the roof ridge at the centre of the 

greenhouse.

• 

Remove greater snow loads from the roof.

• 

Take precautions against snow falling down 

from for instance a tree or a roof.

• 

Dismount the cylinders for the automatic 

window openers, if any (optional extras).

• 

Secure door(s) and window(s) preventing wind 

damage to the greenhouse.

Insurance

Please note that not all insurance companies 

cover greenhouses automatically. Please contact 

your insurance company to ensure an insurance 

coverage.

Guarantee

Juliana grants a guarantee of 12 years which covers 

replacement of faulty parts. The guarantee does 

not cover polycarbonate, glass, transport, assembly, 

freight etc. 

Juliana grants a guarantee of 2 years on painted 

parts, if any. Note that marks in the painting may 

occur due to suspension of the profiles. 

The guarantee is invalid if the greenhouse is not 

assembled according to these instructions.

Complaints

All our greenhouses are built to high standards of 

quality. However, should a complaint occur please 

contact your dealer at once. Remember to specify 

the defect by indicating the greenhouse model and 

number of the component and the quality control 

number.

May we congratulate you on your new Greenhouse

GB

USA

Summary of Contents for Junior 12,1

Page 1: ...Junior Junior 8 3 4 sek 9 9 5 sek 12 1 6 sek 27102020 ...

Page 2: ......

Page 3: ...7 29 Glasmontage tegning 1 til 8 Rengør plader og profiler med sprit Monter nedefra et glas af gangen Påfør en 3 mm silikonestreng på lodrette profiler markeret med en stiplet streg på tegningen 3 mm streng giver maksimal vedhæftning Anvendes mere end anbefalet kan De købe ekstra tuber Monter fjedre og glasholdere som vist X Fjeder Glasholder Evt knust glas vippes forsigtigt udad og silikonen løsn...

Page 4: ...ng from below one glass at a time Apply a 3 mm silicone line on the vertical frames where indicated dotted lines on the illustration A 3 mm line of silicone is sufficient to obtain maximum attachment If you do use more than recommended you can buy extra tubes Spring wire clips and glassholders are to be fitted as shown X Spring wire clips Glassholders In case of broken glass carefully pull it outw...

Page 5: ... Glasmontage Zeichnung 1 bis 8 Entfetten Sie die Platten und Profile mit spiritus Von unten montieren ein Glas nach dem andern Einen 3 mm Silikon Strang auf die senkrechten Profile auftragen mit einer strichpunktierten Linie auf der Zeichnung markiert Ein 3 mm Silikon Strang gibt maximale Oberflächenheftung Falls Sie mehr Silikon auftragen als von uns empfohlen können Sie extra Kartouschen nachkau...

Page 6: ...likonsträng på lodräta profiler markerade med en streckad linje på bilden 3 mm silikonsträng ger maximalt fäste Om det behövs mer silikon kan Ni köpa extra tuber Montera fjädrarna och glashållarna som bilden visar X Fjäder Glashållare Om ett glas går i sönder lutas det försiktigt utåt och silikonen lossnas med en skarp kniv Skrapa profilen helt ren från silikon innan det sätts i ett nytt glas Sida...

Page 7: ...ttre un trait de 3 mm de silicone sur des profils verticaux indiqués d une ligne ponctuée sur le dessin Un trait de 3 mm vous assure une fixation optimale En cas de manque vous pouvez acheter des tubes supplémentaires Le montage des ressorts et des fixations de verre se fait comme indiqué X ressort Du verre éventuellement cassé doit être démonté vers le dehors et le silicone être détaché avec un c...

Page 8: ... achtergevel 5 Zijkanten Blz 27 29 Glasmontage tekening 1 tot 8 Begin van onderen en monteer het glas een voor een Breng een 3 mm streep silicone aan op verticale profielen die met een gestippelde streep op de tekening aangeduid staan een streep van 3 mm biedt maximale aanhechting Als u meer dan de aanbevolen hoeveelheid gebruikt kunt u extra tubes kopen Monteer de veren en glashouders zoals aange...

Page 9: ... un cordón de silicona de 3 mm en los perfiles verticales marcados con una línea punteada en el dibujo Con un cordón de 3 mm obtendrá la mejor adherencia Si utiliza más de lo recomendado puede comprar tubos adicionales Monte los muelles y los soportes de cristal como queda indicado X muelle soporte de cristal Los cristales rotos deben sacarse cuidadosamente hacia afuera y la silicona puede soltars...

Page 10: ...annelli laterali Pagina 27 29 Montaggio delle lastre di vetro vedere i disegni da 1 a 8 Montare un vetro alla volta partendo dal basso Applicare un filo di silicone di 3 mm sui profili verticali contrassegnati da una linea tratteggiata nel disegno un filo di 3 mm assicura la massima adesione In caso di un uso di silicone superiore al dovuto è possibile acquistarne tubetti extra Montare le molle e ...

Page 11: ...ukut 2 Katto 3 Ovi 4 Päädyt 5 Sivut Sivut 27 29 Lasitus piirrokset 1 8 Lasitus aloitetaan alaosasta Laita piirroksessa katkoviivalla merkittyihin kohtiin profiileissa korkeintaan 3 mm yhtäjaksoinen vana silikonia Alaosaan ei tarvitse silikonia eikä räystäsprofiiliin Lasin kiinnittimet asennetaan ohjeessa merkittyihin paikkoihin seuraavasti X Alumiinihelat Lasinjouset Lasin rikkoontuessa poista var...

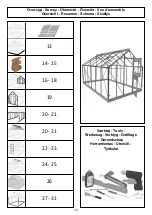
Page 12: ...urvey Übersicht Översikt Vue d ensemble Overzicht Resumen Schema Sisällys 12 13 14 15 16 18 19 20 21 26 22 23 24 25 27 31 Værktøj Tools Werkzeug Verktyg Outillage Gereedschap Herramientas Utensili Työkalut 20 21 ...

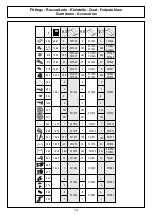
Page 13: ...horen Accesorios Accessori Lisävarusteet 13 7 mm A B 9 9 9 9 8 3 12 1 995 M6x10 16 16 16 4 6 6 2 2 2 2 2 2 4394 3676 2958 2734 16 20 20 M6x40 4 4 F00031 3x6 3x6 4x6 994 996 4394 3676 2958 2734 994 995 995 996 989 616 M6x15 610 F00031 989 989 345 996 9 9 12 1 ...

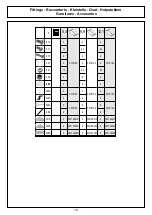
Page 14: ...4 2 26 27 F01842 F01842 F01842 2 2 661 8 8 8 2 2 2 337 2111 5M 3M 5M 3M 5M 3M F01872 F01872 F01872 290 1 1 1 F01874 F01874 F01874 16 35 689 1 1 1 F01876 F01876 F01876 16 35 343 150 150 150 F01877 F01877 F01877 16 35 346 20 20 20 F01878 F01878 F01878 16 35 344 360 420 360 F01879 F01879 F01879 F01880 16 35 633 22 22 22 F01881 F01881 F01881 16 35 469 1 1 1 F01882 F01882 F01882 16 35 430 414 4 2 F0188...

Page 15: ...018122 F018122 450 202S 205S 2 2 4 4 4 4 F018123 F018123 F018123 0050 682 4 8 4 8 4 8 F018124 F018124 F018124 221S 240S 208S 2 2 4 2 2 4 2 2 4 00310221S 00310221S 00310221S 00310240S 00310240S 00310240S 00310208S 00310208S 00310208S Fittings Raccorderie Kleinteile Osat Hulpstukken Garnitures Accesorios ...

Page 16: ...23 240S 240S 26 25 20 22 22A 29 221S 14 3 4 5 1 2 6 10 14 15 7 8 9 2 mm 8 3 9 9 12 1 14 20 21 22 24 23 29 26 1450 2672 1938 1938 2295 1562 2660 1576 2 1 1 1 1 2 1 1 2 1 1 1 1 2 1 1 2 1 1 1 1 2 1 1 25 1576 1 1 1 2 3 4 1 14 20 20 22A 11 12 13 20 23 21 20 22 23 610 M6x15 617 M6x11 610 M6x15 617 M6x11 610 M6x15 617 M6x11 610 M6x15 ...

Page 17: ...23 29 21 29 29 29 29 23 22A 22 14 240S 240S 240S 14 14 23 23 29 29 21 22 22A 26 26 26 25 25 25 221A 616 617 616 617 616 617 616 617 Baggavl Rear gable Hintergiebel Bakgavel Pignon derrière Achtergevel Frontis trasero Pannello posteriore Peräpääty ...

Page 18: ...8S 208S 3 4 5 1 2 6 9 12 20 18 19 21 10 11 14 13 7 8 1 mm 8 3 9 9 12 1 10 11 1 12 1 11 12 13 1 2672 1782 1782 2106 2106 1686 1 1 1 1 1 1 1 1 1 1 1 1 1 1 1 1 1 1 13 2 1686 1 1 1 2 3 4 1 14 10 10 11 2 10 13 2 12 13 1 11 10 15 16 17 14 1450 2 2 2 15 1576 1 1 1 16 1576 1 1 1 19 969 2 2 2 65 1 707 1 1 1 610 M6x15 617 M6x11 610 M6x15 617 M6x11 617 M6x11 616 617 616 617 616 610 616 610 ...

Page 19: ...n devant Voorgevel Frontis frontal Pannello frontale Ovipääty 5 6 7 10 9 8 11 12 13 16 15 14 14 13 2 11 2 11 1 13 1 240S 240S 16 15 10 11 1 12 19 19 14 10 11 1 13 2 19 11 2 13 1 19 240S 14 19 11 19 14 19 13 2 13 1 19 14 240S 616 617 616 617 616 617 616 617 ...

Page 20: ...Forgavl Front ganle Vordergiebel Frontgavel Pignon devant Voorgevel Frontis frontal Pannello frontale Ovipääty 17 18 19 21 20 11 2 11 1 16 15 11 12 65 1 221S 208S 208S 16 65 1 15 15 16 616 617 ...

Page 21: ...es Pannelli laterali Sivut 3 mm 8 3 9 9 12 1 30 31 32 33 2896 1450 2896 1613 2 6 2 4 8 4 10 4 2 3 4 1 32 33 31 2 1 3 4 30 31 31 31 31 33 33 30 31 31 31 32 32 33 30 3614 2 30 4332 2 32 3614 2 32 4332 2 617 M6x11 30 617 M6x11 617 M6x11 617 M6x11 617 M6x11 ...

Page 22: ...Tak Toit Dak Tejado Tetto Katto 5 mm 8 3 9 9 12 1 50 50 50 51 52 53 2896 3614 4332 1575 1729 250 1 6 4 3 1 8 4 4 1 10 4 5 51 52 2 1 3 4 5 4 5 4 2 1 2 1 2 1 2 1 3 3 3 3 5 6 7 9 8 50 53 51 Insert ekstra bolts for Windows ...

Page 23: ...3 6 5 4 7 8 9 240S 16 29 23 32 14 240S 16 29 23 32 14 20 30 14 33 50 16 22A 15 221S 50 16 52 22A 15 221S 50 51 51 51 52 32 31 33 32 51 31 50 51 51 53 616 617 9 Tag Roof Dach Tak Toit Dak Tejado Tetto Katto ...

Page 24: ... 12 1 600 912 1 1 1 2 3 4 1 1 2 3 4 630 635 630 600 605 620 625 640 691 650 0050 0050 0050 0050 5 6 7 8 630 620 625 630 691 635 640 625 633 4 2x13 630 600 0050 633 605 912 1 1 1 620 1012 1 1 1 625 1012 1 1 1 630 602 3 3 3 635 602 1 1 1 640 698 1 1 1 1005 3 5x16 ...

Page 25: ...r Tür Porte Deur Puerta Porta Ovi 5 6 7 8 11 12 11 12 640 689 625 635 635 640 689 625 635 640 689 625 12 633 0050 12 11 290 633 11 633 11 9 10 9 10 3 4mm 6mm 470 469 664 3 5x16 205 450 616 617 Lock 337 Skumliste ...

Page 26: ... 1 70 700 2 4 4 2 3 4 1 70 1 2 3 4 5 6 70 71 72 71 73 70 70 72 72 71 71 71 71 71 585 4 8 8 72 700 2 4 4 73 510 2 4 4 75 732 2 4 4 611 M5x8 611 M5x8 Vinduer Windows Fenster Fönster Fenêtres Ramen Ventanas Finestre Luukut ...

Page 27: ... Fenêtres Ramen Ventanas Finestre Luukut 5 6 7 8 11 11 9 10 8 9 10 73 70 72 71 71 72 73 72 71 75 73 50 407 407 629 450 202 629 615 M5x20 73 205 51 51 51 51 51 51 50 75 75 72 72 71 12 12 50 612 M5x20 611 M5x8 611 M5x8 480 661 75 618 616 ...

Page 28: ...2 3 4 14 14 14 30 32 7 8 3 9 9 12 1 2 3 4 1 431 414 414 430 430 430 14 14 14 14 32 32 32 6mm 6mm 431 2 2 2 616 617 616 617 Nedløb Downpipe Fallrohr Stuprör Tuyan de descente Goot Canalón Scarico Syöksytorvet ...

Page 29: ...Glas Glass Verre Cristales Vetro Lasit 344 X 82 X 82 X 82 X 82 X 82 X 82 X 82 X 82 X 82 X 82 X 82 X 82 X 1 0 2 0 m m 343 10 15 mm 1 2 3 4 5 8 7 6 3mm Acetone ...

Page 30: ... X X X X X X X X X X X X X X X Cn X X X Co Ca Co Ca Cc Cc Cp Cp X X Cn X X X X X X X X X X X X X Da Da Da X X X X X X X Da Da Db Db X 344 346 X m m 9x10 8 3 9x12 9 9 9x14 12 1 460x610 594x594 460x29 328 460x340 637 680x154 370 154 590x15 400 590x480 700x25 475 590x610 700x610 700x390 8 343 Ba 8 8 1 Bb1 1 1 1 Bb2 1 1 2 Bc 2 2 2 Bd 2 2 1 Be1 1 1 2 Cn 2 2 2 Cp 2 2 2 Cc 2 2 4 Co 4 4 36 Ca 44 52 8 Ck 1...

Page 31: ...Glas 9x10 8 3 9x12 9 9 9x14 12 1 460 X 1471 1771 2 2 2 B 2 2 2 460 X 1783 2083 A1 700 X 1470 1927 2 2 2 B1 2 2 2 590 X 1938 2323 D 700 X 1450 8 10 12 E 700 X 1578 6 6 8 F 700 X 985 2 4 4 X 700 X 610 2 4 4 Y1 594 X 594 1 1 1 Y2 594 X 694 1 1 1 C 680 X 1 1 1 156 377 156 M 1490 M 1490 M 1450 M 1450 M 1450 M 1450 M 1450 M 1950 M 1950 M 1950 M 1950 M 2350 M 2350 M 1 5 7 5 M 1 5 7 5 M 1 5 7 5 M 1 0 0 0 ...

Page 32: ... E F X A1l A1r B1l B1r U 8 5 0 U 8 5 0 U 5 9 0 U 5 9 0 U850 U850 U590 U590 M 1950 A684 A684 A684 A684 A684 A684 A684 A684 A684 A684 A684 A684 A684 A684 X X X X X X X X X X X X X X X X X X X X X X X X X X X X X X X X X X X X X X X X X X X X X X X X X X X X X X X X X X X X X X X X X X X X X X X X X X X X X X X X X X X X X X X X X X X X X X X X X X X X X X X X X X X X X X X X X X X X X X X X X X X X ...

Page 33: ...461 Bl 1 1 1 458 X 1773 2073 Br 1 1 1 458 X 2073 1773 A1l 700 X 1461 1919 1 1 1 A1r 1 1 1 700 X 1919 1461 B1l 1 1 1 588 X 1932 2317 B1r 1 1 1 588 X 2317 1932 D 702 X 1443 8 10 12 E 702 X 1570 6 6 8 F 702 X 975 2 4 4 X 702 X 608 2 4 4 Y1 595 X 590 1 1 1 Y2 595 X 690 1 1 1 C 682 X 1 1 1 150 375 150 A M 1 2 3 Y 596 X 513 Y3 596 X 688 Cl 590 X 9 395 Cr 590 X 395 9 344 X Silicone 31 ...

Page 34: ...706204401 Bd 460 x 340 637 989S 00500989S 13 2 10601686 12 32 11023614 620 10341012 02 A1r 0706204501 Be1 680 x 154 370 154 994 00500994 14 10161450 32 11024332 625 10341012 01 B1l 0706204001 Cn 590 x 15 400 995 00500995 15 10291576 112 33 10601613 629 00300629 B1r 0706204101 Cp 590 x 480 996 00500996 16 10291576 122 50 10172896 630 10350599 01 C 0706203600 Cc 700 x 25 475 638 00300638 19 10600969...

Page 35: ......

Page 36: ......
Reviews: