background image

EN

28

the appliance before use. Familiarise 
yourself with the controls on the 
appliance and how to use them. Learn 
how to stop the appliance quickly and 
disengage the drive.

•   Never allow children to use or go near the 

appliance. 

•   Keep children, onlookers and pets away 

from the work area.

•   Be careful to avoid slipping or falling when 

using the appliance.

PREPARATIONS

•   Carefully inspect the area where the 

appliance is to be used and remove any 
doormats, toys, wires or other foreign 
objects.

•   Wear suitable winter clothing. Wear 

non-slip shoes.

•   Do not attempt to clear snow on gravel 

surfaces. The appliance is only intended to 
be used on surfaces with solid and 
smooth paving.

•   Do not make any adjustments when the 

motor is running.

•   Wear safety glasses during use and when 

making adjustments and/or repairs.

USE

•  Do not use the appliance indoors.
•  Never put your hands or feet near, or 

under, rotating parts. Always keep at a 
safe distance from the ejector opening. 

•  Be careful when working on, or crossing 

entrances, roads, etc. Pay attention to 
traffic and hidden danger.

•   Switch off the motor immediately if you 

run into something. Carefully check the 
appliance and repair any damaged parts 
before using it again.

•   Switch off the motor immediately if the 

appliance starts vibrating abnormally. 
Identify the cause. Vibrations usually 
indicate a problem.

SAFETY INSTRUCTIONS

•   Only use approved spare parts and 

accessories for servicing. Replace 
damaged power cords immediately.

•   Keep onlookers, especially children, and 

pets at a safe distance.

•   Secure the extension cord so that it 

cannot come loose during the work.

•   Pull out the plug immediately if the power 

cord or the extension cord get damaged.

•   Be careful with the power cord. Do not 

pull the power cord to unplug the plug. 
Keep the power cord away from heat, oil 
and sharp edges.

•   Keep your hands and the rest of your body 

away from the moving parts. The safety 
devices must be fitted correctly and work 
properly.

•  Follow the instructions below if the 

appliance knocks against any foreign 
objects:


– Switch off the appliance.


–  Check the appliance for damage.


–  Repair any damage before restarting 

the appliance.

•   Maintain and take good care of the 

appliance. Follow the instructions when 
replacing parts and accessories. 
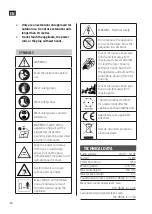
     WARNING!   

•  Improper use can result in a risk of 

death, amputation, or other serious 
personal injury. 

•  The appliance can eject objects with 

great force, which can result in a risk of 
personal injury and/or material 
damage. 

•  Failure to follow all the instructions and 

safety instructions can result in a risk of 
serious personal injury and/or death.

TRAINING

•   Read all the instructions, safety 

instructions and all the warning labels on 

Summary of Contents for Meec tools 005876

Page 1: ...ave them for future reference Translation of the original instructions Viktig Les bruksanvisningen n ye f r bruk Ta vare p den for fremtidig bruk Oversettelse av original bruksanvisning Viktigt L s br...

Page 2: ...ego ze sklep w gdzie przy zakupie nowego sprz tu bezp atnie przyjmiemy stary tego samego rodzaju i w tej samej ilo ci Z zastrze eniem prawa do zmian W razie ewentualnych problem w skontaktuj si telefo...

Page 3: ...2 2015 EN 61000 3 2 2014 EN 61000 3 3 2013 Outdoor Noise Directive 2000 14 EC amended by 2005 88 EC RoHS Directive 2011 65 EU EN 50581 2012 Measured sound power level on an equipment representative fo...

Page 4: ...1 2 3 1 2 3 4 5 6 7 8 9 10 11 12 13 5 4...

Page 5: ...4 5 6 7 8 9...

Page 6: ...10 11 12 14 13 15...

Page 7: ...16 18 20 21 19 17...

Page 8: ...22 24 26 25 23...

Page 9: ...en transporteras f re rensning av rotorhus eller utkast samt f re reng ring inspektion justering eller reparation S KERHETSANVISNINGAR Anv nd endast godk nda reservdelar och tillbeh r vid service Byt...

Page 10: ...s kert driftskick F lj alla anvisningar och s kerhetsanvisningar samt anvisningar f r f rvaring etc Klisterm rken med s kerhetsinformation och anvisningar ska alltid vara rena och l sbara Byt ut dem o...

Page 11: ...a rotorhuset med h nderna St ng av apparaten och dra ut stickproppen innan rotorhuset rensas Risk f r sk rskada H ll h nder och f tter borta fr n r rliga delar Rotorn forts tter att rotera n gra sekun...

Page 12: ...ret monteras samman f r p det flyttbara handtaget ver mittdelen BILD 2 OBS Det g r inte att montera det justerbara handtaget efter att r ren monterats samman JUSTERBART HANDTAG 1 F r in det vre r ret...

Page 13: ...r relser f r att avl gsna det vre lagret Upp till 15 cm sn kan avl gsnas i varje passage G r flera passager f r att r ja bort all sn n H ll sladden borta fr n hinder sn skruven och andra vassa f rem...

Page 14: ...aka den v nstra sidok pan och dra t de fem skruvarna 10 S tt tillbaka den h gra sidok pan och dra t de fem skruvarna BYTE AV SKRAPBLAD VARNING St ng av sn skyffeln och dra ut stickproppen innan arbete...

Page 15: ...til alle bevegelige deler har stanset helt f r du forlater kj restillingen f r maskinen transporteres f r rensing av SIKKERHETSANVISNINGER Bruk bare godkjente reservedeler og godkjent tilbeh r ved ser...

Page 16: ...trammet samt at maskinen er i god driftsmessig stand F lg alle anvisninger og sikkerhetsanvisninger samt anvisninger for oppbevaring og s videre Klistremerkene med sikkerhetsinformasjon og anvisninger...

Page 17: ...ter unna bevegelige deler Rotoren fortsetter dreie i noen sekunder etter at maskinen er sl tt av Godkjent i henhold til gjeldende direktiv Uttjent produkt skal sorteres som elektrisk avfall TEKNISKE D...

Page 18: ...et vre r ret inn i det nedre r ret og plasser skruehullene parallelt med hverandre BILDE 3 2 Stikk l seskruen gjennom hullet i det vre og nedre r ret og l s med mutteren BILDE 4 BILDE 5 VIKTIG L seskr...

Page 19: ...e all sn en Hold ledningen unna hindre sn skruen og andre skarpe gjenstander eller kanter Ikke rykk i ledningen og unng tr kke p eller kj re over den Sl av sn freseren og trekk ut st pselet etter hver...

Page 20: ...t h yre sidedekselet p plass igjen og stram de fem skruene BYTTE AV SKRAPESKJ R ADVARSEL Sl av sn freseren og trekk ut st pselet f r arbeidet starter 1 Snu sn freseren opp ned L sne de fire skruene so...

Page 21: ...acy na podjazdach drogach itp oraz podczas przeje d ania przez nie Uwa aj na ruch drogowy i ukryte zagro enia ZASADY BEZPIECZE STWA Naprawiaj c narz dzie korzystaj wy cznie z zatwierdzonych cz ci i ak...

Page 22: ...IRNIKA Podczas czyszczenia obudowy wirnika przestrze gaj poni szych wskaz wek Wy cz urz dzenie i wyjmij wtyk z gniazda Odczekaj 10 sekund aby si upewni e wirnik ca kowicie si zatrzyma Do czyszczenia o...

Page 23: ...miany akcesori w lub innej czynno ci konserwacyjnej wy cz urz dzenie i wyjmij wtyk z gniazda Chro przew d przed wysok temperatur smarami i ostrymi kraw dziami W razie uszkodzenia lub utkni cia przewod...

Page 24: ...magane do ochrony u ytkownika nale y zidentyfikowa na podstawie oceny nara enia na oddzia ywanie szkodliwych czynnik w w warunkach rzeczywistych bior c pod uwag wszystkie etapy cyklu roboczego jak r w...

Page 25: ...rzez wirnik i wyrzucone w powietrze WSKAZ WKI Uruchom szufl i przechyl j tak aby zgarniarka opiera a si na ziemi Przesuwaj j do przodu Poruszaj si z pr dko ci umo liwiaj c ca kowite od nie enie powier...

Page 26: ...ruby kt re przytrzymuj obudow wirnika i od cz g rn cz os ony od dolnej RYS 20 4 Odkr cztery ruby i dwie nakr tki z mo cowania silnika RYS 21 5 Wyjmij mocowanie silnika z obudowy wirnika RYS 22 6 Zdejm...

Page 27: ...wykwalifi kowany personel 3 Sprawd dok adnie przed u acz pod k tem ewentualnych uszkodze i lub zu ycia Wymie przed u acz niezw ocznie je li zauwa ysz oznaki zu ycia lub uszkodzenia 4 Przechowuj szufl...

Page 28: ...f the appliance starts vibrating abnormally Identify the cause Vibrations usually indicate a problem SAFETY INSTRUCTIONS Only use approved spare parts and accessories for servicing Replace damaged pow...

Page 29: ...snow screw there is a risk of serious personal injury MAINTENANCE AND STORAGE Check at regular intervals that all unions are intact and properly tightened and that the appliance is in safe working con...

Page 30: ...when using the appliance WARNING Electrical safety Do not expose the appliance to rain or moisture Store the appliance in a dry place Risk of cut injuries Keep your hands and feet away from moving par...

Page 31: ...ver 3 Power cord 4 Top tube 5 Bottom tube 6 Motor casing 7 Scraper blade 8 Snow screw 9 Locking screw 10 Adjusting screw bottom handle 11 Bottom handle 12 Power switch 13 Start inhibitor FIG 1 ASSEMBL...

Page 32: ...he left or right by putting the snow shovel at a slight angle For the best results throw the snow downwind and run with overlapping movements If the snow is deep hold the top and bottom of the handle...

Page 33: ...replace the motor bracket and screw tight 8 Fit the top and bottom panels and tighten all the screws 9 Replace the left side panel and tighten the five screws 10 Replace the right side panel and tight...

Reviews: