viii
CONTENTS
SPECIFICATIONS ........................................................................................................................ 1
1.SETTING UP THE SEWING MACHINE ................................................................................... 2
2.INSTALLING THE THREAD STAND ........................................................................................ 2
3.INSTALLING THE BELT COVER AND THE BOBBIN WINDER ............................................. 3
4.LUBRICATION .......................................................................................................................... 3
5.ATTACHING THE NEEDLE ...................................................................................................... 4
6.WINDING A BOBBIN ................................................................................................................ 4
7.THREADING THE BOBBIN CASE ........................................................................................... 5
8.INSTALLING THE TAKE-UP THREAD GUIDE ROD ............................................................... 5
9.THREAD THE MACHINE HEAD .............................................................................................. 6
10.ADJUSTING THE STITCH LENGTH ...................................................................................... 6
11.FORWARD/REVERSE SEAM RATIO ..................................................................................... 6
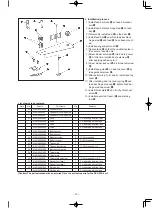
12.THREAD TENSION ................................................................................................................. 7
13.THREAD TAKE-UP SPRING .................................................................................................. 7
14.PRESSURES OF THE PRESSER FOOT AND WALKING FOOT ......................................... 7
15.HEIGHT OF THE FEED DOG (DSC-245,-4,-7) ...................................................................... 8
16.ADJUSTING THE WALKING FOOT AND THE PRESSER FOOT ........................................ 9
17.NEEDLE-TO-HOOKRELATIONSHIP ................................................................................... 10
18.AUXILIARY THREAD TENSION CONTROLLER (DSC-245-4,-7, DSC-245V-4,-7) ............ 10
19.ADJUSTING THE PRESSURE OF THE FIXED KNIFE (DSC-245-4,-7, DSC-245V-4,-7) ... 11
20.ONE-TOUCH TYPE REVERSE FEED STITCHING MECHANISM
(DSC-245-4,-7, DSC-245V-4,-7) ............................................................................................ 11
21.ADJUSTING THE THREAD TRIMMING CAM ..................................................................... 12
22.ADJUSTING THE CAM ROLLER ARM AND THE CAM ROLLER ARM PRESSER
(DSC-245-4,-7, DSC-245V-4,-7) ............................................................................................ 12
23.ADJUSTING MAX MOVING STROKE OF THE ROTARY KNIFE
(DSC-245-4,-7, DSC-245V-4,-7) ............................................................................................ 12
24.ADJUSTING THE OPERATING STROKE OF THE PICKER
(DSC-245-4,-7, DSC-245V-4,-7) ............................................................................................ 13
25.HOW TO REPLACE THE KNIVES (DSC-245-4,-7, DSC-245V-4,-7) ................................... 13
26.HOW TO CHANGE FROM ELLIPTICAL FEED TO HORIZONTAL FEED .......................... 14
27.HOW TO CHANGE FROM HORIZONTAL FEED TO ELLIPTICAL FEED .......................... 16
28.MOTOR PULLEY AND SEWING SPEED (DSC-245, DSC-245V) ....................................... 18
29.TROUBLES AND CORRECTIVE MEASURES .................................................................... 19
– 13 –
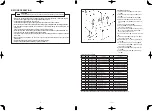
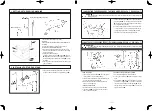
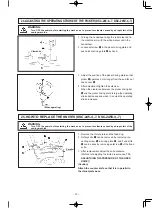
24.ADJUSTING THE OPERATING STROKE OF THE PICKER (DSC-245-4,-7, DSC-245V-4,-7)
25.HOW TO REPLACE THE KNIVES (DSC-245-4,-7, DSC-245V-4,-7)
1
.
Turning the handwheel, align the red marker dot in
the machine arm with the white marker dot in the
handwheel.
2
.
Loosen setscrew
❶
in the picker driving plate and
push picker driving plate
❷
by hand.
3.
Adjust the position of the picker driving plate so that
picker
❸
operates 2 mm longer from the end face of
hook cover
❹
.
4
.
After adjustment,tighten the setscrew.
○ When the clearance between the picker driving bar
❺
and the picker driving plate is large,the operating
stroke decreases,and when it is small,the operating
stroke increases.
1
.
Remove the throat plate and the feed dog.
2.
Rotary knife
❶
can be removed by removing con-
necting screw
❸
in driving plate
❷
, and fixed knife
❹
can be done by removing setscrew
❺
of the fixed
knife.
3.
After replacement,adjust the knife pressure.
(Method for adjusting the knife pressure,see
「
19.
ADJUSTUING THE PRESSURE OF THE FIXED
KNIFE
」
)
(Caution)
Attach the counter knife so that it is in parallel to
the throat plate base.
すき間
Clearance
(When operating)
WARNING :
Turn OFF the power before starting the work so as to prevent accidents caused by abrupt start of the
sewing machine.
WARNING :
Turn OFF the power before starting the work so as to prevent accidents caused by abrupt start of the
sewing machine.
Parallel
Summary of Contents for DSC-245
Page 2: ...日本語 ...
Page 31: ...日本語 日本語 ...


