background image

− 

3. CONFIGURATION

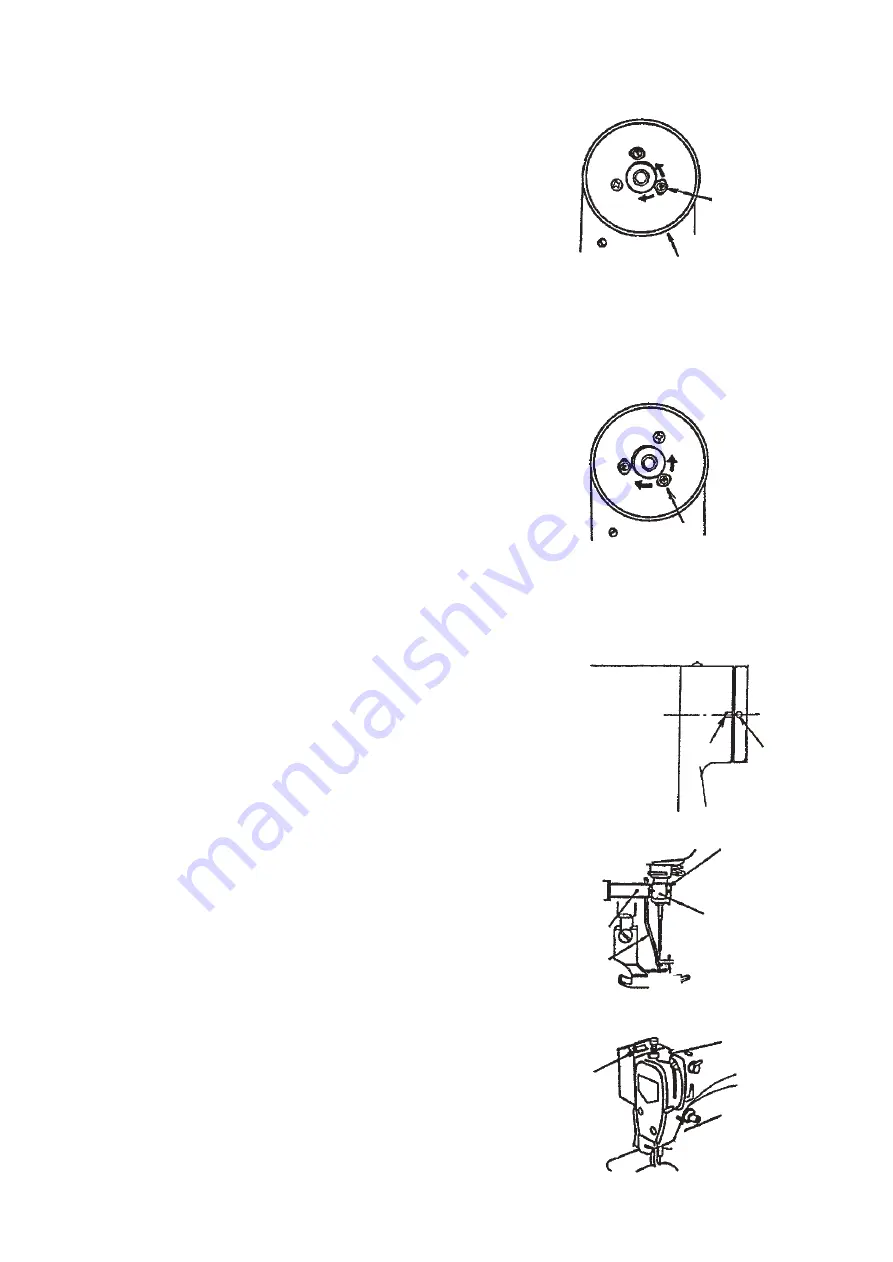
3-1 Adjusting the needle stop position

1) Adjusting the upper stop position (Upper stop position

after thread trimming)

The standrad needle stop position is obtained, when

needle stops after thread trimming, by aligning the red

marker dot on the machine arm with the white marker

dot on the handwheel.

Stop the needle in its highest position, and loosen screw

(A) in the figure on the right to perform adjustment within

the slot of the screw.

 To advance needle stop position 

 Direction (1)

 To delay needle stop position 

 Direction (2)

2) Adjusting the lower stop position

The lower needle stop position when the pedal is

returned to the neutral position after the front part of

the pedal is depressed can be adjusted by loosening

screw (B) in the figure on the right and adjusting within

the slot of the screw.

 To advance needle stop position 

 Direction (1)

 To delay needle stop position 

 Direction (2)

[Caution] Do not rotate the machine with screws (A)

and (B) loosened.Just loosen the screws,

and do not remove them.

3-2 Adjusting the wiper (WB type)

       1. Adjusting the wiper position

Adjust the wiper position in accordance with the thickness

of fabric to be sewn.

Normally, adjust it as follows :

1) Turn the handwheel in the normal direction to align white

marker dot (1) with marker dot (2) on the machine arm.

2) Insert wiper (3) into wiper shaft (4) so that a clearance

of 2 mm is provided between the top end of the wiper

and the top end of the needle. At this time, adjust so

that the distance from the flat section of the wiper to

the center of the needle is 1 mm. Securely fix the wiper

with wiper adjusting screw (5) as if pressing wiper (3)

with wiper collar (6) .

[Caution] Do not loosen the wiper solenoid setscrew.

When the wiper is not used, turn OFF the

wiper seesaw switch.

(1)

(2)

(A)

(1)

(2)

(B)

(1)

(2)

(5)

(4)

(3)

(6)

1 mm

2 mm

Fig. 4

Handwheel

Fig. 5

Fig. 6

Fig. 7

Wiper seesaw
switch

Fig. 8

Summary of Contents for DDL-9000

Page 1: ...R ENGINEER S MANUAL 29338001 No 00 HIGH SPEED 1 NEEDLE LOCKSTITCH MACHINE WITH AUTOMATIC THREAD TRIMMER DDL 9000 ...

Page 2: ...l and operators at an apparel factory contains operating instructions in detail And this manual describes Standard Adjustment Adjustment Procedures Results of Improper Adjustment and other important information which are not covered in the Instruction Manual It is advisable to use the relevant Instruction Manual and Parts List together with this Engineer s Manual when carrying out the maintenance ...

Page 3: ... installing base 20 3 16 Adjusting the position of the touch back switch 21 3 17 Adjusting the position of the handwheel 21 3 18 Adjusting the automatic presser lifter AK118 21 3 19 Optionals Presser foot micro lifter 25 3 20 AE 8 Bobbin thread remaining amount detector 25 3 21 ED 4 Compact material end sensor 25 3 22 PK 70 and 71 3 step pedal 25 3 23 Adjusting the tension release change over 26 3...

Page 4: ...rn powder of V belt 4 Workability such as handling of materials easy to observe needle entry area etc is taken seriously Sewing space is enough expanded 5 Noise and vibration when sewing are decreased to improve the sewing environment and to decrease the operator s burden 6 Smooth feeding of materials has been obtained by the improvement of feed dog and thread take up lever As a result low tension...

Page 5: ...8 Equivalent to SCHMETZ Nm65 to 110 10 mm max 15 mm AK max 10 mm Standard 3 row 11028008 with engraved marker line Export standard 4 row B1109012i0B B1613012A00 3 row feed dog B1613012i00 4 row feed dog B15240120BA excluding a part of export territory Lubrication hook 11038650 Lubrication hook with needle guard 11141355 For DB X 1 11035003 FOR SCHMETZ 11141207 Standard with calibration markings 23...

Page 6: ...needle guard 22890404 For DB X 1 22886907 For SCHMETZ 22887004 For light weight materials with calibration markings 23627250 Low tension D3128555D00 Low tension D3129555D00 Extra low tension 11162104 22896252 with spring for dry head B9117552A00 aluminum 0 75 to 0 85 mm standard Nonlubrication Built in compact AC servomotor Timing belt system Rated output 450W 3 phase 200V single phase 100V DC 34V...

Page 7: ...c 1 4 Cautions when operating 1 Be sure to drain oil from oil tank and attach the air vent cap red rubber cap attached to the air vent gold bushing located on the side of machine bed when transporting the sewing machine 2 When placing the SS or SH type sewing machine head on a stand or the like before setting up the sewing machine head on the table take care whether there is a protrusion under the...

Page 8: ...tainer 2 2 Check points before trial operation and operation 1 Make sure that the wiring to the control box is securely performed 2 Make sure that the safety switch securely works Check whether the warning buzzer beeps when the sewing machine head is tilted 3 Check that the red rubber cap of air vent 17 located on the front side of machine bed has been removed 4 First make the sewing machine run a...

Page 9: ...d Caster Adjust the screw in accordance with the floor on which the operator works so that there is no play and less vibration 11 Resistor pack This is used to automatically identify the model of sewing machine used 12 Bobbin winder This is a bobbin winder built in the machine hed 13 Thread trimmer retainer This works to cut and retain bobbin thread wound with the bobbin winder 14 Tension release ...

Page 10: ...etes reverse feed stitching The machine stops with its needle up or down according to the set of stop position when you reset the pedal to stop neutral The machine trims threads and stops with its needle up when you fully depress the back part of the pedal The machine will completely perform thread trimming even if you reset the pedal to its neutral position immediately after the machine started t...

Page 11: ... after it completes reverse feed stitching The machine stops with its needle down when you reset the pedal to stop neutral The presser foot goes up when you lightly depress the back part of the pedal If you furthrer depress the back part the presser foot comes down and the thread trimmer is actuated After the machine has stopped with its needle up the presser foot goes up Wiper works when the wipe...

Page 12: ...ce needle stop position Direction 1 To delay needle stop position Direction 2 Caution Do not rotate the machine with screws A and B loosened Just loosen the screws and do not remove them 3 2 Adjusting the wiper WB type 1 Adjusting the wiper position Adjust the wiper position in accordance with the thickness of fabric to be sewn Normally adjust it as follows 1 Turn the handwheel in the normal direc...

Page 13: ...uence of thread trimming Power switch ON Depress front part of pedal Needle goes up Reverse feed stitching at sewing start Detection Pedal neutral position Needle down stop Depress back part of pedal Reverse feed stitching at sewing end Cam engagement Tension release Sewing machine rotates from needle down to needle up Knife catches thread Thread handling Thread trimmer solenoid is actuated Thread...

Page 14: ... thin synthetic thread however if the following troubles occur One or several stitches skip at the start of sewing Thread slips from needle at the start of sewing Perform the following adjustments for synthetic thread special In case of thin threads Align marker dot on the machine arm Fig 13 3 with green marker dot on the handwheel Fig 13 1 and adjust thread tension No 1 to lengthen the thread rem...

Page 15: ...ad trimmer cam timing 1 Proper observing of the thread trimmer cam timing Thread trimmer cam timing for both cotton and synthetic threads can be easily adjusted by aligning marker dot on the machine arm with that on the handwheel Tilt the machine head turn the handwheel by hand until the thread take up lever goes up slightly near the upper dead point press thread take up picker Fig 12 1 to the rig...

Page 16: ... knife 2 Adjusting the moving knife position Adjustment is performed by changing the right and left positions of moving knife link pin Fig 15 1 when the sewing machine stops Loosen the lock nut of moving knife link pin Fig 15 1 Following the predetermined position in Fig 14 move the moving knife link pin to the left and right so that V groove Fig 14 for positioning moving knife on the knife instal...

Page 17: ...cam so that it comes to this side and press the thread take up picker to the right when the setscrew comes to this side Move the cam to the right and left to engage the cam with the roller In this state lightly pulling the cam to the right move it in the direction of arrow this side until it will rotate no further Temporarily tighten setscrew No 2 Fig 15 7 in the cam At this time check the followi...

Page 18: ...ust the installing angle of counter knife Counter knife can be installed by moving to the right from the standard installing position At this time the feeding length of needle thread and bobbin thread is lengthened more not only as much as the moving distance of knife than the standard time but also thread trimming timing is delayed As a result the length of needle thread remaining at the top end ...

Page 19: ...loosen screw 1 and move thread release wire 2 to the left After performing adjustment securely tighten screw 1 3 9 Sharpening the knife blade The shape of blade top of the counter knife affects most the sharpness of the knife In many cases the sharpness is improved by sharpening the blade of the counter knife only It is important that the blade face of the counter knife comes in contact with the b...

Page 20: ...ig 26 3 3 Loosen and take out moving knife hinge screw Fig 25 3 using 3 mm hexagonal wrenck key Fig 25 4 4 Loosen and remove knife forked base hinge screw Fig 25 1 Lift up knife forked base Fig 25 2 and remove the pin of moving knife from the forked groove in the knife forked base 5 Remover the pin of moving knife slide the moving knife to the left and take it out from the bottom face of knife for...

Page 21: ...g in slip off of thread Marker line 1 Proper position of the thread take up picker Adjust the thread take up picker so that bobbin thread is lightly pulled out in the state that clutch plate Fig 27 1 is pressed in the direction of the arrow mark right side At this time as shown in Fig 28 adjust so that a clearance of 1 0 to 1 5 mm is provided between the top end of thread take up picker bobbin pre...

Page 22: ...s of the clutch plate and the solenoid are the positions where the clearance of section A is 0 1 to 0 5 mm when the thread trimmer solenoid is drawn Fig 30 In this state tighten solenoid setscrew Fig 30 10 Solenoid stroke 6 m m Driving arm stopper 3 14 Driving arm stopper Section A Fig 30 Driving arm stopper Roller arm Fig 31 Stopper section A ...

Page 23: ...e entry position 3 15 Installing removing the knife installing base 1 Remove the hook and the bobbin case holder 2 Lift up moving knife link Fig 33 1 to this side and remove it from knife forkd pin Fig 33 2 after removing moving knife link hinge screw Fig 33 3 3 Remove knife installing base setscrew Fig 33 5 and remove knife installing base Fig 25 4 Perform the installation in the reverse order of...

Page 24: ...n setscrew 3 3 17 Adjusting the position of the handwheel When removing the handwheel be sure to check the following matters for adjustment 1 Provide a clearance of 1 mm between handwheel 1 and the pulley cover If the clearance is too narrow the position detector solenoid comes in contact with the synchronizer If it is too wide defective detection may occur 2 Be sure to adjust screw No 1 in the ha...

Page 25: ...er side rod with pin 1 Caution 1 Knee lifter side rod is easily loosened Securely tighten it 2 Apply grease to the respective hinge screw sections 4 Install knee lifter link spring retainer 14 on wire presser base 15 so that tension release wire 12 and oil pipe 13 are pressed with the hook At this time pay attention to the routing of oil pipe 13 and wire 12 5 Hook knee lifter link spring 6 to the ...

Page 26: ...he machine head and lower the presser foot to make a state that lifting plate 22 is pressed down Turn solenoid shaft 23 to the left with screwdriver A and tighten screw 24 using hexagonal wrench key B At this time set the solenoid in the state that it is pressed in the direction of the arrow mark Caution Check that there is a clearance between the bottom face of presser bar guide bracket 25 and th...

Page 27: ...r is not installed Selecting the presser foot lifting by pedal The presser foot can be lifted with the operation of depressing the back part of the pedal by changing jumper 1 located on the control circuit board Follow the silk screen indication located on the upper side of the jumper to change PFL Presser foot can be lifted by depressing the back part of the pedal KFL Presser lifting operation by...

Page 28: ...nd the presser foot gradually goes up 2 Tighten nut 8 to fix the micro lifter at the position where the optimum condition of the sewing materials is obtained after trial sewing 3 20 AE 8 Bobbin thread remaining amount detector When the amount of remaining bobbin thread reaches the set value buzzer will sound to warn the operator not to perform the next operation of depressing the front part of the...

Page 29: ... knee lifter Turn it upward until it will go no further and tighten it again Tension release is not possible with the knee lifter 3 24 Adjusting the presser foot micro lifter The presser foot can be minutely lifted with ease using the micro lifter screw installed on the machine head to perform the sewing 1 Loosen micro lifter nut 1 and turn micro lifter screw 2 to the right to gradually lift the p...

Page 30: ...wing dimensions only when JUKI exclusive table is not used since the main dimensions of the table are described below Reference dimensions of table Section F C1 chamfer F reverse side C A B D E C C1 chamfer E JUKI stand installing position C1 5 to 2 5 chamfer To prevent machine from being caught when tilting it Section B 1 place Section C 2 places Section E 2 places Section D 2 places Section A 3 ...

Page 31: ...w to be slipped from the flat section 4 When there is no trouble with feed adjusting link 5 the strain can be removed by adjusting the lateral position of the feed rocker cam or the feed rocker arm Turn the handwheel several times and the feed rocker cam moves to the position where there is no strain In this state quietly tighten setscrew No 1 Further tighten setscrew No 2 5 Then similarly turning...

Page 32: ...lace a piece of paper under the presser foot Then make normal feed of 10 stitches and reverse feed of 10 stitches by operation of the feed lever to check that proper ratio of normal to reverse feed is obtained Adjust the feed dial with three graduations If the ratio of normal to reverse feed is not proper gradually turn the feed adjusting base pin with wrench and securely tighten two setscrews 4 o...

Page 33: ... in the lateral direction of the throat plate If the slippage is small it can be adjusted with the play in the installing hole of the feed dog If it is large however readjust the lateral position of feed driving base arm 4 and feed rocker base arm 3 Loosen setscrew 4 in the feed driving cam loosen the swetscrew in the feed rocker base arm 3 and adjust the lateral position of the feed dog Determine...

Page 34: ...d feed rocker base shafts 1 and 3 to the rear side Caution If there is a play in the feed base noise or defective straight stitching will result The standard height of the feed dog is 0 8 to 0 85 mm If the height of the feed dog is raised feed force is improved However jumping of the presser foot at high speed or defects of light weight materials is likely to occur If the height of the feed dog is...

Page 35: ...maged although bite to the fabric is slightly deteriorated In addition the feed dog securely feeds fabric at the end of feed and puckering is reduced due to puller effect 9 10 7 8 7 8 7 8 Caution Whenever the timing of feed driving cam 9 is changed the feed timing in terms of the needle will be changed When the timing of feed driving cam is excessively changed readjust it referring to Adjusting th...

Page 36: ...ustment in the following procedure so that the feed dog is lowered at the top end of the needle eyelet except when intentionally changing the adjustment 2 Adjusting the timing Adjusting places are three lower sprocket thread trimmer cam and hook Tilt the machine head and loosen two setscrews A in the lower sprocket Fix the feed driving cam at the feed dog lowering timing position where the top end...

Page 37: ...SH 1 Check that oil wick located at the top of the oil wick support securely comes in contact with the needle bar at the position of approximately 5 mm below the needle bar upper metal and when it does not adjust the position of the oil wick support 2 When centering of needle bar upper and lower metals is not properly performed seizure will result Touch with fingers the periphery of the needle bar...

Page 38: ...t 7 After installing the pulley cover tighten the setscrews in the order of No 1 and No 2 at the position where a clearance of approximately 1 mm is provided between the handwheel and the pulley cover Caution There is the release section A in the shaft section of encoder case B located in the rear of the motor If the handwheel is held removed dust enters from this section and damages the sensor se...

Page 39: ... in the following procedure 3 Fix the position of bobbin lever 3 of the bobbin winder with setscrew 2 so that a clearance of approximately 1 mm is provided between bobbin winder adjust plate 2 and lever 3 Lightly press the bobbin lever in the direction of A at the position where the bobbin lever is released and remove the play Then tighten lever setscrew 4 so that a clearance of approximately 11 5...

Page 40: ...e oil amount is stabilized If the oil amount adjustment screw is excessively loosened the O ring is removed and oil spurts out Do not loosen it more than 8 turns Do not drain oil in the oil tank even when using the RP hook at the sewing speed of 4 000 rpm or less Oil is not lubricated to the hook shaft front metal and the needle bar As a result seizure may occur Set oil amount to 0 with the oil am...

Page 41: ...rew spring and plunger and check that the plunger groove is placed in the center of the hole of machine bed At the time of NG no good Longitudinal position of the hook shaft is slipped or the position of the hook shaft front metal is slipped End face of the hook shaft front metal is 24 mm from the needle entry position When this distance is proper correct the position of the hook shaft Adjust the ...

Page 42: ... gear box unless a trouble occurs When it is compelled to open it take care of the following matters Prepare a new gear box cover packing 23628100 before starting the work 1 Tilt the machine head and prepare an oil receiver under the gear box 2 Loosen the tension release wire presser and the pipe presser screw and remove the wire and the pipe from the cover 3 Remove the gear box setscrew and drain...

Page 43: ...versely Reference for adjustment value of the thread tension Main materials and threads are described Based on the reference value adjust the thread tension in accordance with materials and threads Bobbin thread tension is the tension when pulling thread to this side in the direction of 45 from the top surface of the throat plate Thread take up spring stroke is the amount of thread take up from th...

Page 44: ...When defective stitches are apt to occur adjust the thread take up spring so that the stroke is longer and the tension is lower than those of the sewing machine with the lubricating hook level to such an extent that the spring works up to the end when pulling out thread It is effective to increase the stroke of the thread take up spring to stabilize the loop however the spring does not show its ef...

Page 45: ...e amount of oil for five seconds after making the sewing machine run idle for 30 seconds 4 Adjust the position of the screw in the order of steps 2 to 3 until the appropriate amount of oil is obtained Cautions and points Note 1 When replacing the hook or for the machine head after an extended period of disuse including the new machine head it takes approximately 10 to 20 seconds at the sewing spee...

Page 46: ...ns continuous operation at high speed or the like In addition take care of thread breakage Amount of oil is much 2 mm to up In case of severe conditions such as continuous operation at high speed or the like Caution If the amount of oil is too much the sewing product may be stained with oil and oil in oil tank reduces earlier than expected Approx 25 mm Approx 70 mm Oil splash confirmation paper Fi...

Page 47: ...thread take up picker is pressed until the top end comes in contact with bobbin Adjust the rising amount with the position of thread tension release wire 3 8 in the rear side on machine bed Check that the disk is loosened paralell If not turn thread tension spring by 180 or correct the tilt of the spring Check and adjust thread trimmer cam timing referring to 3 5 Change the red dot to green dot ad...

Page 48: ...p spring is too high or too large Abration of hook blade tip Attaching of needle is improper Check sections A and B of the presser foot and section C of throat plate When using synthetic thread for tricot cloth A 0 8 mm R of sections B and C 0 3 mm When using synthetic thread A 1 2 mm and parts without recess or the like at sections B and C are good When using cotton thread parts with smaller rece...

Page 49: ... scratches on the hook Speed of the sewing machine at the sewing start is high and bobbin thread is hard to be interlaced Tension of thread tension No 1 is too low Thread trimming timing is too late Counter knife excessively recedes Refer to the previous item Needle thread remaining at the top end of needle after thread trimming is too long Refer to the previous item Needle throat plate and presse...

Page 50: ...start is low Bobbin thread tension or needle thread tension is too low Presser foot or throat plate is improper Turn OFF the power switch press by hand thread take up picker to bobbin csase at the position where needle is lowered slowly turn handwheel by hand to this side perform thread trimming and stop the thread take up at the upper dead point At this time if the length of needle thread remaini...

Page 51: ...es not rise when trimming thread Hangnail of thread Properly attach the needle Check whether the needle is bent Decrease the stroke of thread take up spring Check stitch skipping by operating the machine at low speed Readjust the hook Advance the hook timing Remove throat plate move the knife by hand and cut approximately three pieces of cotton thread 50 The knife is good if the three threads can ...

Page 52: ...e pressure is too high Thread is not trimmed Cam roller is not removed from the groove in thread trimmer cam in the resting section Adjust the position referring to the item 3 14 Replace the timing belt Adjust the engagement of counter knife and moving knife Consider to correct the counter knife Adjust the position referring to the item 3 6 Amount of recession of the moving knife Adjust the positi...

Page 53: ...or SPP needle is effective Finish the thread path Advance the hook timing to such an extent that stitch skipping does not occur and improve thread slipping Delay feed in terms of needle so that thread is pulled by feed force Move arm thread guide to the right and decrease thread supply amount by the thread take up Increase the stroke Use silicon Minimize the pressure For some materials it is effec...

Page 54: ... ends of teeth with diamond file or the like or replace it with a new one Replace the feed dog with one with fine pitch Change the position of feed driving base pin and tilt the feed dog with its front up to make the puller effect Replace the feed dog Decrease the number of revolution Use a gauge having a small clearance between groove of throat plate and moving direction of feed dog in the range ...

Page 55: ...r foot Decrease the number of revolution Increase the tension of thread tension No 2 Balloon stitch or thread breakage is apt to occur if the stroke of thread take up spring is small since the released thread is not pulled up enough Adjust the stroke of thread take up spring to a rather large value If the tensin is too low when the machine runs at high speed the spring cannot follow up and pulling...

Page 56: ... is defective Bobbin thread in the bobbin case runs idle There is a scratch in the bobbin Feed timing is improper or feed dog height is low For cotton thread and spun thread adjust the timing to the standard or slightly delay the timing For filament thread adjust the timing to the standard or slightly advance the timing Increase the clearance to improve the slide of thread Properly adjust the amou...

Page 57: ...resser bar guide bracket and lifting plate A clearance of 0 8 to 1 mm should be provided when the presser foot comes closely in contact with the lifting plate Use the presser foot with the large recess on the sole Adjust the timing of thread tension disk rising referring to the item 3 8 Use the throat plate with large needle hole Replace the needle or the thread used Replace the needle Replace the...

Page 58: ...igh or too low Tension of thread tension No 1 is too low The stroke is too large or too small The tension is too high or too low Selection of the spring for the kind of thread is improper Decrease the tension Use silicon Decrease the number of revolution Advance the feed timing Decrease the stroke Decrease the tension Adjust the clearance between presser bar guide bracket and lifting plate Use the...

Page 59: ...on of the needle is improper Thread take up spring is improperly adjusted Replace the needle Replace the needle Replace the needle Reattach the needle Defective stitching is apt to occur when attaching the needle with its indented part facing to this side Replace the needle Use the ball point needle Replace the needle Correct the hook blade point or replace the hook Increase the clearance to impro...

Page 60: ... Thread breaks when performing reverse feed stitching or back tack stitching Needle is bent Top end of the needle is blunt Needle is too thin Needle is too long Adjust the hook in the state that the timing is earlier by 0 2 mm than the lower marker line of needle bar Or change the needle bar to needle bar of 22886907 Interval of the marker lines of needle bar of 22886907 is narrower by o 2 mm than...

Page 61: ...late is small Presser foot pressure is too high Feed dog is positioned high Replace the feed dog Correct the installation Remove the play in the state that the feed driving base pin and the feed rocker base pin are slightly pressed Readjust the position of presser bar guide bracket Replace the presser foot Or loosen the presser bar guide bracket screw and adjust the bend of presser foot Increase t...

Page 62: ...ss for thread on the presser foot sole is too large Parallelism of the presser foot is defective Presser foot is rising Pitch changes according to the number of revolution and irregular stitches occur Properly adjust the amount of oil Replace the hook or correct the thread path Replace the bobbin or bobbin case Adjust the tension or position of the bobbin winder thread tension In addition take car...

Page 63: ...t rise from the bobbin case 3 First set the ear 1 insert a sewing needle into the bobbin and set the ear 2 in the state that the central part of the spring is raised Part No of bobbin case spring D1837555B0B To change the height When using the bobbin case with idle prevention spring be sure to set it in the direction of winding as shown in the illustration Irregular stitches at high or low speed W...

Page 64: ...n this engineer s manual is subject to change for improvement of the commodity without notice 99 08 Printed in Japan E R INTERNATIONAL SALES H Q 8 2 1 KOKURYO CHO CHOFU SHI TOKYO 182 8655 JAPAN PHONE 81 3 3430 4001 to 4005 FAX 81 3 3430 4909 4914 4984 TELEX J22967 Copyright C 1999 JUKI CORPORATION All rights reserved throughout the world ...

Reviews: