


22
23
JBP-SCRP-MANUAL |
©
2021 JUICED BIKES
JBP-SCRP-MANUAL |
©
2021 JUICED BIKES
•
Reduce payload weight.
•
Properly inflate the tires between 30-35 psi. Do not
overinflate the tires.
•
Coast to a stop and avoid rapid decelerations.
NOTICE
If the battery pack power is low, choose a lower level of pedal assist if going on
stops and hills. The sports mode will demand enough power to convince the battery
pack that it is depleted, but you may still use a lower level of pedal assist.
NOTICE
Riding downhill or pedaling when not using the throttle will not recharge the
battery pack.
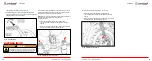
ADVANCED MATRIX DISPLAY OVERVIEW
The advanced matrix display acts as the dashboard for your
e-bike. It has the ability to show the basic status of the
electronics system such as speed, distance traveled and
battery level.
It also has an “advanced mode” that can give additional
information on how your electric vehicle is working. The
display also lets you adjust a limited set of parameters to better
customize the performance of your e-bike.
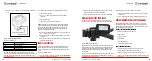
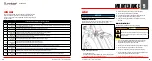
BUTTON OVERVIEW
Fig. 24 - Buttons on the Advanced Matrix Display
Three buttons control the functions of the display.
Power Button:
Located on the back side of the display
“Assist Up” Button:
Located on the front face of the display
“Assist Down” Button:
Located on the front face of the display
OPERATION
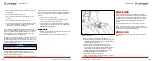
MAIN DISPLAY SCREEN OVERVIEW
Fig. 25 - Advanced Matrix Display Screen
The main display shows several important metrics:
BATTERY VOLTAGE (VOLTS)
This is the voltage level of the battery. It is measured in
volts (V).
HEADLIGHT GRAPHIC
The headlight graphic appears when you turn on the LED
headlight. Turning on the headlight will also turn on the display’s
backlight so the screen is visible in the dark.
ASSIST LEVEL
The assist level indicator displays which assist mode the bike
is in.
The assist levels progress in the following order:
ECO
1
2
3
SPORT
POWER (WATTS)
The power indicator shows how many watts the system is using
in real time. When you turn the e-bike on, the bike uses about
4-6 watts even when not moving. This number will never be
zero, as the system requires some small amount of power
to operate.
BATTERY LEVEL GRAPHIC
The battery level graphic is a graphical representation of how
much charge remains in the battery. More bars will appear in
the graphic when the battery is charged. Less bars will appear
when the battery is depleted.
SPEED (MPH OR KM/H)
The speed indicator shows the current speed that the e-bike is
traveling. The speed can be shown in mph or km/h depending
on which unit setting is used. The speed sensor picks up
information from the rear wheel.
TRIP DISTANCE (MI OR KM)
The trip distance keeps track of how far the bike has traveled
until the rider resets it.
OPERATION


