background image

J

.P. SELECTA s.a.u. 

Ctra. NII Km 585.1 Abrera 08630 (Barcelona) España 

e-mail[email protected] - website: www.jpselecta.es  

Tel 34 937 700 877 Fax 34 937 702 362 

INSTRUCTION MANUAL CODE 80219 REV E 

MAR/2017 

(It can be modified without notice) 

Page: 25 


7


Installation 

7.1


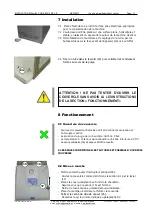
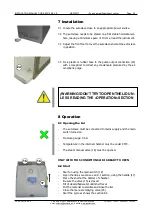
Locate the autoclave close to an appropriate power source. 


7.2


The autoclave needs to be placed on a flat stable horizontal

 sur- 

face, leaving a minimum space of 10 cm around the instrument. 


7.3


Adjust the front feet to level the autoclave and set the autoclave 
in position. 


7.4


Fix a plastic or rubber hose to the pump output connection (24) 
with a receptical to collect any condensate produced by the at- 
mospheric purge. 


8


Operation 

8.1


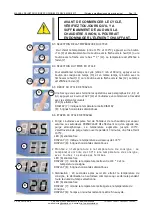
Opening the Lid 

-


The autoclave must be connected to mains supply and the main 
switch turned on. 


-


Pressure gauge: 0 bar 


-


Temperature in the internal chamber must be under 95ºC. 


-


The steam manual valve (16) must be opened. 


ONLY WITH THIS CONDITIONS LID IS READY TO OPEN 


8.2


Start 

-


Start on using the main switch (18) 

-


Open the lid as we can see on 8.1 section, using the handle (17) 

-


Place the shelf at the bottom of chamber. 

-


Be sure the valve (15) is closed. 

-


Fill of decalcified water until shelf

 level. 

-


Put the material to sterilize and close the lid. 

-


Close the manual emptying valve (16) 

-


Start the cycle as shows the section 8.3 


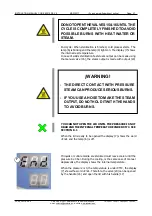
¡WARNING! 

DON’T TRY TO OPEN THE LID UN- 

LESS READING THE «OPERATION» SECTION 

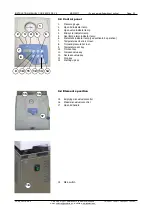
24 

15 

16 

17 

Summary of Contents for 4002136

Page 1: ...P SELECTA s a u Ctra NII Km 585 1 Abrera 08630 Barcelona Espa a e mail selecta jpselecta es website www jpselecta es Tel 34 937 700 877 Fax 34 937 702 362 AUTOCLAVES POUR STERILISATION A LA VAPEUR AU...

Page 2: ...les 5 3 Sp cifications techniques 5 4 Liste de contenu et accessoires 6 4 1 Liste de contenu 6 4 2 Accessoires 6 5 Introduction 7 5 1 De nitions 7 5 1 1 St rilisation 7 5 1 2 D sinfection 7 5 1 3 Mili...

Page 3: ...echnical speci cations 19 4 Content list and accesoriess 20 4 1 Standard contents 20 4 2 Accesories 20 5 Introduction 21 5 1 De nitions 21 5 1 1 Sterilization 21 5 1 2 Disinfect 21 5 1 3 Culture media...

Page 4: ...ons dans ce manuel accompagn de cette ic ne Respecter les instructions pour effectuer l op ration Risque de br lure par contact avec les l ments temp rature lev e La temp rature dans la zone indiqu e...

Page 5: ...loi fourni 2 3 Ces instructions sont une partie ins parable de l appareil et doivent tre disponibles pour tous les utilisateurs de l autoclave 2 4 Tout doute doit tre consult au fournisseur de l autoc...

Page 6: ...t tting 34100 Manuel d utilisation Instructions manual 80219 34100 4 Liste de contenu et accessoires 4 1 Contenu standard du paquet L quipement standard comprend les composants suivants 4 2 Accessoire...

Page 7: ...nfection Il est entendu par la d sinfection le proc s de destruction d agents infectieux Il se produit une temp rature plus basse que la st rilisation La d sinfection peut liminer seulement certaines...

Page 8: ...rcle que la pression 0 et la temp rature en dessous de 95 C 4 Limiteur de pression de pression maximale qui d connecte l l ment chauffant en cas de surpression 6 Thermostatlimitantdeprotectiondelar si...

Page 9: ...ape ouvert 4 Indicateur Led fin du cycle 5 Indicateur Led d alarme sur temp rature 6 Indicateur Led tat 7 Indicateur de la temp rature et des erreurs 8 Indicateur de temps et la pression z ro 9 Bouton...

Page 10: ...GO 80219 REV E MAR 2017 Sujetas a modi caciones sin previo aviso Pag 10 15 Commande vanne vide 16 Commande vanne vapeur 19 Soupape de s curit 20 Vanne de sortie vapeur 21 C ble de raccordement lectriq...

Page 11: ...8 Fonctionnement 8 1 Ouverture du couvercle Pour ouvrir le couvercle l autoclave doit tre connect au r seau et l interrupteur activ La pression de jauge de la chaudi re doit tre 0 bar La temp rature l...

Page 12: ...temp rature r elle DISPLAY 8 6 lignes horizontales discontinues 8 6 ETAPES DU CYCLE DE TRAVAIL 1 Purg L autoclave expulse l air de l int rieur de la chaudi re par vapeur satur e Les autoclaves PRESOC...

Page 13: ...95 c VOIR CHAPITRE 8 1 lorsque le couvercle est pr t tre ouvert DISPLAY 7 montre la mot End et le LED 6 est d sactiv Si un liquide ou un milieu de culture sont st rilis s L autoclave doit laisser refr...

Page 14: ...pas tre manipuler sauf pour le r armer Error 4 Vanne manuelle 16 ouverte pendant un cycle Error 5 Porte ouverte pendant un cycle Error 6 Pression sup rieure 0 05 bar avec l autoclave au repos Error 7...

Page 15: ...vitez de placer dans le m me plateau instrumental de m tal diff rent 11 2 Tubes Les tubes doivent tre parfaitement propres rinc s et goutt s Placer les tubes si possible ouverts des deux c t s Assure...

Page 16: ...0V K7 7 4 12 8 13 16 9 14 TIERRA C 14V 12 Sch ma lectrique Pos 1 1 Description Fusible main d uvre Code 15411 2 Interrupteur 20096 3 Contacteur c 13006 4 Pressostat 16212 5 Micro rupteur porte 20002 6...

Page 17: ...MANUAL CODE 80219 REV E MAR 2017 It can be modi ed without notice Page 17 13 Sch ma hydraulique Pos Description Code 4 Pressostat 16212 6 Micro rupteur vanne 20067 7 Sonde Pt100 43071 9 Electrovanne p...

Page 18: ...hown with this icon Beware follow instructions as indicated Risk of burns in high temperature areas The temperature in the zone indicated with this icon can exceed 60 C Use thermal protective gloves t...

Page 19: ...N AND DISINFECTED SHALL NOT BE REPAIRED 2 6 Any unauthorized modi cation lack of maintenance or deliberate damage to themachine transgressesthedirective89 655 CEEwherethemanufacturer willnotberesponsi...

Page 20: ...tting 34100 Manual instrucciones Instructions manual 80219 4 Contents list and accessories 4 1 Standard contents The standard equipment consists of the following items 4 2 Accessories Wired baskets m...

Page 21: ...objects 5 1 2 Disinfect Disinfectionistheprocessofthedestructionofmicroorganisimagents Thetempe rature used is less than that of sterilization 5 1 3 Culture media Agrowthmedium orculture medium is any...

Page 22: ...g of the lid with pressure 0 and temperature under 95 C 4 Maximum pressure limiter that disconnects the heating element in cases of over pressure 5 Limiter thermostat to protect the heating element 6...

Page 23: ...indicator lamp 3 Open valve indicator lamp 4 End cycle indicator lamp 5 Overtemp alarm indicator lamp 6 Statement indicator lamp see section 8 5 operation 7 Temperature and errors screen 8 Timeandpre...

Page 24: ...MANUAL DE INSTRUCCIONES CODIGO 80219 REV E MAR 2017 Sujetas a modi caciones sin previo aviso Pag 24 15 Emptying valve handle 16 Steam valve handle 19 Safety valve 20 Exit steam valve 21 Power supply...

Page 25: ...ection 24 with a receptical to collect any condensate produced by the at mospheric purge 8 Operation 8 1 Opening the Lid The autoclave must be connected to mains supply and the main switch turned on P...

Page 26: ...g horizontal lines 8 6 Working Cycle Steps 1 Purge The autoclave expulses the chamber internal air to get saturated steam The Presoclave II autoclaves makes a process called atmospheric purge The temp...

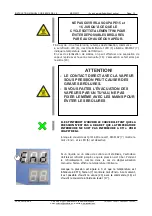
Page 27: ...AR AND THE INTERNAL TEMPERATURE UNDER 95 C SEE SECTION 8 1 When the lid is ready to be opened the display 7 shows the word End and the lamp 6 is off If liquids or culture media are sterilized must lea...

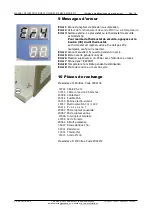
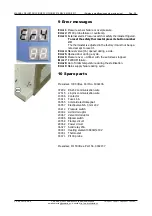
Page 28: ...except to reset it Error 4 Manual valve 16 opened during a cicle Error 5 Opened door during a cycle Error 6 Pressure over 0 05bar with the autoclave stopped Error 7 E2PROM failure Error 8 Out of limit...

Page 29: ...per leaving a space between each instrument Try to keep similar type material instruments together on a tray 11 2 Tubing The tubing need to be clean and drained Place the tubing so that the openings o...

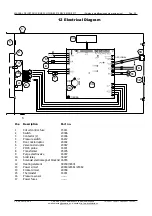
Page 30: ...11 20V K7 7 4 12 8 13 16 9 14 TIERRA C 14V 12 Electrical Diagram 1 Pos 1 Description Circuit control fuse Part no 15411 2 Switch 20096 3 Contactor c 13006 4 Pressure switch 16212 5 Door microrruptor 2...

Page 31: ...L CODE 80219 REV E MAR 2017 It can be modi ed without notice Page 31 13 Hydraulic Diagram Pos 4 Description Pressure switch Part no 16212 6 Valve microrruptor 20067 7 Pt100 probe 43071 9 Purge electro...

Page 32: ...ostatic baths Bater as de kjeldahl y bater as de soxhlet Kjeldahl battery and Soxhlet battery Centr fugas de sobremesa y refrigeradas Centrifuges Estufas bacteriol gicas y de cultivos Bacteriological...

Reviews: