JOYSTEK BELL J1 Quick Start Manual Download Page 7

- 6 -

(not included)

(not included)

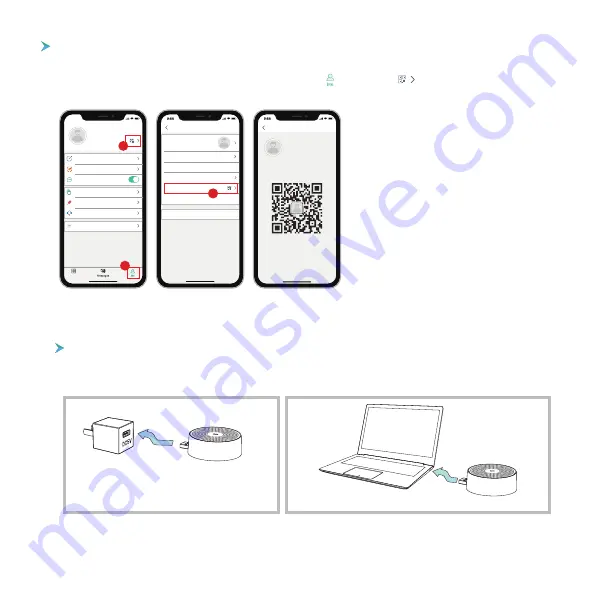
1.  Powered by DC5V phone charger.  

2. Powered by PC USB Port.

13. connect the chime

supply power to the chime

The chime can be powered by an USB compatible phone charger (DC5V 1A). You can also plug the chime 
to the USB port on your PC/notebook to supply power.


Share by QR code scanning


    The  new users can show their QR codes to the administrator, and share device by QR Code scanning.

     Find your QR code:

   Run 

CloudEdge

 App >> Tap on “     ”  >> Tap on “         ”  >> Tap on “ 

My QR Code

” 

                                                               >> Let the administrator scan your QR Code

NOTE: 

  1. Guide your family members to download and 
install the 

CloudEdge

 App, and register an account 

prior to device-sharing.
  2. There is no limitation on numbers of users
 sharing one device. 
  3. Only the adminstrator got access to the setting 
menu. Other users can only live view & playback.
  4. All users can receive doorbell calls and alarm 
notifications. 
  5. Many users can access to the doorbell simul
-tanously, to live view or playback.

My QR Code

User Name

1882020****

Scan the QRCode to share camera with me

9:55

Devices

User Name

1882020****

In-App Alert Sound

Pictures & Videos

Device Share

FAQ

Feedback

Online Help

More

1

2

My information

Account

Edit Nickname

Profile Photo

Reset Password

My QR Code

Your Region

Log Out

User Name

1882020* * * * 

Region

3

Summary of Contents for BELL J1

Page 1: ......

Page 2: ...cator USB Port Type A M 3 4 1 3 2 4 Indoor Chime Screw Tools 1 2MP camera Motion sensor Speakers Doorbell button LED indicator Charging indicator Micro USB port Reset hole Security screw hole Micropho...

Page 3: ...2 7 wi fi set up Before you start the Wi Fi configuration please note below 1 The doorbell works with 2 4 GHz Wi Fi but not with 5 GHz Wi Fi 2 Avoid using special characters or symbols like either in...

Page 4: ...on spot is covered by strong 2 4 GHz Wi Fi signal Note If the video quality from the doorbell outside is not as good as it was indoors you may need to move your router closer to your installation spot...

Page 5: ...10 57 30 10 58 10 58 30 10 59 10 59 Calendar Alarm 10 58 06 10 57 10 57 30 10 58 10 58 30 10 59 10 59 Calendar Alarm Nov 2019 SUN MON TUE WED THU FRI SAT 27 28 29 30 31 1 2 10 11 12 13 14 15 16 17 18...

Page 6: ...Share Receive Notifications Device Information Basic Function Alarm Setting Device Version SD Card Cloud Server Settings 1 Device Share 9 55 Add 2 Device Share Recent contacts Scan QR Code Account 3...

Page 7: ...de your family members to download and install the CloudEdge App and register an account prior to device sharing 2 There is no limitation on numbers of users sharing one device 3 Only the adminstrator...

Page 8: ...4 1 Press and hold reset button on the chime for about 5 seconds till the indicator flashes blue twice and the chime will be restored to factory default 2 You can also tap on refer to Picture 4 in the...

Page 9: ...166 1 Shut off power at the breaker remove the old doorbell from the wall and dis connect the wires 2 Connect the wires to the screw terminals on your mounting bracket Either wire can be connected to...

Page 10: ...tery life may be different due to different activation freqency 3 Optional The nameplate holder can be mounted on the top rear bottom rear of the bracket prior to bracket installation 1 Dismount the b...

Page 11: ...ite OS 1920 1080 px HD SD dual stream High power IR LED with ICR 1 7mm F2 0 166 Digital WDR 2 way audio with noise cancellation Color 0 01 Lux B W 0 001Lux Network Wifi Frequency Standards Live View S...

Page 12: ...s well as cloud storage You can activate the cloud storage service in App Q5 What happens when the SD is full A5 When the memory card is full the camera automatically erase the oldest footage Q6 Does...

Reviews: