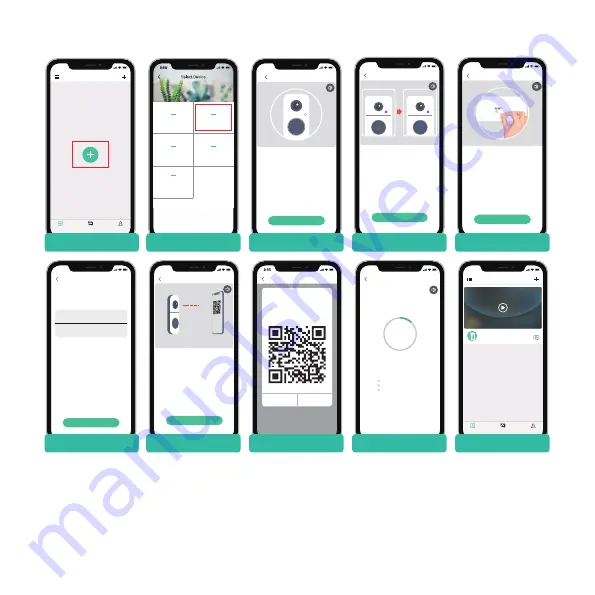
JOYSTEK BELL J1 Quick Start Manual Download Page 4

Guiding steps:

9:55

Devices

Messages

Me

Tap + to add a new device

Devices

· Using the supplied reset pin, reset the
device(please consult the user manual for more on
this)
· Wait for the LED indicator to flash RED
· Tap Next

Please reset the device

Install Doorbell

Next

9:55

Install Doorbell

Press the [Bell] button, and tap Next

Help

Next

9:55

Please follow the instruction manual to
power the device

Please stay near your router for the best signal

Install Doorbell

Next

9:55

Camera

Battery Camera

Floodlight Camera

Network Video 

Recorder

Doorbell

1. Tap “+” to add device

2. Select Doorbell

3. check power status

4. Activate the doorbell

5. Reset device

- 3 -

8. run a test

After setup, tap on the live view window in the App for a test. Then take your doorbell outside to the installation
spot and run a test there. Make sure the installation spot is covered by strong 2.4 GHz Wi-Fi signal.

Note:

If the video quality from the doorbell outside is not as good as it was indoors, you may need to move your 
router closer to your installation spot, or invest in an Wi-Fi extender.

9:55

Devices

Messages

Me

Devices

056853326

Select your Wi-Fi network

Change WiFi

Hide Password

Home

Password123

(Please select a 2.4G network, this device will not

work with 5G Wi-Fi networks)

Wi-Fi Setup

Next

9:55

Scan QR Code

Scan the QR code below with the

device at a distance of 5-8 inches.

A tone will be heard when 

successfully scanned.

Help

Next

9:55

Please stay near your router for the

best signal

Device Found!
Connecting device to network...
Registering device...

12%

connecting...

Connect Network

Operation

Next

9:55

Please remove all film from the lens. Tap
Next to show a QR code, and let your 
device scan the code. Keep your phone 5-8 
inches from the lens.

15~25cm

5~8 in

6. Input Wi-Fi password

7. Prepare Code Scanning

8.Generate QR Code

9. Wait for connection

10. Adding device complete

Summary of Contents for BELL J1

Page 1: ......

Page 2: ...cator USB Port Type A M 3 4 1 3 2 4 Indoor Chime Screw Tools 1 2MP camera Motion sensor Speakers Doorbell button LED indicator Charging indicator Micro USB port Reset hole Security screw hole Micropho...

Page 3: ...2 7 wi fi set up Before you start the Wi Fi configuration please note below 1 The doorbell works with 2 4 GHz Wi Fi but not with 5 GHz Wi Fi 2 Avoid using special characters or symbols like either in...

Page 4: ...on spot is covered by strong 2 4 GHz Wi Fi signal Note If the video quality from the doorbell outside is not as good as it was indoors you may need to move your router closer to your installation spot...

Page 5: ...10 57 30 10 58 10 58 30 10 59 10 59 Calendar Alarm 10 58 06 10 57 10 57 30 10 58 10 58 30 10 59 10 59 Calendar Alarm Nov 2019 SUN MON TUE WED THU FRI SAT 27 28 29 30 31 1 2 10 11 12 13 14 15 16 17 18...

Page 6: ...Share Receive Notifications Device Information Basic Function Alarm Setting Device Version SD Card Cloud Server Settings 1 Device Share 9 55 Add 2 Device Share Recent contacts Scan QR Code Account 3...

Page 7: ...de your family members to download and install the CloudEdge App and register an account prior to device sharing 2 There is no limitation on numbers of users sharing one device 3 Only the adminstrator...

Page 8: ...4 1 Press and hold reset button on the chime for about 5 seconds till the indicator flashes blue twice and the chime will be restored to factory default 2 You can also tap on refer to Picture 4 in the...

Page 9: ...166 1 Shut off power at the breaker remove the old doorbell from the wall and dis connect the wires 2 Connect the wires to the screw terminals on your mounting bracket Either wire can be connected to...

Page 10: ...tery life may be different due to different activation freqency 3 Optional The nameplate holder can be mounted on the top rear bottom rear of the bracket prior to bracket installation 1 Dismount the b...

Page 11: ...ite OS 1920 1080 px HD SD dual stream High power IR LED with ICR 1 7mm F2 0 166 Digital WDR 2 way audio with noise cancellation Color 0 01 Lux B W 0 001Lux Network Wifi Frequency Standards Live View S...

Page 12: ...s well as cloud storage You can activate the cloud storage service in App Q5 What happens when the SD is full A5 When the memory card is full the camera automatically erase the oldest footage Q6 Does...

Reviews: