background image

CZ


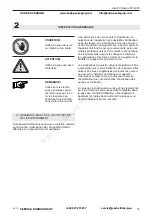
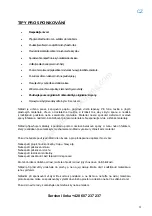
ZÁKLADNÍ POKYNY PRO SPONKOVÁNÍ  


ČTI NÁVOD 

NOSTE OCHRANU SLUCHU 


Přečtěte si prosím tyto bezpečnostní pokyny 
pozorně, abyste předešli zranění sebe i 
ostatních. Věnujte pozornost všem kapitolám 
návodu pro další pokyny k provozování nářadí. 


Prevence  zranění - Operátor a ostatní přítomní v 
prostoru  sponkování  a  hřebíkování  musí  nosit 
ochranu sluchu. 


NOSTE OCHRANU ZRAKU 

NEBEZPEČÍ ROZDRCENÍ 


Prevence  zranění - Operátor a ostatní přítomní 
v  prostoru  sponkování,  hřebíkování  nebo 
páskování musí nosit ochranné brýle. 


Sešívačky  obsahují  mechanismus  pro  sevření 
spony.  Tento  mechanismus  může  rozdrtit  části 
těla  např.  prsty.  Páskovačky  mohou  sevřít  a 
rozdrtit  části  těla  mezi  pásku  a  produkt  při 
utahování.


ZÁKAZ 

NEBEZPEČÍ ZAKOPNUTÍ 


Je zakázáno nechávat nářadí bez dozoru. Pokud 
zařízení  nepracuje  nenechávejte  je  nabité 
sponami  či  hřebíky.  Je  zakázáno  mířit  nářadím 
na jiné osoby.  


Dbejte aby se Vám přívodní hadice nepletla pod 
nohy.  Hrozí  zakopnutí  a  zranění.  Pracujte  na 
rovném a stabilním podkladu. 


Servisní linka +420 607 237 237 

www.kuda-packaging.com

Summary of Contents for 126365

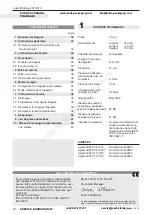
Page 1: ... innan du använder klammer verktyget Vor dem Gebrauch des Gerätes die Betriebs anleitung aufmerksam lesen Avant l utilisation de l appareil consultez soigneusement le mode d emploi OPERATING INSTRUCTIONS Translation of original manual BRUKSANVISNING Original bruksanvisning BETRIEBSANLEITUNG Übersetzung der Originalbetriebsanleitung MODE D EMPLOI Traduction du mode d emploi original KUDA PACKAGING ...

Page 2: ...Description 5 4 1 Design 5 4 2 Function 5 5 Initial operation 6 5 1 Installation 6 5 2 Compressed air connection Lubrication 6 6 Operating instructions 7 6 1 Loading the magazine 7 6 2 Operating the stapler 7 7 Preventive and corrective maintenance 8 7 1 Cleaning the stapler 8 7 2 Removing jammed staples 8 7 3 Replace feed spring or pusher 9 7 4 Replace driver blade 9 8 Trouble shooting 10 9 Spare...

Page 3: ...erating instructions must always be available at the place of operation of the stapler They must be read and observed by all persons concerned with work on the stapler This work specifically includes operation refilling of operating material fault elimina tion and maintenance In addition to the operating instructions and the regu lations for accident prevention effective in the country of use and ...

Page 4: ...efully Protect yourself When operating the stapler wear eye ear protection Warning Danger of crushing Do not put your fingers underneath the nozzle Warning Hazard Lay the compressed air hose so that there is no risk of tripping over it Do not exceed the air pressure Do not exceed the re commended air pressure Use safety coupling For connecting the air hose to the stapler use only a safety coupling...

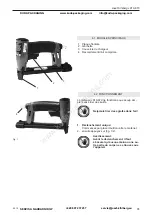
Page 5: ... the work piece 2 Pull the trigger fig 1 2 4 1 DESIGN 1 Door 2 Trigger 3 Magazine lid 4 Compressed air connection Fig 1 Warning before stapling ensure that your hand or any other part of your body is not underneath the nozzle 1 2 3 4 KUDA PACKAGING www kuda packaging com info kuda packaging com SERVIS A NAHRADNÍ DÍLY 420 607 237 237 servis josef kihlberg eu w w w k u d a p a c k a g i n g c o m ...

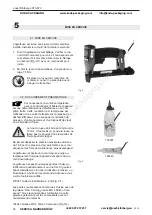
Page 6: ...8 Never exceed the maximum permitted air pressure of 7 bar 100 psi The maximum supply pressure is 7 bar 100 psi A low air pressure will give low maintenance costs The stapler and the hose must have a coupling which automatically bleeds all air pressure from the stapler when it is disconnected The stapler needs a small amount of lubricating oil in the nipple each day or approx 10 drops once a week ...

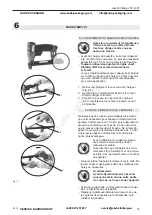
Page 7: ...and or any other part of your body is not underneath the nozzle 6 2 OPERATING THE STAPLER Adjust the air pressure to the lowest one that will drive the staples to the desired depth Start at approx 5 0 bar 72 psi and raise this by 0 5 bar 7 psi increase until the correct operating pressure for the job in hand is found Never exceed 7 bar 100 psi A low air pressure will give low maintenance costs Pla...

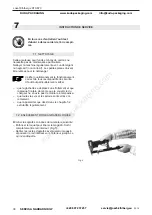
Page 8: ...7 1 CLEANING THE STAPLER This stapler does not require special servicing It only needs regular cleaning with a non aggressive non corrosive cleaner agent Do not remove any parts for cleaning purposes Check the proper functioning of all safety devices daily Make especially sure that the trigger works smoothly the door stays in place and the magazine lid does not open itself all screws and nuts are ...

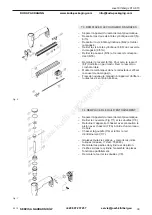
Page 9: ... tool from air supply Remove the two front screws Fig 6 15 at the front nozzle plate Remove the screw 6 42 holding magazine to the body and remove the magazine Remove the screws 6 38 holding the magazine rear cover 6 51A Remove the pusher 6 54 and the feed spring 6 53 Mount the pusher spring under the front roller First mount the pusher tension the pusher spring a little carefully release the push...

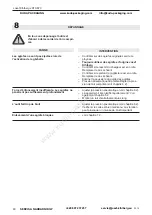
Page 10: ...e staple track Air pressure too low Secure that working pressure is as recommended see chapter 6 2 Adjust the air pressure as chapter 6 2 Has the tool been used without oil Provide lubri cation see chapter 5 2 Fit a longer driver blade Check if the air pressure is correct Adjust as per chapter 6 2 Ensure that the work piece is firmly held in place Vibration causes high sound levels Open the door a...

Page 11: ...05 15 11 Josef Kihlberg JK10 670 KUDA PACKAGING www kuda packaging com info kuda packaging com SERVIS A NAHRADNÍ DÍLY 420 607 237 237 servis josef kihlberg eu w w w k u d a p a c k a g i n g c o m ...

Page 12: ...rivning 15 4 1 Sammansättning 15 4 2 Funktion 15 5 Idrifttagande 16 5 1 Installation 16 5 2 Anslut tryckluft smörjning 16 6 Användning 17 6 1 Ladda klammermagasin 17 6 2 Använda klammerverktyget 17 7 Förebyggande och avhjälpande underhåll 18 7 1 Rengöring av klammerverktyget 18 7 2 Avlägsna kilad klammer 18 7 3 Byta frammatarfjäder eller frammatare 19 7 4 Utbyte av drivare 19 8 Felsökning 20 9 Res...

Page 13: ...örningar och förlänga livslängden på klam merverktyget Manualen skall alltid hållas tillgänglig i arbetsområdet för verktyget Den skall läsas och förstås av all per sonal som använder verktyget Som tillägg till manualen skall bestämmelse för före byggande olycksfallsrisker följas för det land där produkten används Det skall också iakttagas tekniska förordningar angående säker och riktig användning...

Page 14: ... använder klammerverk tyget Varning Akta fingrarna Stoppa inte fingrar eller andra kroppsdelar under nosen Varning Snubbelrisk Lägg tryckluftsslangen så att det inte finns någon risk för att snubbla över den Överskrid inte lufttrycket Överskrid inte rekom menderat lufttryck Använd säkerhets koppling Anslut luftslangen till häftaren endast med säkerhetskoppling Använd aldrig gas från högtryckstuber...

Page 15: ...nosen 4 2 FUNKTION Verktyget JK10 670 enkelskott avfyrning utan säker hetsbygel Avfyra aldrig i luften 1 Enkelskotts avfyrning Placera verktyget först mot arbetsstycket 2 Tryck sedan på avtryckaren fig 1 2 Fig 1 1 2 3 4 KUDA PACKAGING www kuda packaging com info kuda packaging com SERVIS A NAHRADNÍ DÍLY 420 607 237 237 servis josef kihlberg eu w w w k u d a p a c k a g i n g c o m ...

Page 16: ...luftregulator med manometer och dimsmörjarenhet Som alternativ till detta kan dims mörjolja tillföras i nippeln några droppar dagligen eller ca 10 droppar vecka Överskrid aldrig maximalt luftryck Högsta tillåtna tryck är 7 bar 100 psi och maximalt matartryck är 7 bar 100 psi Justera arbetstrycket till 5 0 6 bar 73 87 psi Lågt arbetstryck innebär låga underhållskostnader Häftaren och slangen måste ...

Page 17: ...ngefär 5 0 bar 72 psi och höj sedan trycket i steg om 0 5 bar 7 psi tills det rätta arbetstrycket etablerats Överstig dock aldrig 7 bar 100 psi Ett lågt lufttryck bidrar till att hålla underhållskostna derna nere Säkerställ att verktyget inte pekar mot dig själv eller någon annan när inkoppling sker till tryckluftssystemet Vid användning av verktyget bör man stå välbalanserat och stadigt Om klamme...

Page 18: ...var Kontrollera samtidigt att alla skruvar och muttrar är åtdragna För att ta bort en kilad och defekt klammer gör följan de Frigör magasinspärren medelst sitt trycke och dra ut den inre klammerbanan hela vägen Ta bort eventuella klammerrester ur magasinet samt tryck in den inre klammerbanan tills den snäp per in bakom spärren 7 2 AVLÄGSNA KILAD KLAMMER Säkerställ att verktyget ej är inkopplat til...

Page 19: ...uvarna Fig 6 15 vid främre drivarstyrningen Demontera skruven 6 42 som håller magasinet till verktygskroppen och ta därefter bort magasinet Demontera skruvarna som håller magasinspär ren 6 38 och demontera innerbanan från magasi net Demontera frammataren 6 54 och dess fjäder 6 53 Montera den nya frammatarfjädern under den främre rullen Montera först på frammataren spänn frammatar fjädern något slä...

Page 20: ...tryck Säkerställ att rätt arbetstryck används Se kapitel 6 2 Justera arbetstrycket enligt kapitel 6 2 Har verktyget använts utan tryckluftsolja Säker ställ tillsatssmörjning enligt kapitel 5 2 Montera längre drivarblad Kontrollera att arbetstrycket är rätt Justera enligt kapitel 6 2 Säkerställ att arbetsstycket är fastsatt Vibrationer orsakar hög ljudnivå Öppna dörren och ta bort den defekta klamm...

Page 21: ...05 15 21 Josef Kihlberg JK10 670 KUDA PACKAGING www kuda packaging com info kuda packaging com SERVIS A NAHRADNÍ DÍLY 420 607 237 237 servis josef kihlberg eu w w w k u d a p a c k a g i n g c o m ...

Page 22: ...5 4 2 Funktionsprinzip 25 5 Inbetriebnahme 26 5 1 Inbetriebnahme 26 5 2 Druckluftaufbereitung 26 6 Bedienung 27 6 1 Magazin mit Klammern laden 27 6 2 Bedienung des Klammergerätes 27 7 Wartung und Instandsetzung 28 7 1 Reinigung 28 7 2 Steckengebliebene Klammern entfernen 28 7 3 Magazinfeder ersetzen 29 7 4 Antriebsschiene ersetzen 29 8 Störungsbehebung 30 9 Ersatzteil Set 41 10 Teileliste mit empf...

Page 23: ...s Gerätes zu erhöhen Die Betriebsanleitung muss am Einsatzort des Gerätes verfügbar sein Sie ist von allen Personen zu lesen und anzuwenden die mit dem Gerät arbeiten Zu diesen Arbeiten zählen insbesondere die Bedie nung die Störungsbehebung und die Wartung Neben der Betriebsanleitung und den im Verwender land und an der Einsatzstelle geltenden Regelungen zur Unfallverhütung sind auch die anerkann...

Page 24: ...ltig lesen Schützen Sie sich Beim Arbeiten Gehör schutz und Schutzbrille tragen Vorsicht Quetschgefahr Finger nicht unter das Gerät halten Achtung Stolperstelle Druckluftschlauch so verlegen dass sich keine Stolperstelle bildet Luftdruck nicht über schreiten Den vorgeschriebenen Luftdruck nicht über schreiten Original Anschluss kupplungen verwen den Es dürfen nur Anschluss kupplungen verwendet wer...

Page 25: ... das Werkstück aufsetzen 2 dann den Abzug betätigen Fig 1 2 4 1 AUFBAU 1 Vorderplatte 2 Abzug 3 Magazindeckel 4 Druckluftanschluss Warnung Vor dem Auslösen sicherstellen dass sich keine Hand oder andere Körper teile unter dem Gerät befinden Fig 1 1 2 3 4 KUDA PACKAGING www kuda packaging com info kuda packaging com SERVIS A NAHRADNÍ DÍLY 420 607 237 237 servis josef kihlberg eu w w w k u d a p a c...

Page 26: ...m betragen Es muss darauf ge achtet werden dass der Schlauch keine Schlaufen bildet in welchen sich Öl sammeln kann Den maximal zulässigen Luftdruck von 7 0 bar nie mals überschreiten Niedriger Luftdruck führt zu nied rigen Wartungskosten Das Klammergerät muss eine Kupplung aufweisen die automatisch entlüftet wenn das Gerät vom Luftan schluss getrennt wird Das Klammergerät benötigt einige Tropfen ...

Page 27: ...s der richtige Arbeitsdruck ge funden ist Den maximal zulässigen Luftdruck von 7 0 bar niemals überschreiten Niedriger Luftdruck führt zu niedrigen Wartungs kosten Das Gerät immer fest auf das Packstück aufsetzen Niemals Klammern in sehr harte oder spröde Mate rialien eintreiben Abzug betätigen wie in Kapitel 4 2 beschrieben Bewegen Sie das Klammergerät seitlich bis die notwendigen Klammern angebr...

Page 28: ...zug sich reibungslos bewegt und die Vorderplatte sowie der Magazindeckel sich nicht von selbst öffnen dass alle Schrauben und Muttern korrekt angezo gen sind dass das Gerät wie in Kapitel 5 2 beschrieben regelmässig geschmiert wird 7 2 STECKENGEBLIEBENE KLAMMERN ENTFERNEN Steckengebliebene Klammern folgendermassen entfernen Die Klinke drücken um das Magazin frei zugeben und die Innenschiene ganz h...

Page 29: ...el befestigen Magazin wieder an Gerät befestigen Überprüfen ob alle Schrauben festgezogen sind Gerät vom Luftanschluss trennen Deckel Fig 7 1 und Büchse 7 8 entfernen Gerät auf den Kopf drehen und mit einem Stück Holz vorsichtig den Kolben mit Treiber 7 7A herausschlagen Stift 7 6 herausschlagen und Antriebsschiene 7 7 entfernen Alle Teile und O Ringe einfetten Grease Artikel Nr 184943 Zylinder un...

Page 30: ...rkolben in Ordnung ist Nötigenfalls ersetzen Schmutz in der Klammerbahn beseitigen Luftdruck zu tief Luftdruck einstellen siehe Kapitel 6 2 Luftdruck einstellen siehe Kapitel 6 2 Wurde das Gerät regelmässig geschmiert Siehe auch Kapitel 5 2 Längere Antriebsschiene einbauen Luftdruck einstellen siehe Kapitel 6 2 Überprüfen ob das Packgut fest gehalten wird Vi bration kann hohen Geräuschpegel verurs...

Page 31: ...05 15 31 Josef Kihlberg JK10 670 KUDA PACKAGING www kuda packaging com info kuda packaging com SERVIS A NAHRADNÍ DÍLY 420 607 237 237 servis josef kihlberg eu w w w k u d a p a c k a g i n g c o m ...

Page 32: ... 34 4 Description 35 4 1 Modules principaux 35 4 2 Fonctionnement 35 5 Mise en service 36 5 1 Mise en service 36 5 2 Raccordement pneumatique 36 6 Mode d emploi 37 6 1 Chargement du magasin avec agrafes 37 6 2 Mode d emploi pour l appareil 37 7 Instruction de service 38 7 1 Nettoyage 38 7 2 Enlèvement d une agrafe bloquée 38 7 3 Remplacer le chargeur d agrafes 39 7 4 Remplacer le rail d entraîneme...

Page 33: ...urée de vie Les instructions de service doivent constamment être à disposition sur le lieu d utilisation de l appareil Elles doivent être lues et appliquées par toutes les person nes qui sont chargées de travaux sur l appareil Ces travaux comprennent en particulier le service l alimentation des consommables l élimination des pannes et l entretien En plus des instructions de service et des règlemen...

Page 34: ...de d emploi Protégez vous Au cours du travail porter des protections acoustiques et de lu nettes de protection Prudence danger d écrasement Ne pas laisser les doigts sous l appareil Attention danger de trébucher Déplacer le tuyau d air comprimé de manière à ce qu il ne présente au cun danger de trébucher La pression d air com primé ne doit pas être supérieure La pression d air compri mé recommandé...

Page 35: ... ensuite appuyez sur fig 1 2 4 1 MODULES PRINCIPAUX 1 Plaque frontale 2 Gâchette 3 Couvercle du chargeur 4 Raccordement d air comprimé Avertissement Avant le déclenchement il faut s assurer qu aucune main ou une au tre partie du corps ne se trouve sous l appareil Fig 1 1 2 3 4 KUDA PACKAGING www kuda packaging com info kuda packaging com SERVIS A NAHRADNÍ DÍLY 420 607 237 237 servis josef kihlberg...

Page 36: ... doit être au minimum de 10 mm If faut veiller à ce que le tuyau ne fasse pas de boucles dans lesquelles de l huile pourrait stagner Ne jamais dépasser la pression maximale autorisée de 7 0 bar Une pression d air plus faible a pour con séquence des frais de maintenance plus avantageux L agrafeuse nécessite un raccord qui se purge au tomatiquement lorsque l appareil est séparé du rac cord pneumatiq...

Page 37: ...r jusqu à ce que la pression de travail soit trouvée Ne jamais dé passer la pression pneumatique autorisée de 7 0 bar Une pression basse entraîne des frais de mainte nance plus avantageux Toujours placer l appareil fermement sur le colis Ne jamais chasser des agrafes dans des matières très dures ou cassantes Actionner la gâchette comme décrit dans le chapi tre 4 2 déclenchement répétitif Déplacez ...

Page 38: ...ce sans frottement et que la plaque frontale de même que le couvercle du chargeur ne s ouvre pas de manière intempestive que toutes les vis et les écrous sont serrés cor rectement que l appareil tel que décrit dans le chapitre 5 2 est lubrifié régulièrement 7 2 ENLÈVEMENT D UNE AGRAFE BLOQUÉE Eliminer les agrafes coincées de la manière suivante Enfoncer le loquet pour libérer le magasin Sortir com...

Page 39: ...rcle du magasin Fixer de nouveau le magasin à l appareil Vérifier si toutes les vis sont bien serrées Séparer l appareil du raccordement pneumatique Retirer le couvercle Fig 7 1 et les douilles 7 8 Retourner l appareil et chasser avec précaution le piston avec chassoir 7 7A à l aide d un morceau de bois Chasser la goupille 7 6 et retirer le rail d entraînement 7 7 Graissez toutes les pièces y comp...

Page 40: ...placer le cas échéant Eliminer la poussière du guide des agrafes Pression pneumatique trop faible Régler la pres sion de l air comprimé voir chapitre 6 2 Ajuster la pression pneumatique voir chapitre 6 2 L appareil a t il été lubrifié régulièrement Voir également chapitre 5 2 Monter un rail d entraînement plus long Ajuster la pression pneumatique voir chapitre 6 2 Vérifier si le colis est bien mai...

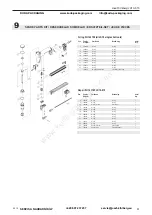
Page 41: ... O ring Kit 143159 all JK10 single shot tools Pos Part No Part Name Benämning Antal Artikelnr Qty 2 185282 O ring O ring 1 4 185284 O ring O ring 1 7A 185288 Piston cpl 670 Kolv kompl 1 9 185292 O ring O ring 1 16 185300 O ring O ring 2 18 185302 O ring O ring 1 19 185303 O ring O ring 1 21 185305 O ring O ring 1 22 185306 O ring O ring 1 27 185311 O ring O ring 1 32 185316 O ring O ring 1 39 1853...

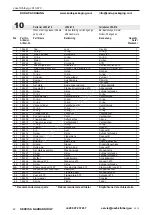
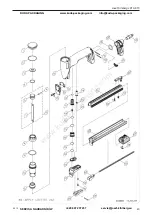
Page 42: ...04 Valve cylinder Ventilhylsa yttre Ventilführung 1 21 185305 O ring O ring O ring 1 22 185306 O ring O ring O ring 1 23 185307 Plunger cover Ventil lock Ventildeckel 1 24 185308 Connecting tube Ventil Ventilkolben 1 25 185309 Trigger base Avtryckarhus Abzug 1 26 185310 Trigger valve stem Ventilspindel Ventilkolben 1 27 185311 O ring O ring O ring 1 28 185312 Trigger Avtryckare Abzug 1 29 185313 P...

Page 43: ...05 15 43 Josef Kihlberg JK10 670 KUDA PACKAGING www kuda packaging com info kuda packaging com SERVIS A NAHRADNÍ DÍLY 420 607 237 237 servis josef kihlberg eu w w w k u d a p a c k a g i n g c o m ...

Page 44: ...1 CZ JK Servisní linka 420 607 237 237 w w w k u d a p a c k a g i n g c o m ...

Page 45: ...ítomní v prostoru sponkování hřebíkování nebo páskování musí nosit ochranné brýle Sešívačky obsahují mechanismus pro sevření spony Tento mechanismus může rozdrtit části těla např prsty Páskovačky mohou sevřít a rozdrtit části těla mezi pásku a produkt při utahování ZÁKAZ NEBEZPEČÍ ZAKOPNUTÍ Je zakázáno nechávat nářadí bez dozoru Pokud zařízení nepracuje nenechávejte je nabité sponami či hřebíky Je...

Page 46: ...t používáno pod dohledem zodpovědné a obeznámené osoby Operátor a pracovník údržby obdrží pokyny odpovídající vybavení a přiměřený čas pro pravidelnou každodenní inspekci čištění a údržbu zařízení Nikdy nepoužívejte k pohonu nářadí kyslík hořlavé plyny CO2 páru nebo vysokotlaké nádoby protože mohou způsobit výbuch a vážná zranění Používejte pouze stlačený atmosférický vzduch který je čistý suchý a...

Page 47: ...řebíku a nadměrně zabraňovat průniku materiálem Nesponkujte tvrdé a křehké materiály Nářadí připevňuje materiály k podkladu pomocí ocelové nerezové spony U tvaru nebo hřebíkem který je zatlačen pneumatickým mechanismem nářadí vysokou rychlostí skrz materiál Pokud nebudete používat nářadí dle návodu a pro předepsanou aplikaci hrozí vám Nebezpečí propíchnutí končetiny trupu hlavy atp Nebezpečí poško...

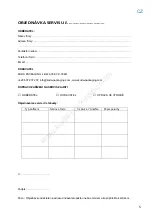
Page 48: ...237 237 info kuda packaging com www kuda packaging com DOPRAVU ZAŘÍZENÍ NA SERVIS ZAJISTÍ ODBĚRATEL DODAVATEL OPRAVA VE VÝROBĚ Objednáváme servis dle tabulky Typ zařízení Sériové číslo V záruce Ano Ne Popis poruchy V Podpis Pozn Objednávku odešlete na adresu dodavatele poštou nebo emailem a kopii přiložte k zařízení w w w k u d a p a c k a g i n g c o m ...

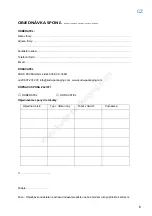
Page 49: ...33441 420 607 237 237 info kuda packaging com www kuda packaging com DOPRAVU SPONA ZAJISTÍ ODBĚRATEL DODAVATEL Objednáváme spony dle tabulky Objednací číslo Typ délka nohy Počet v tisících Poznámka V Podpis Pozn Objednávku odešlete na adresu dodavatele poštou nebo emailem a kopii přiložte k zařízení w w w k u d a p a c k a g i n g c o m ...

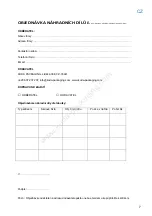
Page 50: ...441 420 607 237 237 info kuda packaging com www kuda packaging com DOPRAVU ND ZAJISTÍ ODBĚRATEL DODAVATEL Objednáváme náhradní díly dle tabulky V Podpis Pozn Objednávku odešlete na adresu dodavatele poštou nebo emailem a kopii přiložte k zařízení Typ zařízení Sériové číslo Obj Číslo dílu Pozice v náčrtu Počet Ks w w w k u d a p a c k a g i n g c o m ...

Page 51: ...Í SPONY KOMPLETNÍ ZÁKAZNICKÁ PODPORA KUDA PACKAGING sponkovací systémy JOSEF KIHLBERG AB Lidická 308 Dobřany 33441 Česká Republika INFOLINKA 420 607 237 237 WWW www josef kihlberg eu Email info josef kihlberg eu NÁKUP ON LINE www sesivacky cz www zosivacky sk w w w k u d a p a c k a g i n g c o m ...

Reviews: