background image

10 


Connecting to Wireless Network


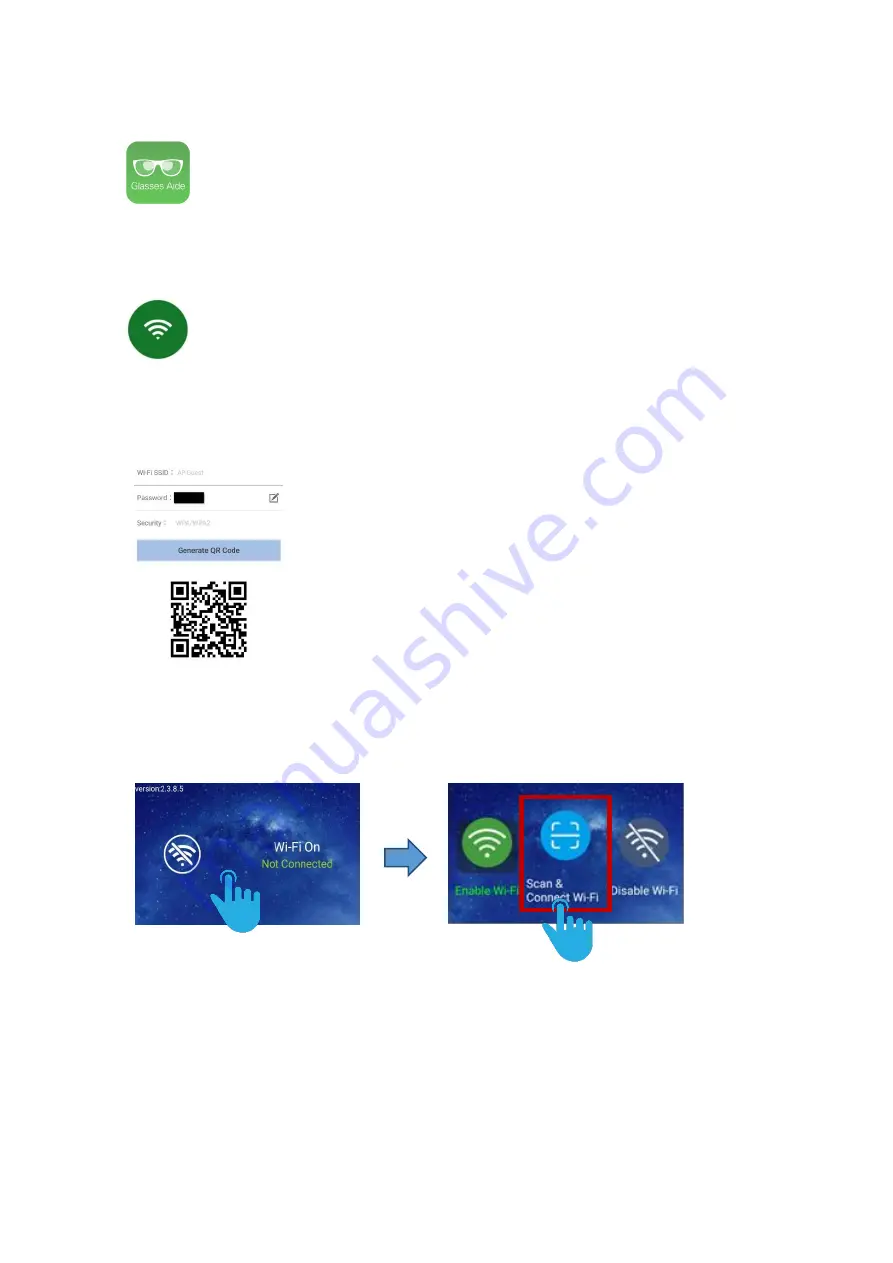
1. Open 

Glasses Aide

 APK on your Android-based smartphone. 


2. Open the Wi-Fi setting option and scan available Wi-Fi connections. Then choose 
a Wi-Fi connection from the scanned list. 


3. Enter the necessary information for the Wi-Fi connections including SSID and 
password, and then tap to generate QR Code to connect to wireless network. 


4. The 

Setting

 screen should appear. Simply tap 

Scan & Connect Wi-Fi

Note:

 you must have scanned the QR Code to access this step. 


The device will be automatically connected to the same Wi-Fi network if the setup is 
performed properly. 

Tap on the Wi-Fi status screen 

Tap on 

Scan & Connect Wi-Fi


Summary of Contents for J-102

Page 1: ...J Supporter Smart Glasses Starter Kit Model J 102 User s Manual English version 1 0...

Page 2: ...J 102 5 3 Using J Supporter 6 Turn J Supporter On Off 6 Software Functions 6 Home Screen 7 Setting Up J Supporter 9 Connecting to Wireless Network 10 Setup Time 11 Setup Bluetooth Function 12 Check So...

Page 3: ...Supporter J 102 Headset Home Key Monocular Lens See thru Camera LED Navigation Pad Computer 3 5mm Earphone Socket Micro USB for charging or transfer data Power hold it to turn on off Volume Control 2...

Page 4: ...ockets 1 x 2 5mm 1 x 3 5mm Camera 8 Million pixels auto focus supported Picture resolution up to 3264 x 2448 Support 1080p video Sensor GPS Ambient Light Sensor 3 axis Gyroscope 3 axis Accelerometer 3...

Page 5: ...n HT20 2 412 2 462GHz Bluetooth 2 402 2 480 GHz Standard Accessories Arm Bag Accommodates the J Supporter computer set and a mobile power bank and can be worn on user s arm Charger Include both micro...

Page 6: ...itional Accessories for J 102 Basic Len less Frame For right side wearing Helmet Adapter An adapter with a ball joint secures the J 102 to the helmet and helps user adjust the smart glasses position f...

Page 7: ...s font size and language for navigation Support The Free Trial is only for designated project customers This enables remote two way communication so that the on site staff can transfer video footages...

Page 8: ...down Back Slide forward back Switch App Function HOME Key Touch Input Function Tap lightly Enter Menu Confirm Hold it approx 3 seconds Return to Home Screen Wireless Network Status Bluetooth Status Ti...

Page 9: ...eed to be connected to the Internet to be used When J Supporter is connected to the Internet voice control is automatically enabled Default Voice Commands 2 sets for demo version By Mandarin By Englis...

Page 10: ...nstall our Glasses Aide App 1 Please download Glasses Aide APK file GlassesAide_2 2 1 4_Release apk from the link http www jorjin com product php id 177 it is in the category Download 2 Install Glasse...

Page 11: ...necessary information for the Wi Fi connections including SSID and password and then tap to generate QR Code to connect to wireless network 4 The Setting screen should appear Simply tap Scan Connect W...

Page 12: ...de APK on your Android based smartphone 2 Open the Time option 3 Input current time and generate QR Code 4 The Setting screen should appear Simply tap on the time setup screen Note you must have scann...

Page 13: ...2 Set up the Bluetooth connections for the device s you wish to connect with your J Supporter Smart Glasses Please perform the setup based on the device user s guide Check Software version You can fi...

Page 14: ...13 Power Status Power Remaining Status Indicator 20 Red 20 90 Orange 90 97 Green flashing 97 100 Green constant...

Page 15: ...for operating them 1 Please download Application Folder APK Current version is 2 4 0 0 from Jorjin website download url http www jorjin com product php id 177 2 Establish connection between J Support...

Page 16: ...15 3 Once the installation is completed the Application App will appear on the screen of J Supporter The apps you install later will appear in the Application...

Page 17: ...d url http www jorjin com product php id 177 5 Refer to step 2 to install System Application into J Supporter 6 After installation you will be able to see the new System Application folder in the Appl...

Page 18: ...r Smart glasses can be developed by using the standard Android API However Jorjin still prepares the Basic SDK for developers to access camera and navigation pad functions If you need the Basic SDK se...

Page 19: ...device or removing the chassis may cause electrical shock For repair please contact Jorjin Please apply dry cloth and turn the device off to clean it Please do NOT place the device in proximity with a...

Page 20: ...otection against harmful interference in a residential installation This product generates uses and can radiate radio frequency energy and if not installed and used in accordance with the instructions...

Page 21: ...bled for products marketed in the US FCC Caution 1 Any changes or modifications not expressly approved by the party responsible for compliance could void the user s authority to operate this equipment...

Page 22: ...pplies approved for this product employ special provisions to avoid radio interference and should not be altered or substituted Unapproved modifications or operations beyond or in conflict with these...

Page 23: ...no user serviceable parts in the batteries Do not disassemble or open crush bend or deform puncture or shred the battery Do not modify or remanufacture attempt to insert foreign objects into the batt...

Page 24: ...OGIES INC Other company and product names may be trademarks or registered trademarks of the respective owners with whom they are associated Jorjin may update this user manual from time to time You can...

Reviews: