background image

11

NOTE:

  Under certain conditions when tractor is standing idle

with the engine running, hot engine exhaust gases may
cause “browning” of grass.  To eliminate this possibility,
always stop engine when stopping tractor on grass areas.

CAUTION:  Always stop tractor com-
pletely, as described above, before leav-
ing the operator's position; to empty
grass catcher, etc.

OPERATION

The operation of any tractor can  result in foreign objects thrown into the eyes, which can
result in severe eye damage.  Always wear safety glasses or eye shields while operating
your tractor or performing any adjustments or repairs.  We recommend a wide vision
safety mask over spectacles or standard safety glasses.

HOW TO USE YOUR TRACTOR

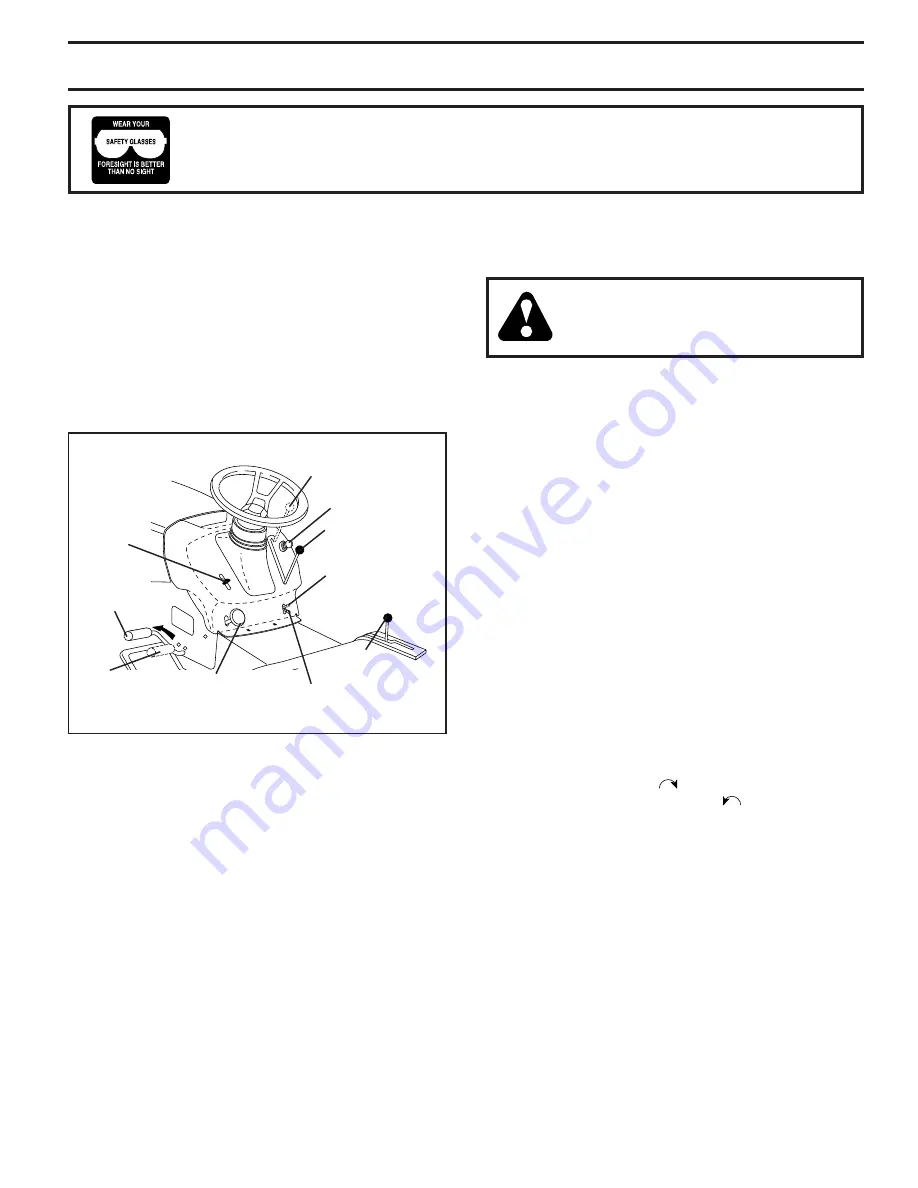
TO SET PARKING BRAKE (See Fig. 5)

Your tractor is equipped with an operator presence sensing
switch.  When engine is running, any attempt by the operator
to leave the seat without first setting the parking brake will
shut off the engine.

Depress clutch/brake pedal into full “BRAKE” position
and hold.

Place parking brake lever  in “ENGAGED” position and
release pressure from clutch/brake pedal.  Pedal should
remain in “BRAKE” position.  Make sure parking brake
will hold tractor secure.

PARKING BRAKE
"DISENGAGED"
POSITION

FIG. 5

CLUTCH/BRAKE
PEDAL "DRIVE"
POSITION

STOPPING (See Fig. 5)

MOWER BLADES -

To stop mower blades,move attachment clutch lever to
“DISENGAGED” position.

GROUND DRIVE -

To stop ground drive, depress clutch/brake pedal into
full “BRAKE” position.

Move gearshift  lever to neutral (N) position.

ENGINE -

Move throttle control to slow position.

NOTE:

  Failure to move throttle control to slow position and

allowing engine to idle before stopping may cause engine to
“backfire”.

Turn ignition key to “OFF” position and remove key.
Always remove key when leaving tractor to prevent
unauthorized use.

Never use choke to stop engine.

IMPORTANT: 

 LEAVING THE IGNITION SWITCH IN ANY

POSITION OTHER THAN "OFF" WILL CAUSE THE
BATTERY TO BE DISCHARGED, (DEAD).

ATTACHMENT CLUTCH
LEVER "ENGAGED"
POSITION

IGNITION KEY

"DISENGAGED"
POSITION

PARKING BRAKE
"ENGAGED"
POSITION

GEAR SHIFT
LEVER

THROTTLE/
CHOKE
CONTROL
LEVER

"BRAKE"
POSITION

HEIGHT
ADJUSTMENT
KNOB

TO ADJUST MOWER CUTTING HEIGHT (See
Fig. 5)

The cutting height is controlled by turning the height adjust-
ment knob in desired direction.

Turn knob clockwise (

) to raise cutting height.

Turn  knob  counterclockwise (

) to  lower cutting

height.

The cutting height range is approximately 1-1/2" to 4".  The
heights are measured from the ground to the blade tip with
the engine not running.  These heights are approximate and
may vary depending upon soil conditions, height of grass
and types of grass being mowed.

The average lawn should be cut to approximately 2-1/2
inches during the cool season and to over 3 inches
during hot months.  For healthier and better looking
lawns, mow often and after moderate growth.

For best cutting performance, grass over 6 inches in
height should be mowed twice.  Make the first cut
relatively high; the second to desired height.

TO USE THROTTLE CONTROL (See Fig. 5)

Always operate engine at full throttle.

Operating engine at less than full throttle reduces the
battery charging rate.

Full throttle offers the best bagging and mower perfor-
mance.

TO MOVE FORWARD AND BACKWARD (See
Fig. 5)

The direction and speed of movement  is controlled by the
gearshift  lever.

Start tractor with clutch/brake pedal depressed and
gearshift lever in neutral (N) position.

Move gearshift lever to desired  position.

Slowly release clutch/brake pedal to start  movement.

IMPORTANT:

  BRING TRACTOR TO A COMPLETE STOP

BEFORE SHIFTING OR CHANGING GEARS. FAILURE TO
DO SO WILL SHORTEN THE USEFUL LIFE OF YOUR
TRANSAXLE.

Summary of Contents for JNA1642A

Page 1: ...MODEL NO LT16 JNA1642A 15 5 HP 42 Inch LawnTractor 532 18 27 45 3 8 02 RD PRINTED IN U S A ...

Page 2: ...facturer s recommendations for wheel weights or counterweights to improve stability Useextracarewithgrasscatchersorotherattachments These can change the stability of the machine Keep all movement on the slopes slow and gradual Do not make sudden changes in speed or direction Avoidstartingorstoppingonaslope Iftireslosetraction disengage the blades and proceed slowly straight down the slope DO NOT D...

Page 3: ...ate of California to cause cancer and birth defects or other reproductive harm Wash hands afterhandling Be sure the area is clear of other people before mowing Stop machine if anyone enters the area Never carry passengers or children even with the blades off Do not mow in reverse unless absolutely necessary Al ways look down and behind before and while backing Never carry children They may fall of...

Page 4: ...ctions will enable you to assemble and maintain your tractor properly Always observe the SAFETY RULES CUSTOMER RESPONSIBILITIES Read and observe the safety rules Followaregularscheduleinmaintaining caringforand using your tractor Follow the instructions under Customer Responsibili ties and Storage sections of this owner s manual WARNING This tractor is equipped with an internal com bustion engine ...

Page 5: ...tension Shaft Steering Sleeve Steering Wheel Steering Wheel Adapter 1 Knob 1 Washer 17 32 x 1 3 16 x 12 Gauge Seat 2 Keys Keys Slope Sheet 1 Oil Drain Tube For Future Use 1 Hex Bolt 1 4 28 x 1 1 4 1 Locknut 1 4 28 1 Locknut 1 2 20 CONTENTS OF HARDWARE PACK ...

Page 6: ...e battery for minimum of one hour at 6 10 amps See BATTERY inCUSTOMERRESPONSIBILITIES section of this manual for charging instructions 1 4 LOCKNUT LOWER STEERING SHAFT STEERING BOOT EXTENSION SHAFT 1 4 HEX BOLT STEERING WHEEL INSERT ADAPTER 1 2 HEX NUT LARGE FLAT WASHER TABS TAB SLOTS BEFORE REMOVING TRACTOR FROM SKID ATTACH STEERING WHEEL See Fig 1 ASSEMBLE EXTENSION SHAFT AND BOOT Slide extensio...

Page 7: ... full BRAKE position and hold Move gearshift lever to 1st gear Slowly release clutch brake pedal and slowly drive tractor off skid Apply brake to stop tractor set parking brake and place gearshift lever in neutral position Turn ignition key to OFF position Continue with the instructions that follow SEAT PAN SHOULDER BOLT ADJUSTMENT KNOB FLAT WASHER SEAT FIG 3 NOTE You may now roll or drive your tr...

Page 8: ... FOLLOWING IMPORTANT ITEMS Engine oil is at proper level Fuel tank is filled with fresh clean regular unleaded gasoline Become familiar with all controls their location and function Operate them before you start the engine Be sure brake system is in safe operating condition CHECK TIRE PRESSURE The tires on your tractor were overinflated at the factory for shipping purposes Correct tire pressure is...

Page 9: ...ARD FAST SLOW ENGINE ON ENGINE OFF OIL PRESSURE LIGHTS ON FUEL CHOKE MOWER HEIGHT PARKING BRAKE LOCKED UNLOCKED REVERSE NEUTRAL HIGH LOW ATTACHMENT CLUTCH ENGAGED MOWER LIFT DANGER KEEP HANDS AND FEET AWAY FREE WHEEL Automatic Models only OVER TEMP LIGHT PARKING BRAKE IGNITION ATTACHMENT CLUTCH DISENGAGED P KEEP AREA CLEAR SLOPE HAZARDS 15 15 15 SEE SAFETY RULES SECTION ...

Page 10: ...or and starting the engine PARKINGBRAKE Locksclutch brakepedalintothebrake position HEIGHTADJUSTMENTKNOB Usedtoadjustthemower cutting height GEARSHIFT LEVER Selects the speed and direction of the tractor ATTACHMENT LIFT LEVER Used to raise lower and adjustthemowerdeckorotherattachmentsmountedtoyour tractor LIFT LEVER PLUNGER Used to release attachment lift lever when changing its position IGNITION...

Page 11: ...move key when leaving tractor to prevent unauthorizeduse Never use choke to stop engine IMPORTANT LEAVING THE IGNITION SWITCH IN ANY POSITION OTHER THAN OFF WILL CAUSE THE BATTERY TO BE DISCHARGED DEAD ATTACHMENT CLUTCH LEVER ENGAGED POSITION IGNITION KEY DISENGAGED POSITION PARKING BRAKE ENGAGED POSITION GEAR SHIFT LEVER THROTTLE CHOKE CONTROL LEVER BRAKE POSITION HEIGHT ADJUSTMENT KNOB TO ADJUST...

Page 12: ...GH POSITION ENGAGED POSITION LOW POSITION FIG 7 DEFLECTOR SHIELD TO ADJUST GAUGE WHEELS See Fig 6 Gauge wheels are properly adjusted when they are slightly offthegroundwhenmowerisatthedesiredcuttingheightin operating position Gauge wheels then keep the deck in proper position to help prevent scalping in most terrain conditions NOTE Adjust gauge wheels with tractor on a flat level surface Adjust mo...

Page 13: ...gine performance See TO ADJUST CARBURETOR in the Service and Adjustments section of this manual BEFORE STARTING THE ENGINE CHECK ENGINE OIL LEVEL The engine in your tractor has been shipped from the factory already filled with summer weight oil Check engine oil with tractor on level ground Remove oil fill cap dipstick and wipe clean reinsert the dipstick and screw cap tight wait for a few seconds ...

Page 14: ... in the opposite direction making left hand turns until finished See Fig 8 If grass is extremely tall it should be mowed twice to reduce load and possible fire hazard from dried clip pings Make first cut relatively high the second to the desiredheight Do not mow grass when it is wet Wet grass will plug mowerandleaveundesirableclumps Allowgrasstodry beforemowing Alwaysoperateengineatfullthrottlewhe...

Page 15: ...ut oil filter 1 2 GENERAL RECOMMENDATIONS The warranty on this tractor does not cover items that have beensubjectedtooperatorabuseornegligence Toreceive full value from the warranty operator must maintain tractor as instructed in this manual Some adjustments will need to be made periodically to properly maintain your tractor All adjustments in the Service and Adjustments section of this manual sho...

Page 16: ...ntheengineisrunningandtheattachmentclutchis engaged any attempt by the operator to leave the seat should shut off the engine Theattachmentclutchshouldneveroperateunlessthe operator is in the seat BLADE CARE Forbestresultsmowerbladesmustbekeptsharp Replace bent or damaged blades 5 8 BOLT OR PIN BLADE CENTER HOLE TO SHARPEN BLADE See Fig 10 NOTE Wedonotrecommendsharpeningblade butifyou do be sure th...

Page 17: ...and chaff to prevent enginedamagefromoverheating Cleanwithawirebrushor compressedairtoremovedirtandstubborndriedgumfibers ENGINE COOLING FINS Remove any dust dirt or oil from engine cooling fins to preventenginedamagefromoverheating Seeenginemanual MUFFLER Inspect and replace corroded muffler and spark arrester if equipped as it could create a fire hazard and or damage SPARK PLUGS Replace spark pl...

Page 18: ...lter should be replaced once each season If fuel filter becomes clogged obstructing fuel flow to carburetor replacementisrequired With engine cool remove filter and plug fuel line sec tions Place new fuel filter in position in fuel line with arrow pointingtowardscarburetor Be sure there are no fuel line leaks and clamps are properlypositioned Immediately wipe up any spilled gasoline FIG 13 FUEL FI...

Page 19: ...NT IF AN ATTACHMENT OTHER THAN THE MOWER DECK IS TO BE MOUNTED ON THE TRAC TOR REMOVE THE FRONT LINKS AND HOOK THE CLUTCH SPRING INTO SQUARE HOLE IN FRAME TO INSTALL MOWER See Fig 14 Raise attachment lift lever to its highest position Slide mower under tractor with deflector shield to right side of tractor Lower lift lever to its lowest position Connect front links to mower deck and secure with re...

Page 20: ...al number of turns Whendistance D is1 8 to1 2 loweratfrontthanrear tighten nuts F against trunnion on both front links FIG 18 BOTH FRONT LINKS MUST BE EQUAL IN LENGTH FIG 17 TO LEVEL MOWER HOUSING Adjust the mower while tractor is parked on level ground or driveway Makesuretiresareproperlyinflated See PROD UCTSPECIFICATIONS sectionofthismanual Iftiresare over or underinflated you will not properly...

Page 21: ...on the gear shift lever in the neutral N position Tighten adjustment bolt securely NOTE Ifadditionalclearanceisneededtogettoadjustment bolt move mower deck height to the lowest position ADJUSTMENT BOLT NEUTRAL LOCK GATE GEARSHIFT LEVER FIG 22 TO REPLACE MOTION DRIVE BELT See Fig 21 Parkthetractoronlevelsurface Engageparkingbrake For assistance thereisabeltinstallationguidedecalonbottom side of lef...

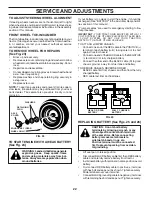
Page 22: ... sparking from acciden tal grounding Lift seat pan to raised position DisconnectBLACKbatterycablefirstthenREDbattery cable and carefully remove battery from tractor Installnewbatterywithterminalsinsamepositionasold battery First connect RED battery cable to positive terminal with hex bolt and keps nut as shown Tighten securely Slide terminal cover over terminal ConnectBLACKgroundingcabletonegative...

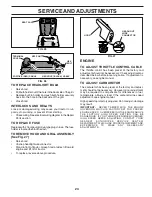
Page 23: ...HEX BOLT POSITIVE RED CABLE NEGATIVE BLACK CABLE TERMINAL COVER ENGINE TO ADJUST THROTTLE CONTROL CABLE The throttle control has been preset at the factory and adjustment should not be necessary Check adjustment as described below before loosening cable If adjustment is necessary see engine manual TO ADJUST CARBURETOR The carburetor has been preset at the factory and adjust mentshouldnotbenecessar...

Page 24: ...NG IN ESSENTIAL FUEL SYSTEM PARTS SUCH AS CARBURETOR FUEL FILTER FUEL HOSE OR TANK DURING STORAGE ALSO EXPERIENCE INDICATES THAT ALCOHOL BLENDED FUELS CALLED GASOHOL OR USING ETHANOL OR METHANOL CAN ATTRACT MOISTURE WHICH LEADS TO SEPARATION AND FORMATION OF ACIDS DURING STORAGE ACIDIC GAS CAN DAMAGE THE FUEL SYSTEM OF AN ENGINE WHILE IN STORAGE Drain the fuel tank Start the engine and let it run ...

Page 25: ...lty ignition switch 7 Check replace ignition switch 8 Faulty solenoid or starter 8 Check replace solenoid or starter 9 Faulty operator presence switch es 9 Contact an authorized service center department Engine clicks but will not 1 Weak or dead battery 1 Recharge or replace battery start 2 Corroded battery terminals 2 Clean battery terminals 3 Loose or damaged wiring 3 Check all wiring 4 Faulty s...

Page 26: ... Mower deck not level 4 Level mower deck 5 Low uneven tire air pressure 5 Check tires for proper air pressure 6 Worn bent or loose blade 6 Replace sharpen blade Tighten blade bolt 7 Buildup of grass leaves and trash under mower 7 Clean underside of mower housing 8 Mower drive belt worn 8 Replace mower drive belt 9 Blades improperly installed 9 Reinstall blades sharp edge down 10 Improper blades us...

Page 27: ... RPM NOTE YOUR TRACTOR IS EQUIPPED WITH A SPECIAL ALTERNATOR SYSTEM THE LIGHTS ARE NOT CONNECTED TO THE BATTERY BUT HAVE THEIR OWN ELECTRICAL SOURCE BECAUSE OF THIS THE BRIGHTNESS OF THE LIGHTS WILL CHANGE WITH ENGINE SPEED AT IDLE THE LIGHTS WILL DIM AS THE ENGINE IS SPEEDED UP THE LIGHTS WILL BECOME THEIR BRIGHTEST WIRING INSULATED CLIPS NOTE IF WIRING INSULATED CLIPS WERE REMOVED FOR SERVICING ...

Page 28: ...28 REPAIR PARTS TRACTOR MODEL NO LT16 JNA1642A PRODUCT NO 954 13 00 85 ELECTRICAL 28 29 26 24 42 43 27 27 25 41 27 27 40 33 90 30 8 2 1 27 52 16 16 48 22 21 ...

Page 29: ...21461 47 Cable Battery 6 Ga 44 red w 16 wire 26 5321751 58 Fuse 27 8735104 00 Nut Keps Hex 1 4 20 Unc 28 5321247 73 Cable Ground 6 Ga 12 black 29 5321213 05 Switch Plunger Gray 30 5321755 66 Switch Ign Delta 33 5321404 01 Key Ign Molded Generic 40 5321797 20 Harness Ign 41 8711104 08 Bolt Blk Fin Hex 1 4 20 x 1 2 42 5321315 63 CoverTerminalRed 43 5321788 61 Solenoid 48 5321408 44 AdapterAmmeterRec...

Page 30: ... PRODUCT NO 954 13 00 85 CHASSIS AND ENCLOSURES 64 74 10 30 51 57 53 52 54 55 17 29 28 12 3 31 1 3 2 9 208 208 5 5 207 144 25 26 26 60 26 144 25 26 10 3 3 3 142 208 13 208 11 143 60 211 114 3 115 3 142 145 37 37 18 206 14 14 38 212 58 219 20 219 23 ...

Page 31: ...5321757 10 Bracket Asm Pivot Mower Rear 51 8738004 00 Nut Lock W Insert 1 4 20unc 52 8190914 16 Washer 9 32 x 7 8 x 16 Ga 53 5321446 97 Bracket Grille Lh 54 5321614 64 Screw Hex Wshd 8 18 x 7 8 55 5321446 96 Bracket Grille Rh 57 8747804 12 Bolt Hex 1 4 20 x 3 4 58 5321501 27 Air Duct Engine P L 60 8721406 08 Bolt Carr 3 8 16 x 1 64 5321547 98 Dash Lower STLT 74 8736806 00 NutCrownlock3 8 16 114 53...

Page 32: ...8 39 57 51 74 75 78 76 77 1 25 19 24 2 53 35 34 37 36 35 62 36 64 65 59 56 55 63 77 61 22 27 26 6 113 18 51 5 18 6 85 52 30 32 32 30 52 11 85 80 4 3 81 84 82 145 79 16 96 26 26 26 89 90 27 51 48 150 151 202 49 47 50 120 21 8 10 156 165 168 166 163 14 159 161 198 158 164 83 162 169 197 116 70 6 170 212 ...

Page 33: ...tch 6 75 56 8170606 20 Screw 3 8 16 x 1 1 4 57 5321308 01 V Belt Ground Drive 95 25 59 5321696 91 Keeper Belt Span Ctr 61 8171206 14 Screw 3 8 16 x 875 62 5321248 72 CoverPedalRound 63 5321754 10 Engine Pulley LT YT 64 8711707 64 Bolt Hex 65 8100407 00 Washer Lock Hvy Hlcl Spr 7 16 66 5321547 78 Keeper Belt Engine Foolproof 70 5321346 83 Guide Belt Mower Drive RH 74 5321370 57 Spacer Axle 75 53212...

Page 34: ... NO LT16 JNA1642A PRODUCT NO 954 13 00 85 STEERING ASSEMBLY 44 51 54 5 9 5 7 7 9 4 3 32 43 6 43 8 10 40 11 8 6 9 46 46 8 6 9 2 47 47 26 30 28 1 41 42 37 36 37 38 12 39 68 67 67 67 13 65 85 85 68 15 15 15 29 29 82 88 71 17 29 43 91 ...

Page 35: ...7 8 X 16 Ga 29 8170606 12 Screw 3 8 16x3 4 30 8760204 12 Pin Cotter 1 8 X 3 4 Cad 32 5321304 65 Rod Tie Wire Form 19 75 Mech 36 5321550 99 Bushing Strg 37 5321529 27 Screw 38 5321720 93 CapWheelSteering 39 8191824 11 Washer 9 16 x 1 1 2 x 11 Ga 40 5321247 01 Lock nut 41 5321599 45 Adaptor Wheel Strg 42 5321696 33 Boot Steering Shaft 43 5321217 49 Washer 25 32 X 1 1 4 X 16 Ga 44 5321806 40 Extensio...

Page 36: ...h 13 5321212 48 Bushing Snap Blk Nyl 50 Id 14 8720504 12 Bolt Rdhd Sqnk 1 4 20x1 1 2 15 5321343 00 Spacer Split 28x 96 Yel Zinc 16 5321212 50 Spring Cprsn 1 27 Blk Pnt 17 5321239 76 Nut Lock 1 4 Lge Flg Gr 5 Zinc 18 5321242 38 Cap Spring Seat 21 5321718 52 Bolt Shoulder 5 16 18 Unc 2A 22 8738005 00 Nut Hex Lock W Ins 5 16 18 23 8711108 14 Bolt Hex Black 24 8191719 12 Washer 17 32 X 1 3 16 X 12 Ga ...

Page 37: ...750 39 Cap Axle Blk 1 50 X 1 00 5321443 34 Sealant Tire 10 oz Tube 8 20 14 5 1 5321563 69 Decal Oper Step Thru Eng Fr 3 5321796 35 DecalHoodRH 4 5321796 36 Decal Hood LH 5 5321804 34 DecalHood 6 5321705 65 DecalWheelSteering 7 5321791 28 Decal Deck B 42 8 5321705 63 DecalWarning 9 5321417 61 DecalFender 10 5321571 40 DecalFenderDangerEng Fr KEY PART NO NO DESCRIPTION 1 6 2 1 5 8 4 10 3 9 11 7 WHEE...

Page 38: ...38 REPAIR PARTS TRACTOR MODEL NO LT16 JNA1642A PRODUCT NO 954 13 00 85 ENGINE 2 1 OPTIONAL EQUIPMENT Spark Arrester 29 44 46 32 31 33 37 33 62 13 4 72 78 81 3 16 78 23 45 14 38 40 41 112 ...

Page 39: ... Tank Fuel Front 32 5321405 27 Cap Asm Fuel W sym Vented 33 5321234 87 Clamp Hose Black 37 5321370 40 Line Fuel 20 38 5321483 15 Plug Drain Oil Easy 40 5321240 28 Bushing Snap Nyl Blk Fuel Line 41 5321392 77 Stem Fuel Tank 44 8176704 12 Screw Hexwsh Thdrol 1 4 20 x 3 4 45 8170006 12 Screw Hexwsh Thdr 3 8 16 x 3 4 46 8190914 16 Washer 9 32 x 7 8 x 16 Ga 62 8100405 00 Washer Lock 5 16 72 8710705 12 ...

Page 40: ...32 33 146 148 145 150 45 144 147 147 142 149 142 49 50 51 54 52 53 55 56 34 1 46 44 21 24 25 26 27 2 28 29 23 21 21 21 18 18 20 2 48 59 19 4 3 129 92 131 130 92 5 6 21 40 143 36 40 37 40 159 152 151 153 154 157 158 67 153 156 155 132 91 94 182 95 183 132 113 117 116 118 119 114 115 112 114 117 119 116 115 111 118 113 ...

Page 41: ...318 45 Arm Asm Pad Brake 54 5321339 43 WasherHardened 55 5321550 46 Arm Idler 42 mower LT YT 56 5321657 23 SpacerRetainerMower 59 5321410 43 Guard TUV Idler 67 5321069 32 Knob Rd 3 8 16 Plstc Thds Blk 68 5321449 59 V Belt Mower 42 91 5321805 32 Bracket Roller Nose LH 92 8738006 00 Nut Lock w Ins 3 8 16 94 5321322 64 RollerNose 95 5321805 33 Bracket Roller Nose RH 111 5321792 92 Bracket Wheel Gauge...

Page 42: ...EPAIR PARTS TRACTOR MODEL NO LT16 JNA1642A PRODUCT NO 954 13 00 85 MOWER LIFT 36 15 20 16 1718 20 20 15 20 4 5 6 2 3 1 6 5 4 7 8 23 24 25 27 28 29 30 50 26 37 41 40 38 12 11 31 32 31 32 19 19 13 13 13 13 49 ...

Page 43: ...38008 00 Nut Lock W Wsh 1 2 13 Unc 19 5321398 68 Arm Suspension Rear 20 5321635 52 Spring Retainer 23 5321108 07 Nut Special 24 8191310 16 Washer 13 32 x 5 8 x 16 Ga 25 5321248 74 Spring 2 1 8 26 5321694 84 RetainerClip 27 5321269 71 Rod Adj Lift 3 8 16 28 8733506 00 Nut Hex Jam 29 5321380 57 Knob Inf 3 8 16 30 5321502 33 TrunnionInfinHeight 31 5321698 65 Bearing Pvt Lift 32 8735406 00 NutCrownloc...

Page 44: ...44 SERVICE NOTES ...

Page 45: ...45 SERVICE NOTES ...

Page 46: ... the Power Train Component and parts The cost of normal maintenance and replacement of service items which are not defective shall be paid for by the original purchaser C Securing Warranty Service Warranty service can be arranged for by contacting either a Tecumseh Authorized Service Outlet any Tecumseh Registered Service Dealer Tecumseh Authorized Service Distributor or Tecumseh Central Warehouse...

Page 47: ...the face Do not mow slopes greater than 15 degrees Make turns gradually to prevent tipping or loss of control Exercise extreme caution when changing direction on slopes 1 Fold this page along dotted line indicated above 2 Hold page before you so that its left edge is vertically parallel to a tree trunk or other upright structure 3 Sight across the fold in the direction of hill slope you want to me...

Page 48: ...48 ...
Reviews: