20
©2012 Johnson Level & Tool
3. Power on horizontal and vertical laser lines, and make a mark
where the cross laser meets target ‘A’. Mark this as ‘A1’.
4. Turn the instrument by 180°, so that the cross line meets target
‘B’. Mark this as ‘B1’.
5. Move the tripod within .6m of target ‘A’. Make a mark where the
cross meets target ‘A’, and label as ‘A2’.
6. Rotate the instrument by 180° and make a mark where the cross
meets target ‘B’, and label as ‘B2’.
7. Calculate (A1-A2)-(B1-B2) = E. If the absolute value of E is above
1mm, the instrument accuracy is out of tolerance and calibration
is required.
Self-check and Calibration
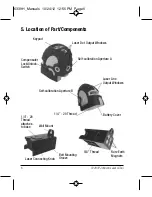
The instrument has two calibration apertures. Aperture ‘A’ adjusts
the horizontal axis. Aperture ‘B’ adjusts the Vertical axis
Notes regarding adjustment:
1. Use a 3mm Hexagon tool for adjustment.
2. The adjustment of each axis may influence the other. When
making fine adjustments in the left/right direction horizontally, the
front and back direction vertically may change. When adjusting
the front/back direction vertically, the left and right direction will
possibly change. Adjustments may need to be checked and
repeated alternately.
3. The adjustment of the self calibration screw cannot exceed 4
turns in either direction.
4. If the instrument accuracy cannot be adjusted through self
calibration, please contact an authorized repair facility, or contact
Johnson Level & Tool.
6339H_Manuals 10/24/12 12:56 PM Page 20

