


10 Conventional Products—2400 and 2400TH Direct 2-Wire Smoke Detectors
!
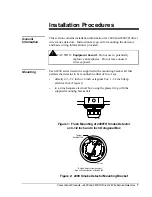
WARNING:
Shock hazard. Disable the power IDCs before
installing detectors.
1.
Wire each detector following installation guidelines.
2.
Line up arrows on the detector with arrows on the mounting bracket.
3.
Turn the detector clockwise until it clicks into place.
4.
Enable the tamper-proof feature. For instructions see the
Tamper-Proof Feature section of this technical bulletin.
5.
After all detectors have been installed, apply power to the control unit.
6.
Test the detector as described in the Testing section of this
technical bulletin.
7.
Reset the detector at the system control panel.
8.
Notify the proper authorities that the system is in operation.
Dust covers can be used to help limit dust entry to the detector. However,
these covers are not a substitute for removing the detector during building
construction. Remove any dust covers before placing the system in
service.
This detector includes a tamper-proof feature that prevents removal of the
detector without the use of a tool.
To make the detector tamper-proof:
1.
Break off the smaller tab at the scribed line on the tamper-proof tab on
the detector mounting bracket (Figure 2).
2.
Install the detector.
To remove the detector from the bracket once it has been made
tamper-proof:
1.
Use a small screwdriver to depress the tamper-proof tab located in the
slot on the mounting bracket.
2.
Turn the detector counterclockwise for removal.
The tamper-proof feature may be defeated by breaking and removing
the plastic lever from the base. However, this prevents using the
feature again.
Installation
Limiting
Exposure to Dust
Tamper-Proof
Feature