background image

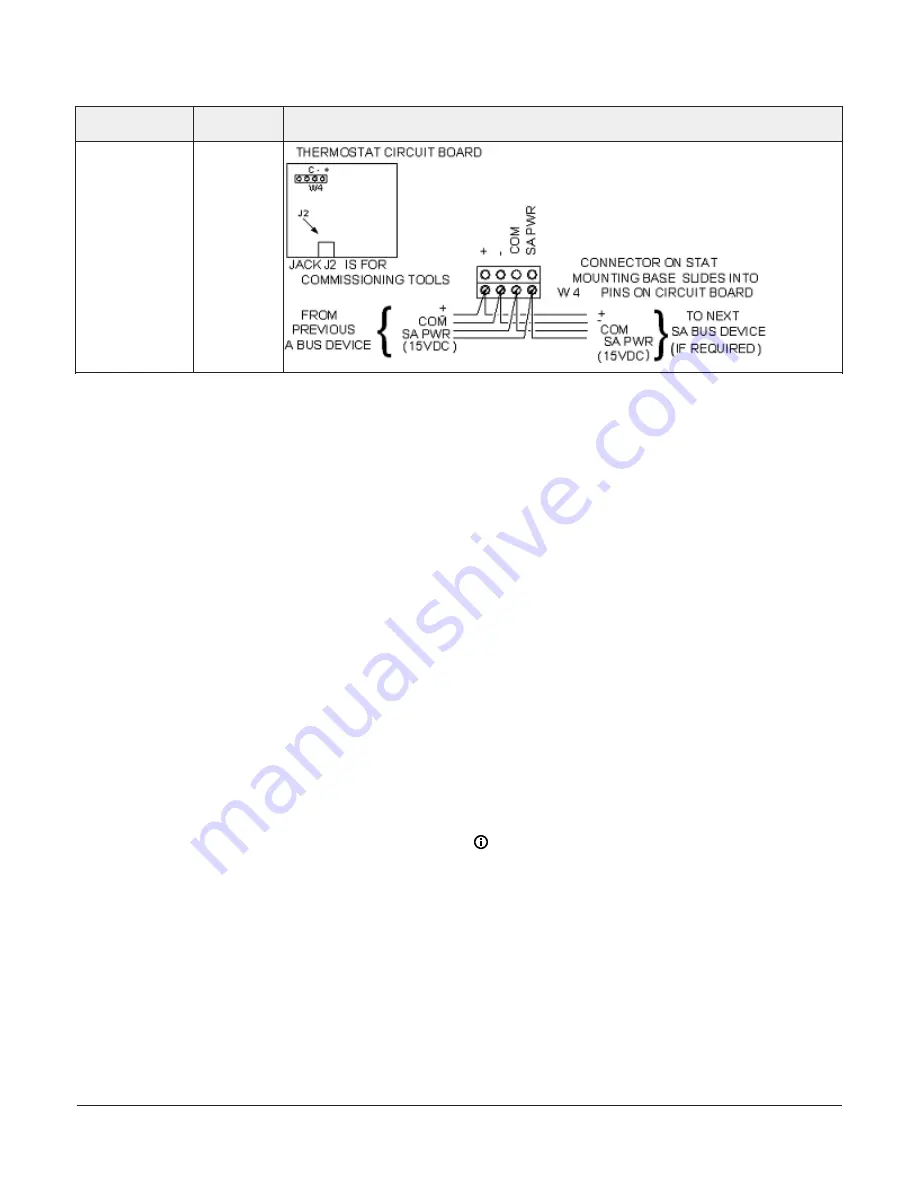
Table 5: Termination details

Type of field

device

Type of Input/

Output

Termination diagrams

Network Stat with

Terminals (Fixed

Address = 199)

SA Bus

Setup and Adjustments

Configuring N2 Communications

N2-capable controllers support the full range of

possible N2 device addresses provided by the N2

protocol standard (1-254).

To configure a controller to communicate using the

N2 protocol, complete the following steps:

1. Disconnect the 24 VAC supply from the

controller.

2. Set the address switches to the desired N2

address. For details about setting a device

address, see 

Setting the device address

.

3. Reconnect the 24 VAC supply to the controller.

4. Using an SA bus connection, download the

firmware and controller application file

configured for N2 to the controller.

Switching the Communications Protocol

from N2 to MS/TP

For N2 sites that are converting to BACnet MS/TP,

you can switch the communications protocol of N2-

configured MS/TP controllers back to BACnet MS/TP.

To switch controller operating in N2 mode back into

BACnet MS/TP mode, complete the following steps:

1. Disconnect the 24 VAC supply from the

controller.

2. Set the address switches to the desired BACnet

MS/TP address. For details about setting a

device address, see 

Setting the device address

.

3. Ensure the DIP switch 128 is set to OFF.

4. Reconnect the 24 VAC supply to the controller.

5. Using an SA Bus connection, download a

controller application file configured for BACnet

MS/TP to the controller.

Configuring Wireless
Communications

To configure a controller for use with the ZFR/ZFR

Pro Series Wireless Field Bus system, complete the

following steps:

1. Disconnect the 24 VAC supply from the

controller.

2. Wire the input/output terminals and SA bus.

Note: 

In wireless network applications, do not

connect any wires to the FC bus terminal block.

(Connect the SA/FC terminal block on an IOM

to an SA bus only.)

3.

Important:

 Before the controller is powered

on, connect the ZFR/ZFR Pro Wireless Field Bus

Router to the FC bus port (RJ-12 modular jack)

on the front of the controller.

FAC3613 Advanced Application Field Equipment Controller Installation Guide

16

Summary of Contents for FAC3613

Page 1: ...nications The FAC3613 field controller can also be installed in a wireless application using a ZFR ZFR Pro Wireless Field Bus Router To configure these controllers to communicate using the wireless communications protocol see Configuring Wireless Communications Fast persistence The FAC3613 model has been significantly upgraded and now includes a fast persistence feature that allows you to retain d...

Page 2: ...ing surface M4 screws or 8 screws One 23 cm 9 125 in or longer piece of 35 mm DIN rail and appropriate hardware for DIN rail mount only Small straight blade screwdriver for securing wires in the terminal blocks FAC3613 physical features Figure 1 FAC3613 Physical Features Table 1 Physical features Physical feature description and references 1 Analog Output AO Terminal Block Can be defined as Voltag...

Page 3: ...ely and evenly on the mounting surface Mount the controller in an area free of corrosive vapors and observe the ambient conditions requirements in Technical specifications Provide sufficient space around the controller for cable and wire connections easy cover removal and good ventilation through the controller 50 mm 2 in minimum on the top bottom and front of the controller Do not mount the contr...

Page 4: ...ns through the mounting clips 3 Drill holes in the wall or surface at the marked locations and insert appropriate wall anchors in the holes if necessary 4 Hold the controller in place and insert the screws through the mounting clips and into the holes or anchors Carefully tighten all of the screws Important Do not overtighten the mounting screws Overtightening the screws may damage the mounting cl...

Page 5: ... the FC Bus terminal function requirements and ratings see Figure 4 FC bus terminal block wiring Note The FC bus Shield SHLD terminal is isolated and can be used to connect daisy chain the shields for FC bus wiring SA bus terminal block The SA Bus terminal block is a brown removable 4 terminal plug that fits into a board mounted jack Wire the removable SA Bus terminal block plugs on the controller...

Page 6: ...dle terminal on the supply power terminal block See for more information about the Supply Power Terminal Block Figure 7 24 VAC supply power terminal block wiring Note The supply power wire colors may be different on transformers from other manufacturers Refer to the transformer manufacturer s instructions and the project installation drawings for wiring details Important Connect 24 VAC supply powe...

Page 7: ...o maintain a closed 4 to 20 mA current loop See UI current loop jumpers See Guideline B in Table 3 Analog Input Resistive Mode 60 600k ohms Internal 12 V 15k ohms pull up Qualified Sensors 0 2k ohms potentiometer RTD 1k Nickel Johnson Controls sensor 1k Platinum and A99B Silicon Temperature Sensor Negative Temperature Coefficient NTC Sensor See Guideline A in Table 3 INn Binary Input Dry Contact M...

Page 8: ...ote All Analog Output Common terminals OCOMn share a common which is isolated from all other commons One common screw terminal point is provided for every two output screw terminal points See Guideline C in Table 3 OUTn Binary Output 24 VAC Triac Class 2 24 V 500 mA External Power Source Connects OUTn to OCOMn when activated External Power Source Requirements 30 VAC maximum output voltage 0 5 A ma...

Page 9: ...hen wiring inputs and outputs Note Figure 8 applies to low voltage 30 V inputs and outputs only Figure 8 Maximum wire length for low voltage 30 V Inputs and Outputs by current and wire size Communications bus and supply power wiring guidelines The provides information about the functions ratings and requirements for the communication bus and supply power terminals The table also provides guideline...

Page 10: ...le or above SA Bus Communications COM SA Bus Signal Reference and 15 VDC Common SA BUS SA PWR 15 VDC Supply Power for Devices on the SA Bus Maximum total current draw for SA Bus is 240 mA 0 6 mm 22 AWG stranded 4 wire 2 twisted pairs shielded cable recommended Note The and wire are one twisted pair and the COM and SA PWR are the second twisted pair of wires Sensor Port SENSOR RJ 12 6 Position Modu...

Page 11: ...ures in this section for the applicable termination diagrams Table 5 Termination details Type of field device Type of Input Output Termination diagrams Temperature Sensor UI Voltage Input External Source UI Voltage Input Internal Source UI Voltage Input Self Powered UI FAC3613 Advanced Application Field Equipment Controller Installation Guide 11 ...

Page 12: ...ion diagrams Current Input External Source Isolated UI Current Input Internal Source 2 wire UI Current Input Internal Source 3 wire UI Current Input External Source in Loop UI Feedback from EPP 1000 UI FAC3613 Advanced Application Field Equipment Controller Installation Guide 12 ...

Page 13: ...y Contact Binary Input UI or BI 0 10 VDC Output to Actuator External Source CO or AO 0 10 VDC Output to Actuator Internal Source CO or AO Current Output CO or AO 24 VAC Triac Output Switch Low External Source CO or AO FAC3613 Advanced Application Field Equipment Controller Installation Guide 13 ...

Page 14: ...grams Analog Output Current AO 4 20 mA Output to Actuator AO 4 20 mA Output to Actuator AO Incremental Control to Actuator Switch Low Externally Sourced BO 24 VAC Binary Output Switch Low Externally Sourced BO FAC3613 Advanced Application Field Equipment Controller Installation Guide 14 ...

Page 15: ...mental Control to Actuator Switch High Externally Sourced BO Network Stat with Phone Jack Fixed Address 199 SA Bus Note The bottom jack J2 on the TE 700 and TE 6x00 Series Sensors is not usable as a zone bus or an SAB connection Network Stat with Terminals Addressable SA Bus FAC3613 Advanced Application Field Equipment Controller Installation Guide 15 ...

Page 16: ...Cnet MS TP To switch controller operating in N2 mode back into BACnet MS TP mode complete the following steps 1 Disconnect the 24 VAC supply from the controller 2 Set the address switches to the desired BACnet MS TP address For details about setting a device address see Setting the device address 3 Ensure the DIP switch 128 is set to OFF 4 Reconnect the 24 VAC supply to the controller 5 Using an S...

Page 17: ...eight switches numbered 128 64 32 16 8 4 2 and 1 Switches 64 through 1 are device address switches Switch 128 must be set to OFF for all hard wired SA and FC bus applications Figure 9 Device address DIP switch block set to address 21 Note Metasys field controllers ship with switch 128 ON and the remainining adress switches off rendering the controllers wired subordinate devices which do not operat...

Page 18: ...p into slots on the inside of the housing cover To remove the controller cover complete the following steps 1 Place your fingertips under the two cover lift tabs FAC3613 physical features on the sides of the housing cover and gently pry the top of the cover away from the base to release the cover from the two upper latches 2 Pivot the top of the cover further to release it from the lower two latch...

Page 19: ...urrent loop jumper positions Set the current loop jumper to the Enabled position Figure 12 to connect an internal 100 ohms resistor across the UI terminals which maintains the 4 20 mA current loop circuit even when power to the controller is interrupted or off Important Current loop jumpers must be in the Disabled default position for all UIs that are not set up to operate as 4 20 mA analog inputs...

Page 20: ... MAP 4 2 BACnet Router Mobile Access Portal MAP Gateway at version 4 2 or above Refer to Controller Tool Help LIT 12011147 for detailed information on commissioning field controllers Beginning at CCT Release 13 the firmware package files are orderable separately they are not included with CCT They are obtained from the Metasys software licensing portal and are loaded and licensed on the computer s...

Page 21: ...and the ZFR1811 Wireless Field Bus Router Blink 2 Hz Download or Startup in progress not ready for normal operation SA BUS Green Blink 2 Hz Blink 2 Hz Data Transmission normal communication Off Steady No Data Transmission N A auto baud not supported On Steady Communication lost waiting to join communication ring FC BUS Green Blink 2 Hz Blink 2 Hz Data Transmission normal communication Off Steady N...

Page 22: ...are also available Refer to the Series Y63 Y64 Y65 Y66 and Y69 Transformers Product Bulletin LIT 125755 AS XFR050 0 for more information Power transformer Class 2 24 VAC 50 VA maximum output no enclosure for more information AS CBLTSTAT 0 Cable adapter for connecting to 8 pin TE 6700 Series sensors AP TBK4SA 0 Replacement SA Bus Terminal Blocks 4 Position Brown Bulk Pack of 10 AP TBK4FC 0 Replacem...

Page 23: ... lead to source 15 VDC supply power from field controller to bus devices Processor RX631 32 Bit Renesas microcontroller Memory 16 MB flash memory and 8 MB RAM Real Time Clock Backup Power Supply Super capacitor maintains power to the onboard real time clock for a minimum of 72 hours when supply power to the controller is disconnected Input and Output Capabilities 8 Universal Inputs Defined as 0 10...

Page 24: ...ations are nominal and conform to acceptable industry standard For application at conditions beyond these specifications consult the local Johnson Controls office Johnson Controls shall not be liable for damages resulting from misapplication or misuse of its products Product warranty This product is covered by a limited warranty details of which can be found at www johnsoncontrols com buildingswar...

Reviews: