background image

 3

Important Safety Information

These warnings are provided for the safety of the users and those living with them. So read
them carefully before installing and using the appliance.
This will allow you to obtain best performance, avoid improper actions, use the appliance in
complete safety and also respect the environment.
If you need assistance, contact our Customer Care Department on 08705 727 727

Installation

·

This oven must be installed by qualified
personnel to the relevant British Standards.

·

This oven is heavy. Take care when mov-
ing it.

·

Remove all packaging, both inside and out-
side the oven, before using the oven.

·

Do not attempt to modify the oven in any
way.

During use

·

This oven is intended for domestic cooking
only. It is not designed for commercial or
industrial purposes.

·

Always stand back from the oven when
opening the oven door during cooking or at
the end of it to allow any build up of steam or
heat to release.

·

Appliances become very hot with use, and
retain their heat for long periods after use.
Care should be taken to avoid touching
heating elements inside the oven.

·

Never line any part of the oven with alu-
minium foil.

·

Do not allow heatproof cooking material, e.g.
roasting bags, to come into contact with oven
elements.

·

Never place plastic or any other material
which may melt in or on the oven.

·

Do not place sealed cans or aerosols in-
side the oven. They may explode if they
are heated.

·

Do not hang towels, dishcloths or clothes
from the oven or its handle.

·

Do not use this oven if it is in contact with
water and never operate it with wet hands.

·

Take great care when heating fats and oils
as they will ignite if they become too hot.

·

Always use oven gloves to remove and re-
place food in the oven.

·

Before cleaning the oven, either turn the
power off or pull the mains plug out.

·

Ensure that all controls are in the OFF posi-
tion when not in use.

·

Do not leave cookware containing foodstuffs,
e.g. fat or oil in or on the oven in case it is
inadvertently switched ON.

·

When using other electrical appliances, en-
sure the cable does not come into contact with
the hot surfaces of the oven.

Summary of Contents for JLBIOS664

Page 1: ...JLBIOS664 OVEN Instruction manual GB...

Page 2: ...ol panel 6 The oven safety devices 7 Whentheovenisfirstinstalled 8 Beforefirstuse 8 Functionsymbols 11 Programming the oven 12 Special and Energy Saving functions 14 Using the oven 17 BakingTable 22 R...

Page 3: ...come very hot with use and retain their heat for long periods after use Care should be taken to avoid touching heating elements inside the oven Never line any part of the oven with alu minium foil Do...

Page 4: ...ould only be repaired or ser viced by an authorised Service Engineer and only genuine approved spare parts should be used Environmental Information Afterinstallation pleasedisposeofthepackaging withdu...

Page 5: ...ription of the appliance 1 Control Panel 2 Electronicprogrammer 3 Air Vents for Cooling Fan 4 Grill 5 Ovenlight 6 Oven Fan 7 Ratingplate Oven accessories 1 5 4 7 2 3 6 Grilltrivet Grill roasting pan S...

Page 6: ...es If power fails for a longer time all the settings will be cancelled When the power is restored thenumbersinthedisplaywillflash and theclock timerhastobereset Cooking function Time Temperature 1 1 1...

Page 7: ...defective component please contact the local customer service The cooling fan The cooling fan is designed to cool the oven and thecontrolpanel Thefanswitchesonautomatically after a few minutes of cook...

Page 8: ...ress Ovenfunction button twice and select the Conventional Cooking function set the temperature to 250 C using the increasing push button Allow the oven to run empty for approximately 45 minutes open...

Page 9: ...the oven light will switch on Toswitchofftheoven youcanpressbutton at any time Any cooking function or programme will stop theovenlightwillswitchoffandthetimedisplay will show the time of day only It...

Page 10: ...or a short time and the thermometer symbol will illuminate permanently HowtosettheTemperature Pressbutton and toincreaseordecrease the pre set temperature while the symbol is flashing If symbol is not...

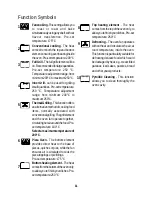
Page 11: ...ment and the oven fan operate together circulatinghotairaroundthefood Pre settemperature 180 C Selectamaximumtemperatureof 200 C Pizza Oven The bottom element provides direct heat to the base of pizza...

Page 12: ...f if in use The Minute Minder function can also be used as well when the oven is off To use or to change the Minute Minder setting pressTimeFunctions buttonuntilthesymbols and flash It is now possible...

Page 13: ...l 0 00 is displayed To Programme the Oven to Switch On and Off 1 Carry out the Cooking Duration setting as described in the relevant chapter 2 Press Time Functions button until the End of Cooking func...

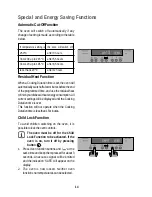
Page 14: ...use the residual heat tofinishyourdisheswithoutenergyconsumption All current settings will be displayed until the Cooking Duration time is over This function will not operate when the Cooking Duration...

Page 15: ...in a shorter time the Fast Heat Up Function can be used 1 Switch the oven on by pressing button 2 Set the required cooking function and temperatureasexplainedinthepreviouspages 3 Setthetemperaturebyp...

Page 16: ...n thedisplay 12 00 and the symbol are flashing automatically 1 Press the Time functions button for approximately 2 seconds An acoustic alarm will sound for a short time 2 Press the Time Functions and...

Page 17: ...cause a heat build up which wouldaffectthebakingresultsanddamage the oven enamel Always place pans heat resisting pans and aluminium trays ontheshelfwhichhasbeeninsertedinthe shelfrunners Whenfoodishe...

Page 18: ...he display 3 Ifnecessaryadjusttemperaturesettingusingthe or controls Conventional Cooking The middle shelf position allows for the best heat distribution To increase base browning simply lower the she...

Page 19: ...cribed forthefancookingfunction How to use the Inner Grill The grill provides quick direct heat to the central area of the grill pan By using the grill for cooking small quantities it can help to save...

Page 20: ...baking Cakes and pastries usually require a medium temperature 150 C 200 C and therefore it is necessary to preheat the oven for about 10 minutes Donotopentheovendoorbefore3 4ofthebaking timehaselaps...

Page 21: ...arminthe ovenatminimumtemperatureuntilserving Caution Do not line the oven with aluminium foil and do not place a roasting pan or baking tray on the floor as other wise the oven enamel will be dam age...

Page 22: ...1 170 2 160 90 120 In cake mould Strudel 2 180 2 160 60 80 In baking tray Jam tart 2 190 2 1and3 180 40 45 In cake mould Fruit cake 2 170 2 150 60 70 In cake mould Sponge cake 1 170 2 1and3 165 30 40...

Page 23: ...0 2 170 120 150 Withrind Shin of pork 2 180 2 160 100 120 2 pieces Lamb 2 190 2 175 110 130 Leg Chicken 2 190 2 200 70 85 Whole Turkey 2 180 2 160 210 240 Whole Duck 2 175 2 220 120 150 Whole Goose 2...

Page 24: ...400 3 250 12 14 10 12 Sandwiches 4 6 3 250 5 7 Toast 4 6 3 250 2 4 2 3 Timings do not include pre heating The empty oven should always be pre heated for 10 minutes Conventional Grilling Thermal Grill...

Page 25: ...thoroughly after every use This is the easiest way to clean dirt off It prevents dirt being burnt on Cleaning and Maintenance Cleaning materials Beforeusinganycleaningmaterialsonyouroven check that t...

Page 26: ...pproachesabout 300 C Upon completion of the cleaning operation the oven door will be locked until the oven cavity has cooled down Thecoolingfanoperatesuntiltheoven hascooled down After cooking it is a...

Page 27: ...hould bekept away until it has cooled Iftheovenhasbeeninstalledunderabuilt inhob donotswitchthehobcookingzones onwhilepyroliyticcleaningisrunning Choosethisfunctiontocleantheovenbypyrolysis The follow...

Page 28: ...ll switch off and the pyrolytic cleaning cyclestarts Assoonastheovenheatsup thethermometer symbol rises slowly indicating that the temperature inside the oven is increasing 5 When temperature inside t...

Page 29: ...rnating with the symbol waiting for confirmation to start the pyrolyticcleaningfunction At this time push the time function button Time Functions The End of Cooking symbol and the arrow symbol will fl...

Page 30: ...ry to remove the internal panes of glass when the door is still assembled Todoso proceedasfollows 1 openthedoorfully 2 Locatethetwodoorhinges Fig 1 3 Liftandturntheleversonthetwohinges Fig 2 4 Holdthe...

Page 31: ...ase the locking system to remove the internalpanesofglass Fig 5 8 Turnthe2fasteners90 andextractthemfrom theirseats Fig 6 9 Gentlyliftandcarefullytakeofftheuppermost pane Fig 7 Fig 5 Fig 6 90 Fig 7 7...

Page 32: ...ethespecialheat reflect ingsurfaceoftheinternalpanesofglass Aftercleaning reassemblethepanesinthedoor and then the oven door following the procedure described above in reverse Make sure you reposition...

Page 33: ...ifyoudonotfeelany roughnessnearthescreenprintingwhenyou pass your fingers over the surface Themiddlepaneofglassmustbeputbackinto the right seats as shown in Fig 11 c theuppermostpanemustbereassembleda...

Page 34: ...a well wetted soap impregnated pad Rinse well and dry with a soft cloth Remove the shelf supports and all oven accessories before activating the pyrolytic cleaning cycle Replacing the oven light Disc...

Page 35: ...the light bulb and replace it if necessary see chapter Cleaning and Maintenance Following the advice contained in these instructions especially the section Using the oven When the cooking process is...

Page 36: ...000W Pizza 1000 2000 W Thermal Grilling 1675W Pyrolitic Cleaning Function 2450W Oven light 40W Convection fan 25W Cooling fan 25W Total rating 2515W Operating voltage 50 Hz 230 V Dimensions of the rec...

Page 37: ...antheothercables Important Afterinstallationandconnecting thecablemustbe placed so that it cannot at any point reach a temperatureofmorethan50 Cabovetheambient temperature Beforetheovenisconnected che...

Page 38: ...surroundorcabinetintowhichtheovenwillbe builtmustcomplywiththesespecifications z thedimensionsmustbeasshownintherelevant diagrams z the materials must withstand a temperature increaseofatleast60 Cabov...

Page 39: ...uring the Appliance to the Cabinet Open the oven door asten the oven to the cabinet placing the four distance holders Fig D A which fit exactly intotheholesintheframeandthenfitthefour wood screws Fig...

Page 40: ...397164701 07 10 R A John Lewis Partnership 171Victoria Street London SW1E 5NN www johnlewis com...

Reviews: