background image

Hints and tips

Warning! Refer to Safety

chapters.

The temperature and baking times

in the tables are guidelines only.

They depend on the recipes and

the quality and quantity of the

ingredients used.

General information

• The appliance has five shelf positions. Count the

shelf positions from the bottom of the appliance

floor.

• The appliance has a special system which

circulates the air and constantly recycles the

steam. With this system you can cook in a

steamy environment and keep the food soft

inside and crusty outside. It decreases the

cooking time and energy consumption to a

minimum.

• Moisture can condense in the appliance or on

the door glass panels. This is normal. Always

stand back from the appliance when you open

the appliance door while cooking. To decrease

the condensation, operate the appliance for 10

minutes before cooking.

• Clean the moisture after each use of the

appliance.

• Do not put the objects directly on the appliance

floor and do not put aluminium foil on the

components when you cook. This can change

the baking results and cause damage to the

enamel.

Baking cakes

• Do not open the oven door before 3/4 of the

set cooking time is up.

• If you use two baking trays at the same time,

keep one empty level between them.

Cooking meat and fish

• Use a deep pan for very fatty food to prevent

the oven from stains that can be permanent.

• Leave the meat for approximately 15 minutes

before carving so that the juice does not seep

out.

• To prevent too much smoke in the oven during

roasting, add some water into the deep pan. To

prevent the smoke condensation, add water

each time after it dries up.

Cooking times

Cooking times depend on the type of food, its

consistency, and volume.
Initially, monitor the performance when you

cook. Find the best settings (heat setting,

cooking time, etc.) for your cookware, recipes

and quantities when you use this appliance.

Oven User Manual

17

Summary of Contents for JLBIOS622

Page 1: ...JLBIOS622 User Manual Oven...

Page 2: ...14 Inserting the accessories 14 Trivet and Grill Roasting pan 14 Additional functions 16 Cooling fan 16 Safety thermostat 16 Hints and tips 17 General information 17 Baking cakes 17 Cooking meat and f...

Page 3: ...of the appliance in a safe way and understand the hazards involved Do not let children play with the appliance Keep all packaging away from children and dispose of it appropriately Keep children and...

Page 4: ...or sharp metal scrapers to clean the glass door since they can scratch the surface which may result in shattering of the glass If the mains power supply cable is damaged it must be replaced by the ma...

Page 5: ...to the mains cable Should the mains cable need to be replaced this must be carried out by our Authorised Service Centre Do not let mains cables touch or come near the appliance door especially when t...

Page 6: ...re the door is never closed when the appliance is in operation Heat and moisture can build up behind a closed furniture panel and cause subsequent damage to the appliance the housing unit or the floor...

Page 7: ...ove the door catch to prevent children or pets from becoming trapped in the appliance Service To repair the appliance contact an Authorised Service Centre Use original spare parts only Oven User Manua...

Page 8: ...ammer 5 Knob for the temperature 6 Temperature indicator symbol 7 Heating element 8 Lamp 9 Fan 10 Shelf support removable 11 Shelf positions Accessories Wire shelf For cookware cake tins roasts Grill...

Page 9: ...cessories and the removable shelf supports back to their initial position Preheating Preheat the empty appliance to burn off the remaining grease 1 Set the function and the maximum temperature 2 Let t...

Page 10: ...r the temperature The indicator comes on when the oven heats up 1 Turn the knob for the oven functions to select an oven function 2 Turn the knob for the temperature to select a temperature 3 To deact...

Page 11: ...ons at the same time and to dry food Defrost This function can be used for defrosting frozen foods such as vegeta bles and fruits The defrosting time depends on the amount and size of the frozen food...

Page 12: ...e of day press again and again until starts to flash Setting the DURATION 1 Set an oven function and temperature 2 Press again and again until starts to flash 3 Press or to set the DURATION time The d...

Page 13: ...he appliance deactivates automatically Setting the MINUTE MINDER 1 Press again and again until starts to flash 2 Press or to set the necessary time The Minute Minder starts automatically after 5 secon...

Page 14: ...nd the wire shelf on the guide bars above and make sure that the feet point down Small indentation at the top increase safety The indentations are also anti tip devices The high rim around the shelf p...

Page 15: ...position You can use the trivet to grill flat dishes in large quantities and to toast 1 Put the trivet into the deep pan so that the supports of the wire shelf point down 2 Put the deep pan into the o...

Page 16: ...he appliance the cooling fan can continue to operate until the appliance cools down Safety thermostat Incorrect operation of the appliance or defective components can cause dangerous overheating To pr...

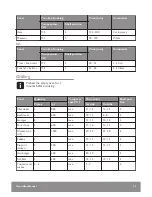
Page 17: ...Clean the moisture after each use of the appliance Do not put the objects directly on the appliance floor and do not put aluminium foil on the components when you cook This can change the baking resul...

Page 18: ...m cake mould Sponge cake 160 2 50 60 In a 26 cm cake mould Christmas cake Rich fruit cake1 150 2 90 120 In a 20 cm cake mould Plum cake1 160 2 50 60 In a bread tin Small cakes one level 140 150 3 20 3...

Page 19: ...cake 150 2 110 120 In a 24 cm cake mould Victoria sandwich 160 2 left and right 50 60 In a 20 cm cake mould 1 Preheat the oven for 10 minutes Bread and pizza Food True Fan Cooking Time min Comments Te...

Page 20: ...ure C Shelf position Beef 190 2 50 70 On a wire shelf Pork 180 2 90 120 On a wire shelf Veal 175 2 90 120 On a wire shelf English roast beef rare 200 2 50 60 On a wire shelf English roast beef medium...

Page 21: ...heat the empty oven for 3 minutes before cooking Food Quantity Tempera ture C Time min Shelf posi tion Pieces g 1st side 2nd side Fillet steaks 4 800 max 12 15 12 14 4 Beef steaks 4 600 max 10 12 6 8...

Page 22: ...1 or 2 Roast beef or fillet well done1 per cm of thickness 170 180 8 10 1 or 2 1 Preheat the oven Pork Food Quantity kg Temperature C Time min Shelf position Shoulder neck ham joint 1 1 5 160 180 90...

Page 23: ...2 Goose 3 5 5 160 180 120 180 1 or 2 Turkey 2 5 3 5 160 180 120 150 1 or 2 Turkey 4 6 140 160 150 240 1 or 2 Fish steamed Food Quantity kg Temperature C Time min Shelf position Whole fish 1 1 5 210 22...

Page 24: ...alfway through the drying time open the door and let it cool down for one night to complete the drying Vegetables Food Temperature C Time h Shelf position 1 position 2 positions Beans 60 70 6 8 3 1 4...

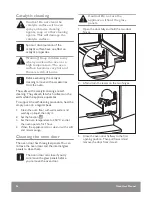
Page 25: ...ol acids or abrasive materials as they can damage the oven surface Clean the oven control panel with the same precautions Cleaning the door gasket Regularly do a check of the door gasket The door gask...

Page 26: ...rt the self cleaning procedure heat the empty oven on a regular basis 1 Clean the oven floor with warm water and washing up liquid then dry it 2 Set the function 3 Set the oven temperature to 250 C an...

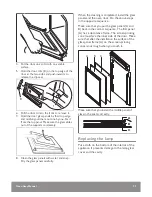
Page 27: ...leaning is completed install the glass panels and the oven door Do the above steps in the opposite sequence Make sure that you put the glass panels A and B back in the correct sequence The first panel...

Page 28: ...ith a cloth to prevent grease residue from burning on the lamp 1 Deactivate the appliance 2 Remove the fuses from the fuse box or deactivate the circuit breaker The back lamp 1 Turn the lamp glass cov...

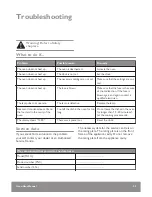
Page 29: ...lamp is defective Replace the lamp Steam and condensation settle on the food and in the cavity of the oven You left the dish in the oven for too long Do not leave the dishes in the oven for longer tha...

Page 30: ...esponsible if you do not follow the safety precautions from the Safety chapters This appliance is supplied without a main plug and a main cable Applicable types of cables for Europe Minimum size Cable...

Page 31: ...everyday cooking General hints Make sure that the oven door is closed properly when the appliance operates and keep it closed as much as possible during the cooking Use metal dishes to improve energy...

Page 32: ...he appliance is under guarantee Spare parts Always insist on genuine spare parts An authorised service engineer should service this product and only genuine spare parts should be used Under no circums...

Page 33: ...3 8021 6400 John Lewis Southsea 023 9282 7511 John Lewis Stratford 020 8532 3500 John Lewis at home Swindon 01793 733180 John Lewis Tamworth 01827 300580 John Lewis Trafford 0161 491 4040 John Lewis a...

Page 34: ...s to recycle it Help protect the environment and human health and to recycle waste of electrical and electronic appliances Do not dispose appliances marked with the symbol with the household waste Ret...

Page 35: ...Oven User Manual 35...

Page 36: ...867339407 A 372016 Subject to change without notice...

Reviews: