background image

The timer

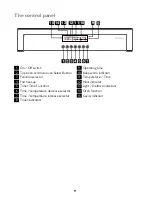
Key
1. Time indicator neon
2. Cook time indicator neon
3. End time indicator neon
4. Countdown indicator neon
5. Decrease control
6. Increase control
7. Time Functions

Important!

 The time of day must be set

before the main oven will operate manually.

To set the time of day

The oven has a 24 hour clock.
When the electricity supply is first switched
on, the display will show 12:00 and the 'Time'
indicator neon will flash.
To set the correct time press the increase
control button and if necessary, the decrease
control button until the correct time on the
24 hour clock is reached. The 'Time' indicator
neon will flash for 5 seconds and then go out.

Important!

 The increase and decrease

control buttons operate slowly at first, and
then more rapidly. They should be pressed
separately.

To set the countdown

The 'Countdown' gives an audible reminder
at the end of any period of cooking.
This cooking period may be up to 2 hrs 30
mins. It is not part of the automatic control.
To set, press the Time Functions button until
the 'Countdown' indicator neon is illuminated
and the display reads 0:00.
To set the required time duration, press the
increase control until the display indicates the
interval to be timed. If necessary press the
decrease control to achieve the correct time
interval.

Important!

 This must be completed within

5 seconds of first pressing the Time Functions
button.

During the operation of the 'Countdown', the
remaining time period will be shown in the
display.
The 'Countdown' will sound intermittently for
up to 2 minutes at the end of the timed period.
The sound can be stopped by pressing any
button.

To cancel the countdown

If you change your mind and want to cancel
the 'Countdown', press the Time Functions
button until the 'Countdown' indicator neon
flashes then depress the decrease control until
0:00 shows in the display.
The 'Countdown' indicator neon will continue
to flash for a few seconds and then return to
the time of day.

10

Summary of Contents for JLBIDO911

Page 1: ...JLBIDO911 Built in oven Instruction manual ...

Page 2: ...installed in an adequately ventilated room It is imperative that the appliance is left in the base to protect both the appliance and the floor This appliance is heavy and care must be taken when moving it Do not attempt to lift or move this appliance by the handles All packaging both inside and outside the appliance must be removed before the appliance is used It is dangerous to alter the specific...

Page 3: ...he door handle until it is fully open Warning Never leave the appliance unattended when the oven door is open Do not place sealed cans or aerosols inside the oven They may explode if they are heated Ensure that all control knobs are in the off position when not in use Do not stand on the appliance or on the open oven doors Do not hang towels dishcloths or clothes from the appliance or its handles ...

Page 4: ...warm 22 Main oven base heat finishing 22 Other convenient functions 23 Cooking charts 25 Hints and tips 31 Something not working 34 Maintenance and cleaning 35 Environmental information 39 Repairs after sales service 40 For the installer Installation 41 Choice of electrical connection 41 Preparing cabinet for fitting of oven 42 Recommended cabinet dimensions in millimetres 43 How to finish unpacki...

Page 5: ...until the appliance has cooled During the initial period the cooling fan may turn on and off this is quite normal Warning Always allow the cooling fan to cool the appliance down before switching off at the wall prior to carrying out any cleaning or maintenance work Control panel indicator neon s The indicator neon will operate when the grill where applicable or oven s is switched on The indicator ...

Page 6: ...off button 2 Press the on off button and the timer selector button simultaneously 3 Using the increase and decrease buttons select one of the languages displayed 4 Press the on off button and the timer selector button simultaneously to save the language selected Important Remove all packaging both inside and outside the oven including the advertising labels and any protective film before using the...

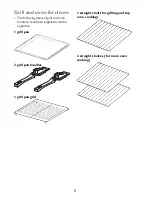
Page 7: ...he following items of grill and oven furniture have been supplied with the appliance 1 grill pan 2 grill pan handles 1 grill pan grid 1 straight shelf for grilling and top oven cooking 2 straight shelves for main oven cooking 7 ...

Page 8: ...Product description 1 Control Panel 2 Top Oven Grill 3 Main Oven 8 ...

Page 9: ...3 Function selector 4 Fast heat up 5 Timer Time Functions 6 Time temperature decrease selector 7 Time temperature increase selector 8 Timer indicators 9 Operating time 10 Keep warm indicator 11 Temperature Time 12 Heat indicator 13 Light Defrost indicators 14 Oven function 15 Cavity indicator 9 ...

Page 10: ... of cooking This cooking period may be up to 2 hrs 30 mins It is not part of the automatic control To set press the Time Functions button until the Countdown indicator neon is illuminated and the display reads 0 00 To set the required time duration press the increase control until the display indicates the interval to be timed If necessary press the decrease control to achieve the correct time int...

Page 11: ...ary press the decrease control until the required time interval is achieved 7 Release the buttons The time of day will be displayed after 5 seconds The Cook Time and End Time indicator neons will be illuminated 8 Set the main oven control to the required temperature The heat indicator neon should be off To set the timer to switch off only 1 Ensure the electricity supply is switched on and that the...

Page 12: ...ensure food in the oven has been covered before cooking if it is not possible to remove food immediately after cooking The top multifunction oven Your top oven is a multifunction oven with 4 convenient functions and can be set to the following modes of cooking Grill Conventional cooking Top oven base heat finishing and Top oven keep warm Details of the functions can be found in the table below Top...

Page 13: ...tities of food Using top oven grill The oven must be switched on before setting any cooking function or programme Press the Oven Select Button until the top oven cavity indicator is illuminated Press the Function selector until the required setting is shown The grill settings are as follows Centre grill area at full power Full grill area at full power Wait 5 seconds until your choice is confirmed ...

Page 14: ...ecially good results if used to cook fruitcakes sweets and savoury flans or quiche The top oven is ideal for use as a warming compartment It can be used to warm dishes and keep food hot Use the lowest setting on the top oven temperature control Using top oven conventional cooking The oven must be switched on before setting any cooking function or programme Press the Oven Select Button until the to...

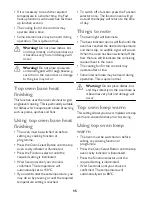
Page 15: ...y set to 150 C If you wish to alter the set temperature you may do so by pressing or until the required temperature setting is reached To switch off a function press the Function selector once The function neon will go out and the display will return to the time of day Things to note The oven light will illuminate The heat indicator neons will flash until the oven has reached the desired temperatu...

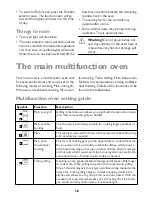
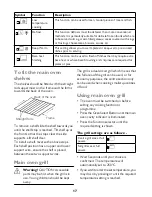
Page 16: ...below Multifunction oven setting guide Symbol Function Description Main oven grill Grilling in the main oven allows you to grill with the oven door closed you must remove the grill pan handle Main oven fan cooking The fan oven is particularly suitable for cooking larger quantities of food Pizza This setting can be used for foods such as pizza where base browning and crispness are required Main ove...

Page 17: ...lt shelf up at the front so that the stops clear the side supports Lift shelf clear To install a shelf reverse the above steps Each shelf position has an upper and lower support wire ensure the shelf is placed between these two support wires Main oven grill Warning CAUTION Accessible parts may be hot when the grill is in use Young children should be kept away The grill is a dual circuit grill whic...

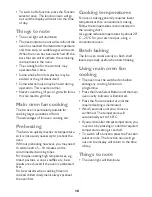
Page 18: ...times For recipes needing high temperatures e g bread pastries scones soufflés etc best results are achieved if the oven is preheated first For best results when cooking frozen or cooked chilled ready meals always preheat the oven first Cooking temperatures Fan oven cooking generally requires lower temperatures than conventional cooking Follow the temperatures recommended in the cooking chart As a...

Page 19: ...e will automatically set to 200 C If you wish to alter the set temperature you may do so by pressing or until the required temperature setting is reached To switch off a function press the Function selector once The function neon will go out and the display will return to the time of day Things to note The oven light will illuminate The heat indicator neons will scroll until the oven has reached t...

Page 20: ...king smells in the kitchen and allows you to grill with the oven doorclosed With the exceptionof toast and rare steaks you can Turbo grill all the foods you would normally cook under a conventional grill The lower part of the oven can be used to cook accompaniments at the same time e g tomatoes and mushrooms with a mixed grill or breakfast Dishes prepared in advance such as shepherd s pie lasagne ...

Page 21: ... temperature cooking Thoroughly sear the meat in a pan over a very high heat Low Temperature cooking cannot be used together with the timer functions Cook Time and End Time Place in a roasting dish or directly on the shelf with a tray underneath to catch the fat Place into the cold oven The oven must be switched on before setting any cooking function or programme Press the Oven Select Button until...

Page 22: ...r is illuminated Press the Function selector until the required setting is illuminated Wait 5 seconds until your choice is confirmed The temperature will automatically set to 80 C To switch off a function press the Function selector once The function neon will go out and the display will return to the time of day Things to note The oven light will illuminate The heat indicator neons will scroll un...

Page 23: ...ance must be on but no oven function must be selected Press the decrease selector and hold it In addition press the Time function button until SAFE appears in the display The oven control lock is now activated Deactivating the oven control lock Press the decrease selector and hold it In addition press the Time Selector button until SAFE disappears from the display The oven control lock is now deac...

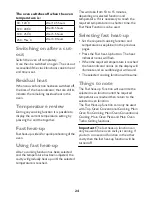
Page 24: ...will take from 10 to 15 minutes depending on selected function and temperature If it is necessary to reach the required temperature in a shorter time the Fast Heat Function can be used Selecting fast heat up Set the required cooking function and temperature as explained in the previous pages Press the Fast heat Up button The heat indicator neons will flash When the required temperature is reached ...

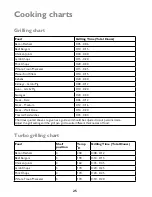
Page 25: ... Rare 0 06 0 12 Steak Medium 0 12 0 16 Steak Well Done 0 14 0 20 Toasted Sandwiches 0 03 0 04 The times quoted above are given as a guide and should be adjusted to suit personal taste Adjust the grill setting and the grill pan grid to suite different thicknesses of food Turbo grilling chart Food Shelf position Temp o C Grilling Time Total Hours Bacon Rashers 4 200 0 08 0 12 Beef Burgers 4 190 0 10...

Page 26: ...and the number type and size of baking tray or tins used It may be necessary to increase or decrease the temperature to suit individual preference and requirements For best results moist recipes for example pizza fruit flans etc should be baked on one level To ensure optimal performance when cooking convenience foods pizza or frozen and chilled ready meal always preheat the oven first Food Shelf p...

Page 27: ...ollow manufacturer s instructions Baked Potatoes 1 180 190 1 00 1 30 Roast Potatoes 1 180 190 1 00 1 30 Large Yorkshire Puddings 1 200 210 0 25 0 40 Individual Yorkshire Puddings 1 200 210 0 15 0 25 Note Shelf positions are counted from the bottom of the oven Main oven conventional cooking chart The temperature and baking times are for guidance only as these will depend on the consistency of the v...

Page 28: ...45 1 05 Fruit Pies Crumbles 3 190 200 0 40 0 60 Milk Puddings 3 130 140 1 30 2 00 Scones 4 220 230 0 08 0 12 Choux Pastry 3 200 220 0 30 0 35 Éclairs Profiteroles 3 170 180 0 20 0 30 Flaky Pastry 3 210 220 0 25 0 40 Mince Pies 3 190 200 0 15 0 20 Pasta Lasagne etc 3 170 180 0 40 0 45 Meat Pies 3 190 210 0 25 0 35 Quiche Tarts Flans 3 190 200 0 25 0 45 Shepherd s Pie 3 190 200 0 30 0 40 Soufflés 3 ...

Page 29: ... flans etc should be baked on one level To ensure optimal performance when cooking convenience foods pizza or frozen and chilled ready meal always preheat the oven first Food Shelf position Temp o C Cooking Time Total Hours Biscuits 3 180 190 0 10 0 20 Bread 3 200 220 0 25 0 30 Bread rolls buns 3 200 220 0 15 0 20 Small Queen Cake 3 160 170 0 18 0 25 Sponge 3 160 170 0 20 0 30 Victoria Sandwich 3 ...

Page 30: ... Follow manufacturer s instructions Baked Potatoes 3 180 190 1 00 1 30 Roast Potatoes 4 180 190 1 00 1 30 Large Yorkshire Puddings 4 210 220 0 25 0 40 Individual Yorkshire Puddings 4 200 210 0 15 0 25 Note Shelf positions are counted from the bottom of the oven Note Fan oven shelf positions are not critical but ensure that they are evenly spaced when more than one is used Roasting chart Meat Temp ...

Page 31: ... the grill Most foods should be placed on the grid in the grill pan to allow maximum circulation of air and to lift the food out of the fats and juices Adjust the grid and grill pan runner position to allow for different thicknesses of food Position the food close to the element for faster cooking and further away for gentler cooking Food should be thoroughly dried before grilling to minimise spla...

Page 32: ...ositions are counted from the bottom upwards There should always be at least 2 5cm 1 between the top of the food and the element This gives best cooking results and allows room for rise in yeast mixtures Yorkshire puddings etc When cooking cakes pastry scones bread etc place the tins or baking trays centrally on the shelf Ensure that food is placed centrally on the shelf andthere is sufficientroom...

Page 33: ...using fan cooking Arrange the shelves in the required positions before switching the oven on Shelf positions are counted from the bottom upwards 6 5 4 3 2 1 When cooking more than one dish in the fan oven place dishes centrally on different shelves rather than clusterseveral disheson one shelf this will allow the heat to circulate freely for the best cooking results When batch baking one type of f...

Page 34: ... up to 2kg 4 5lb in weight can be thawed using the defrost function All joints of meat and poultry must be thawed thoroughly before cooking Always cook thoroughly immediately after thawing Do not leave food at room temperature once it is defrosted Cook raw food immediately or store cooked food in the fridge once it has cooled Something not working Please carry out the following checks on your appl...

Page 35: ...the off position The oven is not cooking evenly Check that the appliance is correctly installed and is level Check that the recommended temperatures and shelf positions are being used The oven light fails to illuminate The oven light bulb may need replacing If the Main Oven is set for automatic cooking the light will illuminate when the cook time begins The oven fan is noisy Check that the oven is...

Page 36: ...firmly in position before replacing the oven shelves Cleaning the shelves wire work runners and grill oven furniture All removable parts except the grill pan handle can be washed in the dishwasher The grill pan grill pan grid oven shelves and wirework runners may be cleaned using a soap impregnated steel wool pad Soaking first in hot soapy water will make cleaning easier Cleaning inside the grill ...

Page 37: ... Removing the covering for the last 20 30 minutes will allow extra browning if required Cleaning the door s Warning Under no circumstances should the door assembly be detached from the product for cleaning Warning To prevent damaging or weakening the door glass panels avoid the use of the following Household detergents and bleaches Soap impregnated pads unsuitable for non stick saucepans Abrasive ...

Page 38: ... under the hinge location points at the rear Ensure the glass is properly located and the text Top is facing towards you and at the top edge of the door Warning Do not attempt to use the oven without the glass being in place Replacing an oven light bulb main oven The type of bulb required is a 300 C 25 watt small Edison Screw Warning Disconnect the appliance from the electricity supply before repl...

Page 39: ...Restore the electricity supply and reset the time of day Environmental information The symbol on the product or on its packaging indicates that this product may not be treated as household waste Instead it should be taken to the appropriate collection point for the recycling of electrical and electronic equipment By ensuring this product is disposed of correctly you will help prevent potential neg...

Page 40: ...ear and concise details of fault 4 The purchase date as found on your receipt 5 The model and serial number of the appliance found on the rating plate So that you always have these numbers at hand we recommend you to make a note of them here Mod P N C S N Your oven is covered by a 3 year parts and labour guarantee see separate details given at point of sale Please retain your purchase receipt safe...

Page 41: ... minor modification to the cabinet will be required to reduce the aperture size down to 560 565mm to allow the product to be securely screwed into the cabinet The dimensions given provide adequate air circulation around the unit within the cabinet ensuring compliance with BS EN60 335 Enquiries regarding the installation of the cooker point if required should be made to your Regional Electricity Co...

Page 42: ... for fitting of oven Make sure that the cabinet is the correct size for the appliance to be fitted If the size is between 565 570mm then the cabinet should be modified so that at the screw fixing points the recommended dimension of at least 560 565mm is maintained The modification should ideally be localised to ensure that after screw fitment the oven is securely fixed into position The cabinet mu...

Page 43: ...cabinet dimensions in millimetres Built in installation Cross section through cabinet showing oven positioned 888 16 5 865 874 879 11 542 2000 Recommended 907 min 300 min 550 min 560 min 570 max 600 min 558 865 43 ...

Page 44: ... and if appropriate remove fuse before commencing any electrical work To remove cover of mains terminal From the rear of the appliance remove mains input terminal cover to gain access to terminal block First remove retaining screw with pozidrive screwdriver Prise cover loose using screwdriver in position 1 then lever off with screwdriver in position 2 at either side Lift cover and remove screw fro...

Page 45: ...nfirmed when switching on the appliance as the timer will be flashing Important House circuit Earth leakage and continuity testsmustbe carriedout before the appliance is connected to the mains Connecting to a hob or cooker point Either follow in general terms the instructions for connecting to the terminal block or refer to the hob suppliers installation instructions Warning Feed the cable through...

Page 46: ...re to avoid fouling the mains lead Ensure the appliance is central and level Do not remove spacers fitted behind fixing holes When the appliance is fully housed screw the stability screws supplied with the appliance into the side of the cabinet taking care not to distort the side trims It is advisable to turn each screw alternatively to avoid damaging the trims Fixing point for stability screws Fi...

Page 47: ...47 ...

Page 48: ...John Lewis Partnership 171 Victoria Street London SW1E 5NN www johnlewis com 311804300 A 012008 ...

Reviews: