background image


User’s Manual


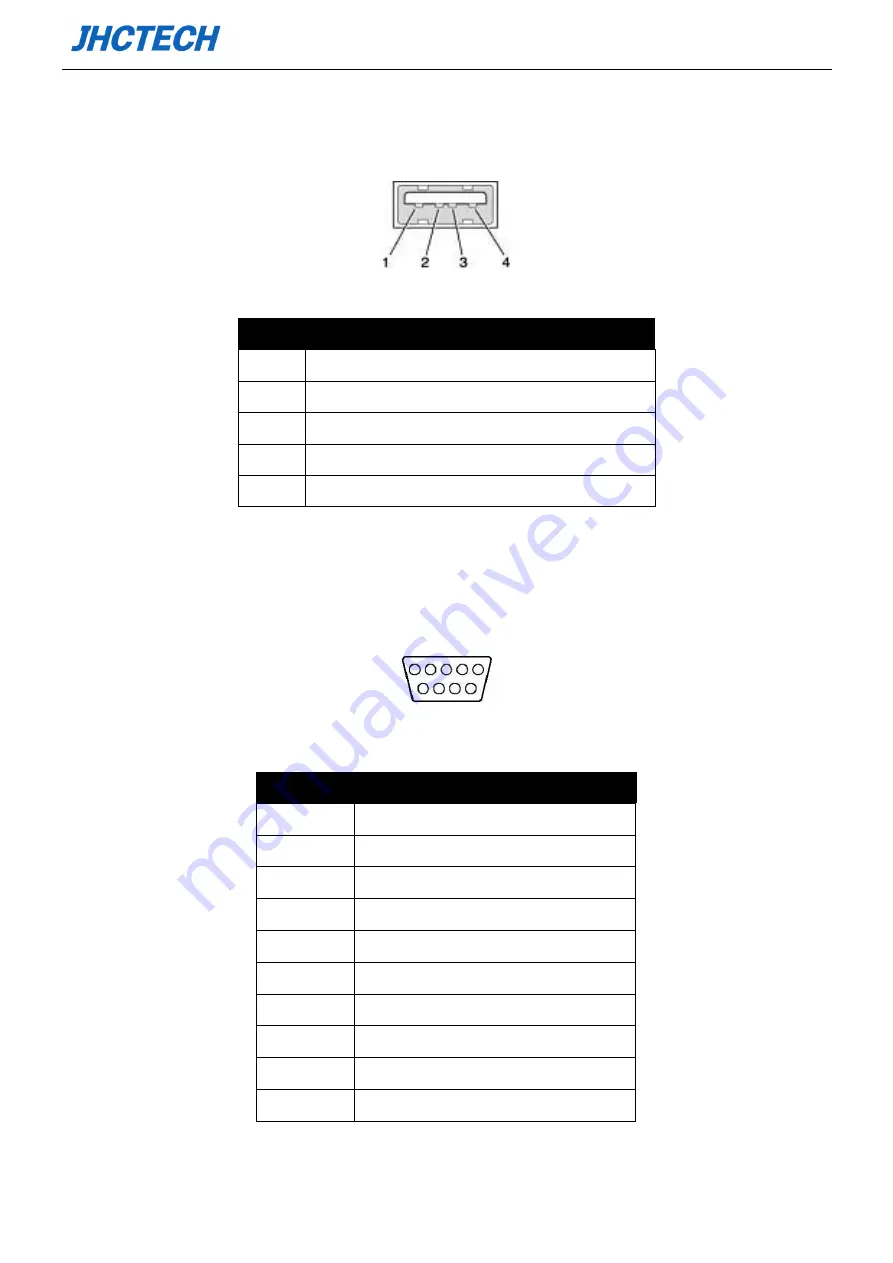
2.1.2 USB Connector   

1 USB2.0 ports by type A connectors in the front. Please refer to Table 2.2 for their pin assignments. 


Figure 2.5 USB2.0 connector 

Table 2.2: USB2.0 Connector   

Pin   

Signal name   

1   

VCC   

2   

USB_P0 

3   


4   

GND   

2.1.3 COM Connector   

There is a COM which is 

D-sub 9-pin connector which is connected

 with computer RS232 serial port.


1      2    3    4      5


6    7    8    9 

Figure 2.6 COM Connector 

Table 2.3: COM Serial Port Pin Assignments   

Pin/Type   

RS232 Signal     

1   

NC 

2   

RXD 

3   

TXD 

4   

NC 

5   

GND   

6   

NC   

7   

NC 

8   

NC 

NC 

Summary of Contents for ALAD-191T

Page 1: ...User s Manual ALAD 191T User s Manual ...

Page 2: ...User s Manual Version Note No Ver Note Date Writer 1 A1 0 First Publish 20190125 Tracy Liu ...

Page 3: ...ntended to be accurate and reliable However Shenzhen JHC Technology Co Ltd assumes no responsibility for its use nor for any infringements of the rights of third parties which may result from its use Acknowledgements Award is a trademark of Award Software International Inc IBM PC AT PS 2 and VGA are trademarks of International Business Machines Corporation Intel and Pentium are trademarks of Intel...

Page 4: ...ent materials service time and freight Please consult your dealer for more details If you think you have a defective product follow these steps 1 Collect all the information about the problem encountered For example CPU speed JHC products used other hardware and software used etc Note anything abnormal and list any onscreen messages you get when the problem occurs 2 Call your dealer and describe t...

Page 5: ...nce when the equipment is operated in a commercial environment This equipment generates uses and can radiate radio frequency energy and if not installed and used in accordance with the instruction manual may cause harmful interference to radio communications Operation of this equipment in a residential area is likely to cause harmful interference in which case the user will be required to correct ...

Page 6: ...nsions 4 System Setup 5 2 1 I O indication 6 2 1 1 Power Input Connector DC IN 7 2 1 2 USB Connector 8 2 1 3 COM Connector 8 2 1 4 OSD Functions ALAD 1 1 Lines 9 2 1 5 OSD Setting 10 Signal source input 10 Picture 10 Sound mode 11 Treble 11 Bass 11 Sleep time 11 Auto sleep 11 OSD time 12 OSD language 12 Scale mode 12 Blue screen 12 Key lock 12 Reset 12 2 2 Touch Drivers 13 2 3 Installation 13 2 3 ...

Page 7: ...User s Manual 1 General Information CHAPTER 1 ...

Page 8: ...reen optional projected capacitive touch 1 Audio in 2 3W speakers DC 9 36V power input 1 2 Features 1 Aluminum die casting chassis natural smooth design 2 19 TFT LCD LED backlight 3 Resistive touch screen or projected capacitive touch screen 4 DC 9 36V wide power input 5 Versatile mounting methods for Panel mounting VESA 100 100 75 75mm and Racking mounting 6 HDMI and VGA video input audio in and ...

Page 9: ... and Linux Windows and Linux Click Lifetime 35 million times 3 billion times 1 3 3 Audio Optional Speaker 1 Audio in 2 3W speaker out 1 3 4 Power Consumption Input Voltage DC 9 36V Power Consumption TDP 12V 1 80 A No consumption output Power Adapter AC to DC 12V 5A 60 W Power Requirement Minimum power input DC 12V 2 5A 1 4 Environmental Specifications Operating temperature 0 60 C With airflow Rela...

Page 10: ...User s Manual 4 1 5 Dimensions ALAD 191T Dimensions Unit mm Figure 1 1 Figure 1 2 ...

Page 11: ...User s Manual 5 System Setup CHAPTER 2 ...

Page 12: ...User s Manual 6 2 1 I O indication Front view Figure 2 1 Remark 1 OSD function keys Bottom view Figure 2 2 ...

Page 13: ... considered a low power solution Connect a DC power cord to this connector Use a power adapter within 9 36V DC output voltage Using a voltage out of the range 9 36V may fail to boot the system or cause damage to the system board Figure 2 4 3 pin 3 81 Connector Table 2 1 Power Connector Pin Assignments Pin Signal Name 1 9 36V 2 NC 3 GND ...

Page 14: ... connector Table 2 2 USB2 0 Connector Pin Signal name 1 VCC 2 USB_P0 3 USB_P0 4 GND 2 1 3 COM Connector There is a COM which is D sub 9 pin connector which is connected with computer RS232 serial port 1 2 3 4 5 6 7 8 9 Figure 2 6 COM Connector Table 2 3 COM Serial Port Pin Assignments Pin Type RS232 Signal 1 NC 2 RXD 3 TXD 4 NC 5 GND 6 NC 7 NC 8 NC 9 NC ...

Page 15: ...off the power Display the OSD Menu Exit a menu of sub menu Select video signal VGA HD MI select next menu item Confirm function Auto setting default function in VGA Select left up menu item Adjust the brightness Press it will display brightness menu press it again will up brightness and press will down brightness Select right down menu item Adjust the contrast Press it will display contrast menu p...

Page 16: ...ode 2 Press to shift the cursor 3 Press AUTO button to select signal channel Picture Press menu button to display the main menu 1 Press to select picture 2 Press to adjust the option and then press to adjust the value 3 Press Menu button to return to the previous menu press Menu button to exit the present menu Figure 2 9 ...

Page 17: ... time Turn off Monitor or select Monitor enter in sleeping time Note The time is the setup complete to the begin sleeping last minute system will prompt press any key to cancel make sure whether you need to turn off Monitor the system will set to off automatic at the same time Auto sleep Turn off or select Monitor to enter in sleeping automatically Note The time is Monitor sequence playing time an...

Page 18: ...ating Figure 2 11 OSD language Sets the present OSD language Scale mode Selects the scale mode of the picture Blue screen No signal display blue or black screen Key lock Locks the key on Monitor panel avoid the unexpected operation Reset Return to the factory setting ...

Page 19: ... Manual 13 Figure 2 12 2 2 Touch Drivers It is available online at the JHCTECH website as follows http www jhctech com cn 2 3 Installation 2 3 1 Panel Mount Step 1 Install the panel PC into the panel opening ...

Page 20: ...User s Manual 14 Figure 2 13 Step 2 Pull out the 4 clamps from the holes around the two sides of the bezel Figure 2 14 Step 3 Insert the screws into each clamp and fasten them ...

Page 21: ...User s Manual 15 Figure 2 15 2 4 Packing List 1 x VGA cable 15P 1 8 meter 1 x HDMI Cable 1 8 meter optional 1 x USB A to USB A 1 8 meter 1 x DC 12V 5A Power Adapter 1 x CD ROM for Touch Driver ...

Reviews: