background image

ESAO Method 
Seismic captor 

Ref : 
472 061 

ENGLISH

 14 


4.2  With the VTT console or the Primo connected, and the 

scientific workshop software 

Start up your scientific workshop software from the Windows start menu and 
select general activity.  
 
The operation is identical with Primo or VTT.  
 
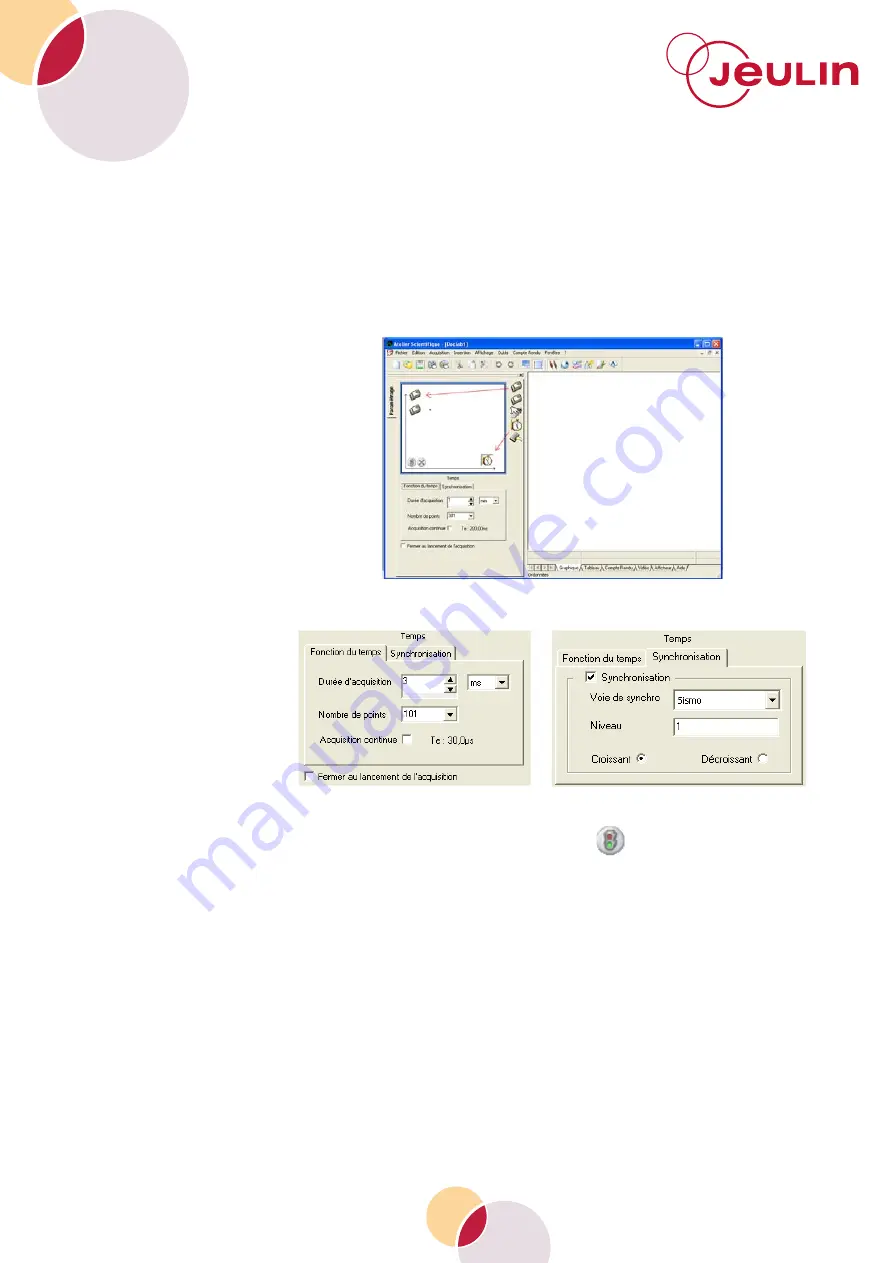
- Drag the icons of the sensors onto the ordinate and the alarm clock 

symbolising the time onto the abscissa.  


Parameter the time then the synchronisation.  


The level of synchronisation may vary depending on the conditions.  

Start recording by clicking on the green light. 


A message appears  ‘waiting for synchronisation’.  
 
Tap the support.  

Summary of Contents for ESAO 472 061

Page 1: ...Méthode ESAO ESAO method Ref 472 061 Français p 1 English p 9 Version 7009 Capteur Sismo Seismic sensor ...

Page 2: ...tonome En mode enregistreur En utilisant le logiciel VTT livré avec le capteur La VTT connectée à un PC La Primo avec un logiciel atelier scientifique 2 Description Le signal est mesuré dans une unité non réelle l a o s correspondant à Amplitude Ondes Sismiques 3 Matériel complémentaire Pour une mise en évidence simple de l impact de la distance sur l onde il est possible d utiliser une maquette s...

Page 3: ...nt Installer le logiciel sismo 1 Démarrer le logiciel Espace VTT 2 Cliquer sur et effectuer l installation sur votre PC du logiciel sismo 3 Transférer par cliquer glisser le logiciel dans votre VTT 4 1 2Mise en place du dispositif expérimental Connecter le ou les capteurs à un des logements de l interface Si vous souhaitez utiliser 2 sismomètres pour réaliser une approche quantitative du phénomène...

Page 4: ...dapté Schéma 1 Schéma 2 La touche F2 permet de paramétrer l affichage mono courbe ou multi courbe Pour débuter en sismologie le mode mono courbe est conseillé pour l acquisition En appuyant sur la touche Mem vous entrez dans un menu permettant de paramétrer l acquisition schéma 3 Schéma 3 Se déplacer à l aide des flèches pour paramétrer la durée de l acquisition sachant que sur le béton la vitesse...

Page 5: ...ar la touche F4 vous pouvez déplacer celle ci schéma 5 valider en cliquant sur OK Le calcul de la vitesse sera alors mis à jour La touche Bleu permet d accéder au tableau avec la valeur de la vitesse calculée schéma 6 Schéma 5 Schéma 6 En appuyant sur Mem vous pouvez paramétrer une nouvelle acquisition Vous pourrez alors paramétrer la fonction Ajout schéma 7 pour travailler à une autre distance ex...

Page 6: ...rer comme indiqué ci dessous pour une distance d environ 1 mètre schéma 12 Schéma 11 Schéma 12 Enregistrer le paramétrage grâce au bouton Mem puis démarrer l acquisition avec le même bouton Un message attente de synchro apparait alors L acquisition démarre quand le choc est fait juste à coté du capteur utilisé pour la synchro Quand la courbe est acquise changer de courbe affichée grâce au bouton o...

Page 7: ...indows et choisir l activité généraliste Le fonctionnement est identique avec Primo ou VTT Glisser les icônes des capteurs en ordonnées et le réveil symbolisant le temps en abscisse Paramétrer le temps puis la synchronisation Le niveau de synchro peut être variable selon les conditions Démarrer l acquisition en cliquant sur le feu vert Un message apparait indiquant l attente de synchro Taper sur l...

Page 8: ...061 FRANÇAIS 7 4 3 Exemple de résultats avec une distance de 1 mètre sur un support en bois bureau Dés afficher la courbe bleu et à l aide du pointeur accessible par clic droit dans le graphique déterminer le délai environ 1 milliseconde ...

Page 9: ...r des acquisitions avec beaucoup de points ne permet pas d obtenir des meilleurs résultats Se baser sur une durée totale de 3 millisecondes par mètre permet de réaliser une première acquisition dans de bonnes conditions 6 Service après vente La garantie est de 2 ans le matériel doit être retourné dans nos ateliers Pour toutes réparations réglages ou pièces détachées veuillez contacter JEULIN SUPPO...

Page 10: ...ode In recorder mode Using the VTT software supplied with the sensor VTT connected to a PC The Primo with a scientific workshop software program 2 Description The signal is measured in a non real unit corresponding to the Seismic Wave Amplitude SWA 3 Additional equipment For a simple demonstration of the impact of distance on the wave it is possible to use an earthquake scale model Ref 507 036 Sen...

Page 11: ...tomatically Install the seismic software 1 Start the VTT Space software 2 Click on and install the seismic software on your PC 3 Click and drag the software into your VTT 4 1 2Installation of the experiment device Connect one or more sensors to one of the interface housings If you want to use 2 seismometers for a quantitative approach for the phenomenon place the 2 seismometers side by side make a...

Page 12: ...nvironment Diagram 1 Diagram 2 The key F2 allows parametering a single or multiple graph curve display When beginning in seismology the single curve mode is recommended for recording By pressing the Mem key you will enter a menu for parametering the recording diagram 3 Diagram 3 Move around using the arrow keys to parameter the recording time in the knowledge that on concrete the speed is in the o...

Page 13: ...of receipt of the signal Using key F4 you can move this diagram 5 and validate by clicking OK The calculation of the speed will then be updated The blue key allows accessing the table with the value of the calculated speed diagram 6 Diagram 5 Diagram 6 By pressing Mem you can parameter a new recording You can then parameter the function Add diagram 7 to work on another distance example 60 cm You w...

Page 14: ...dicated below for a distance of approximately 1 meter diagram 12 Diagram 11 Diagram 12 Record the parametering using the Mem button then start recording with the same button A message waiting for synchronisation then appears Acquisition begins when the shock is made just alongside the sensor used for synchronising When the curve has been recorded change the curve displayed using the orange button ...

Page 15: ...menu and select general activity The operation is identical with Primo or VTT Drag the icons of the sensors onto the ordinate and the alarm clock symbolising the time onto the abscissa Parameter the time then the synchronisation The level of synchronisation may vary depending on the conditions Start recording by clicking on the green light A message appears waiting for synchronisation Tap the supp...

Page 16: ...61 ENGLISH 15 4 3 Example of results with a distance of 1 metre on a wooden support desk Remove the display of the blue curve and using the plotter accessible by right clicking in the graph calculate the delay approximately 1 millisecond ...

Page 17: ...g The act of performing acquisition with many points does not produce better results Use a total duration of 3 milliseconds per meter for an initial recording under good conditions 6 After Sales Service This material is under a two year warranty and should be returned to our stores in the event of any defects For any repairs adjustments or spare parts please contact JEULIN TECHNICAL SUPPORT Rue Ja...

Page 18: ......

Reviews: