background image


9

Description 


1.  CONTROL PANEL – The operating controls for the band saw are located on the base at the 

front of the machine. 
1.1.  ON/OFF SWITCH – Turns the machine on or off. 
1.2. SAW FRAME RELEASE KNOB – Turning this knob counterclockwise unlocks the 

release lever (Item 2). 

1.3.  FEED RATE ADJUST KNOB – Used to adjust the hydraulic feed control rate. 

2.  SAW FRAME RELEASE LEVER – Pull up on this lever to release the saw frame after 

unlocking it (Ref Item 1.2) and push down to return the saw frame to its rearmost position. 

3.  BLADE TENSION HANDLE – Used to set the correct blade tension. Also used to remove and 

install the saw blade. 


Figure 3: Component Descriptions and Locations 

Summary of Contents for VSF-14-1

Page 1: ...s Manual Self Feed Vertical Band Saw Models VSF 14 1 and VSF 14 3 WMH TOOL GROUP 2420 Vantage Drive Elgin Illinois 60123 Ph 888 594 5866 Fax 800 626 9676 www wmhtoolgroup com Part No 5518247 Revision A6 09 03 Copyright WMH Tool Group ...

Page 2: ...ear and tear repair or alterations outside our facilities or to a lack of maintenance WMH TOOL GROUP LIMITS ALL IMPLIED WARRANTIES TO THE PERIOD SPECIFIED ABOVE BEGINNING FROM THE DATE THE PRODUCT WAS PURCHASED AT RETAIL EXCEPT AS STATED HEREIN ANY IMPLIED WARRANTIES OR MERCHANTABILITY AND FITNESS ARE EXCLUDED SOME STATES DO NOT ALLOW LIMITATIONS ON HOW LONG THE IMPLIED WARRANTY LASTS SO THE ABOVE...

Page 3: ...he Blade Guide Bracket 14 Starting the Saw 15 Service and Maintenance 16 Adjustments 16 Blade Tracking Adjustments 16 Blade Guide Bearing Adjustment 17 Cleaning 18 Lubrication 18 Changing the Drive Motor V Belt 18 Chip Brush and Chip Scraper Replacement 18 Blade Guide Bearing Replacement 19 Drive Motor Replacement 19 Adjusting or Replacing the Counterbalance 19 Replacing the Drive Wheel Lower Whee...

Page 4: ...17 Figure 8 Chip Brush and Chip Scraper Locations 18 Figure 9 Exploded View of the VSF 14 Saw Frame 24 Figure 10 Exploded View of the VSF 14 Base 28 Figure 11 Exploded View of the VSF 14 Gear Box Assembly 31 Figure 12 Exploded View of the VSF 14 Bearing Shaft Assembly 32 Figure 13 Exploded View of the VSF 14 Smooth Wheel Assembly 33 Figure 14 Exploded View of the VSF 14 Idler Wheel Assembly 33 Fig...

Page 5: ... of work To reduce your exposure to these chemicals work in a well ventilated area and work with approved safety equipment such as face or dust masks that are specifically designed to filter out microscopic particles 10 Do not operate this band saw while tired or under the influence of drugs alcohol or any medication 11 Make certain the switch is in the OFF position before connecting the machine t...

Page 6: ...blades The operator should not wear gloves when operating the machine 32 All doors should be closed all panels replaced and other safety guards should be in place prior to the machine being started or operated 33 Be sure the blade is not in contact with the work piece when the motor is started The motor should be started and you should allow the saw to come up to full speed before bringing the saw...

Page 7: ...7 How The VSF 14 Band Saw Operates Figure 1 How the VSF 14 Band Saw Operates ...

Page 8: ...580 Height Capacity max in 14 1 2 14 1 2 Throat Capacity max in 8 1 2 8 1 2 Table Size in 18 1 2 x 30 1 2 18 1 2 x 30 1 2 Table Height in 30 30 Blade Wheel Diameter in 14 14 Blade Length approx in 120 120 Blade Width in 1 8 min 1 max 1 8 min 1 max Floor Space Required in 40L x 30 1 2W x 63H 40L x 30 1 2W x 63H Motor 1HP 1Ph 115 230V 60Hz 1HP 3Ph 230 460V 60Hz Net Weight lbs 551 551 Standard Featur...

Page 9: ...se unlocks the release lever Item 2 1 3 FEED RATE ADJUST KNOB Used to adjust the hydraulic feed control rate 2 SAW FRAME RELEASE LEVER Pull up on this lever to release the saw frame after unlocking it Ref Item 1 2 and push down to return the saw frame to its rearmost position 3 BLADE TENSION HANDLE Used to set the correct blade tension Also used to remove and install the saw blade Figure 3 Compone...

Page 10: ...dly but not free fall This is a safety device and therefore should be kept properly adjusted Installation General Do not install the machine in a damp humid dirty or badly illuminated environment Machine Setup The band saw has been pre adjusted at the factory and several test pieces have been cut to verify cutting accuracy Setup of the machine is limited to uncrating the machine securing it to the...

Page 11: ...s machine Before operating the machine remove tie rings watches and other jewelry and roll sleeves up past the elbows Remove all loose clothing and confine long hair Non slip footwear is recommended Do not wear gloves when operating the saw Never use the machine if it is missing any guards or other safety devices Maintain a balanced stance at all times so that you do not fall or lean against the s...

Page 12: ...nd special alloys for cutting unusual or exotic materials A coarse blade could be used for a solid steel bar but a finer tooth blade would be used on a thin wall steel tube In general the blade choice is determined by the thickness of the material the thinner the materials the finer the tooth pitch A minimum of three teeth should be on the work piece at all times for proper cutting The blade and w...

Page 13: ...of your band saw not cutting straight are 1 Blade tension is set to low 2 The blade is either dull or worn on one side 3 The blade is upside down The teeth must point down toward the table Blade Break In Procedures New blades are very sharp and therefore have a tooth geometry that is easily damaged if a careful break in procedure is not followed Consult the blade manufacturer s literature for brea...

Page 14: ...ted through a 45o arc Adjust as follows 1 Loosen the hex head bolt and remove the taper pin on the vise 2 Rotate the vise to the desired angle For accurate cuts use a variable protractor to set the position of the jaw align one side of the protractor with one side of the blade 3 Re install the taper pin and tighten the hex head bolt on the vise Setting the Vise for Square Cuts The procedure for se...

Page 15: ...k pieces are clamped in the vise 3 Be sure that the blade is not in contact with the work piece when the motor is started 4 Start the motor and allow the saw to come up to speed 5 Turn the feed rate knob clockwise all the way This closes the hydraulic valve and stops the feed rate 6 Turn the saw frame release knob counterclockwise to the ON position 7 Pull up on the saw frame release lever Figure ...

Page 16: ...ocation of blade tracking adjustment setscrew 1 Place the saw frame in its rearmost position by pushing down on the saw frame release lever Figure 3 Item 2 and lock it in place by turning the saw frame release knob Figure 3 Item 1 2 clockwise 2 Make sure the blade is properly tensioned NOTE Keep proper tension on the blade at all times using the blade tension adjustment 3 Loosen the two bottom bol...

Page 17: ...ment When adjustment is required readjust immediately Failure to maintain proper blade adjustment may cause serious blade damage or inaccurate cuts It is always better to try a new blade when cutting performance is poor If performance remains poor after changing the blade make the necessary adjustments If a new blade does not correct the problem check the blade guides for proper spacing For most e...

Page 18: ...rive Motor V Belt Disconnect the band saw from its electrical power source 1 Move the saw frame to its rearmost position and by pushing down on the saw frame release lever Figure 3 Item 2 and lock it in place by turning the saw frame release knob Figure 3 Item 1 2 clockwise 2 Remove the panel on the base to expose the belt and pulleys 3 Pivot the motor upwards to loosen the belt 4 Remove the worn ...

Page 19: ...power source 1 Remove the drive motor V belt Refer to Changing the Drive Motor V Belt 2 Loosen the setscrew that holds the motor pulley to the shaft and remove the pulley 3 Open the motor junction box and disconnect the power cord wires from their terminals 4 Remove the nuts washers and bolts that secure the motor to the mounting plate 5 Installation of the motor is the reverse of the above steps ...

Page 20: ... the wheel hub 7 Install the saw blade Refer to Blade Removal and Installation Replacing the Idler Wheel or Bearings Upper Wheel Disconnect the band saw from its electrical power source 1 Remove the saw blade Refer to Blade Removal and Installation 2 Remove the retaining ring and shim from the shaft 3 Remove the wheel and the bronze bearing 4 Examine the drive edge and shoulder of the wheel for da...

Page 21: ...de guides See Blade Guide Bearing Adjustment 8 Use a longer annealing cycle Premature Blade Dulling 1 Blade pitch is too coarse 2 Blade speed is too high 3 Inadequate feed pressure 4 Hard spots in the work piece 5 Scale on in the work piece 6 Work hardening of material especially stainless steel 7 Insufficient blade tension 8 Operating the saw without pressure on the work piece 1 Use a finer tooth...

Page 22: ...flanges 11 Guide bearing is worn 1 Adjust the vise so that it is square with the blade Always clamp the work piece tightly in the vise 2 Lower the feed pressure See Figure 3 Item 1 3 3 Adjust the guide bearing clearance to 0 001 0 002 maximum See Blade Guide Bearing Adjustment 4 Gradually increase the blade tension See Figure 3 Item 3 5 Move the blade guide bracket closer to the work piece See Set...

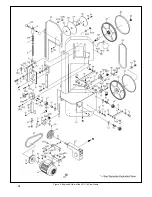
Page 23: ...item numbers shown in the exploded views match the item numbers in the parts listing Order replacement parts from WMH TOOL GROUP 2420 Vantage Drive Elgin Illinois 60123 Ph 888 594 5866 Fax 800 626 9676 www wmhtoolgroup com Identify the replacement part by the part number shown in the parts listing Be sure to include the model number and serial number of your machine when ordering replacement parts...

Page 24: ...24 Figure 9 Exploded View of the VSF 14 Saw Frame ...

Page 25: ...2 24 5519722 Tension Label 1 25 5519723 Upper Blade Guide Handle 3 8 x 1 1 26 5519724 Spring Pin 6 x 50 2 27 5519725 Upper Blade Guide Bracket 1 28 TS 0209091 Socket Head Cap Screw 3 8 16 x 2 2 29 TS 0680042 Flat Washer 3 8 2 30 TS 0207011 Socket Head Cap Screw 1 4 20 x 3 8 1 31 5519726 Upper Blade Guide Slide 1 32 TS 0050021 Hex Cap Screw 1 4 20 x 5 8 1 33 5519727 Spring Pin 6 x 25 1 34 5519728 B...

Page 26: ...Hex Cap Screw 1 2 13 x 1 3 4 1 77 TS 0720111 Lock Washer 1 2 1 78 5519777 Eccentric Bracket 1 79 5519778 Eccentric Bolt 1 80 TS 0561051 Hex Nut Full 1 2 13 2 81 TS 0680061 Flat Washer 1 2 2 82 5519779 Brush Mounting Bracket 1 83 5519780 Brush 1 84 TS 0813032 Slotted Round Head Screw 1 4 20 x 1 2 2 85 TS 0680021 Flat Washer 1 4 2 86 TS 0813032 Slotted Round Head Screw 1 4 20 x 1 2 2 87 5519781 Shaf...

Page 27: ... Socket Head Cap Screw 1 4 20 x 3 8 1 115 TS 0680021 Flat Washer 1 4 1 116 5519798 Speed Indicator Dial 1 117 5519799 Flat Washer 1 118 5519800 Pad 1 119 5519801 Dial Knob 1 120 5519802 Dial Scale 1 121 5519803 Dial Base 1 122 TS 0813021 Slotted Flat Head Screw 1 4 20 x 3 8 5 123 TS 0680021 Flat Washer 1 4 5 124 5519804 Idler Wheel Cover 1 125 TS 0680021 Flat Washer 1 4 1 126 TS 0561011 Hex Nut Fu...

Page 28: ...28 Figure 10 Exploded View of the VSF 14 Base ...

Page 29: ...her 3 8 2 153 TS 0570032 Hex Nut Full 3 8 24 1 154 5519825 Control Box 1 155 5519826 Control Panel Cover 1 156 5519827 Control Panel Label 1 157 JMD18 056A Power ON OFF Switch 120 220 440V 3 Phase 1 158 5519829 Hydraulic ON OFF Knob 1 159 5519830 Feed Rate Adjust Knob 1 160 5519831 Slotted Round Head Screw 3 16 x 1 2 4 161 TS 0813051 Slotted Flat Head Screw 1 4 20 x 5 8 4 162 5519833 Chip Collecto...

Page 30: ... x 2 1 191 5519849 Counterbalance Weight 1 192 5519850 Saw Base 1 193 5519851 Connector PG13 5 2 194 5519852 Connector Mounting Nut 5 195 5519853 Control Box 1 196 5521707 Worklight Power Cable 115V Only 1 196 1 5519854 Power Cable with Plug 115V Only 1 197 5519855 Left Side Panel 1 198 TS 0680021 Flat Washer 1 4 4 199 TS 081F032 Phillips Pan Head Screw 1 4 20 x 1 2 4 200 5519857 Hydraulic Cylinde...

Page 31: ...l Gauge OD 26mm 1 52 9 5519749 Oil Plug PT1 4 1 52 10 5519750 Worm Shaft 1 52 11 5519751 O Retainer Ring ID113 97 x 2 62W 1 52 12 5519752 O Retainer Ring ID61 6 x 2 62W 1 52 13 5519753 End Seal Cover 1 52 14 TS 0720071 Lock Washer 1 4 4 52 15 TS 0207041 Socket Head Cap Screw 1 4 20 x 3 4 4 52 16 5519754 Ventilation Bolt 5 8 18UNF 1 52 17 5519755 Bearing 6205Z 1 52 18 5519756 Transmission Gear 1 52...

Page 32: ... 4 3 52 28 5519764 Main Shaft Cover 1 52 29 5519765 Main Shaft 1 52 30 TS 0090061 Hex Cap Screw 3 8 16 x 1 1 4 3 52 31 TS 0720091 Lock Washer 3 8 3 52 32 TS 0570032 Hex Nut Full 3 8 24 3 Parts List for the VSF 14 Bearing Shaft Assembly Item Part Number Description Size Qty 39 1 5521712 Ball Bearing 627 2Z 8 39 2 5521713 Blade Wheel 4 39 3 5521714 E Retaining Ring E7 4 39 4 5519732 Bearing Shaft 4 ...

Page 33: ...9 1 5519774 Smooth Wheel 2 69 2 BB6201Z Bearing 6201Z 4 Parts List for the VSF 14 Idler Wheel Assembly Item Part Number Description Size Qty 107 1 5519793 Idler Wheel 1 107 2 BB6205ZZ Bearing 6205ZZ 2 107 3 5519794 C Retainer Ring 2 Figure 13 Exploded View of the VSF 14 Smooth Wheel Assembly Figure 14 Exploded View of the VSF 14 Idler Wheel ...

Page 34: ...34 230 Volts Single Phase 115 Volts Single Phase Figure 15 Electrical Schematics for Single Phase Motor Electrical Schematics 115 Volts Single Phase 230 Volts Single Phase ...

Page 35: ... 460 Volts Three Phase 230 Volts Three Phase Figure16 Electrical Schematics for Three Phase Motor 230 Volts Three Phase 460 Volts Three Phase ...

Page 36: ...WMH TOOL GROUP 2420 Vantage Drive Elgin Illinois 60123 Ph 847 851 1000 Fax 800 626 9676 www wmhtoolgroup com Copyright WMH Tool Group ...

Reviews: