15
8.14
Fine feed handwheel
When the controls are set for the
Fine feed using
handwheel
position (see Table 2), the
Fine Feed
Handwheel
(B, Figure 8-6) can be used for manual fine
feed control in either upward or downward direction of
quill. Set feed direction control (C, Figure 8-7) at neutral
position.
Remove
manual
fine
feed
handwheel when not in use.
Failure to comply may cause injury.
8.15
Automatic feed operation
Feed trip adjustment sets the point at which quill will reset
during automatic feed.
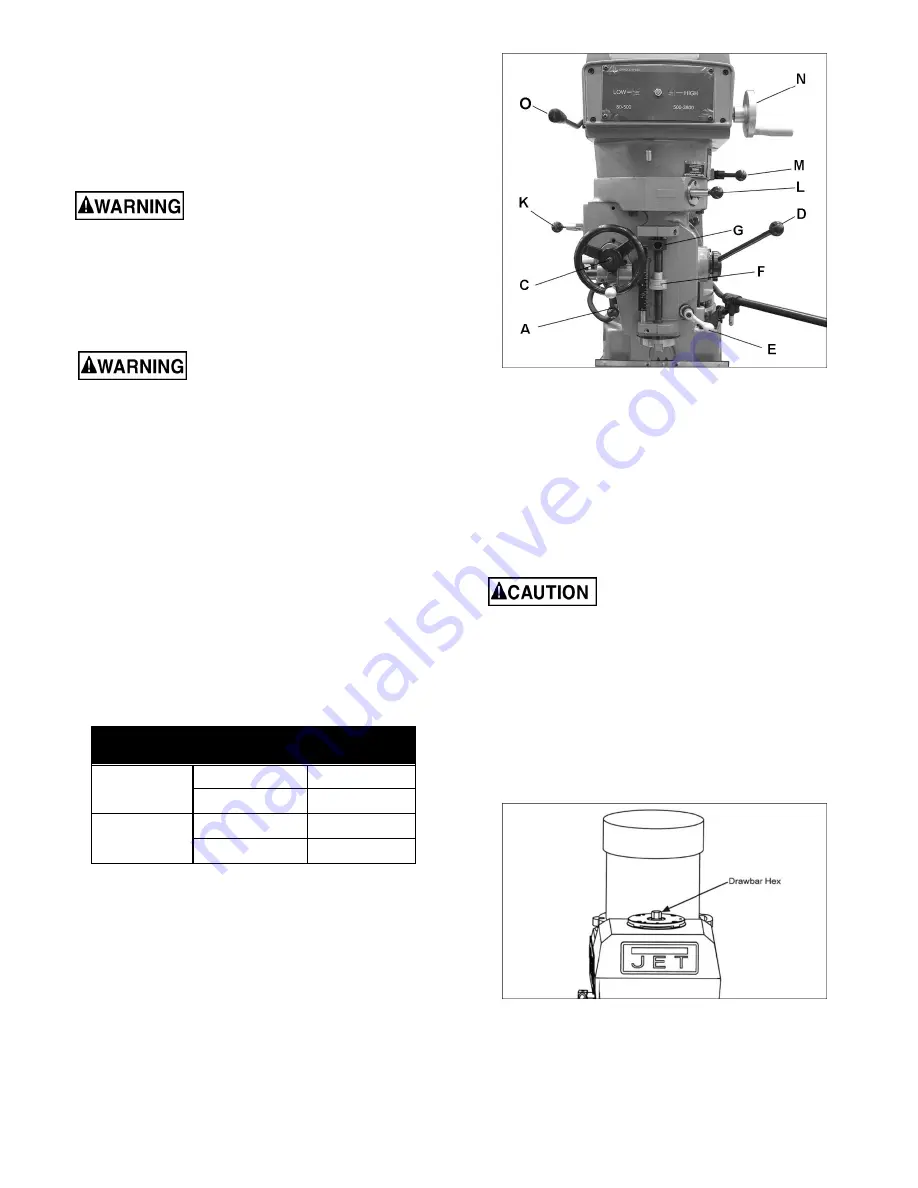
Refer to Figure 8-9.
Remove
manual
fine
feed
handwheel before power feed
operation. Failure to comply may cause injury.
1.
Move micrometer adjusting nut to allow for ample
spindle travel.
2.
Use
Coarse Feed Handle
(D) to advance quill to
point where the feed should stop. Lock quill (E).
3.
Engage
Feed Trip Cam Lever
(A) by pulling away
from head assembly.
4.
Move
Micrometer Adjusting Nut
(F) against
Quill
Stop
(G).
5.
Continue turning
Micrometer Adjusting Nut
(F)
until
Feed Trip Cam Lever
(A) trips.
6.
Loosen
Quill Lock
(E) to allow quill to retract.
7.
Set
Feed Rate Lever
(K) to feed rate required for
tooling and material.
8.
Select feed direction by setting
Feed Direction Knob
(C) position per Table 3:
Spindle
Direction
Feed
Direction
Knob
Position
CW
Down
In
Up
Out
CCW
Down
Out
Up
In
Table 3
9.
Place
Quill Feed Engagement Lever
(L) in
Engaged
position.
10. Turn on spindle.
11. Engage
Feed Trip Cam Lever
(A) by pulling away
from head assembly. Feed will begin until lever trips
out at preset depth.
Figure 8-9
Note:
Due to variables in tool diameter, coatings, coolant,
and materials, no specific spindle speed or feed rate
recommendations are provided. Use general shop
manuals that have data applicable to the milling and
drilling operations being performed. Or, contact the
supplier of the tooling, coolant, and material for specific
recommendations.
IMPORTANT:
The power feed can be used for drills up
to 3/8” in diameter (mild steel). Use manual feed for drills
larger than 3/8”.
The overload clutch is factory set to
hold up to 200 lbs. downfeed pressure on the quill
(accommodates drills up to 3/8”). Do not attempt to
adjust clutch pressure.
8.16
Draw bar operation – changing
tooling
1. Lock spindle using spindle brake (O, Figure 8-9).
2. Using provided wrench on drawbar hexagonal end
(Figure 8-10), loosen draw bar two or three turns
counterclockwise.
Figure 8-10
3. Tap the top of draw bar with a soft-faced hammer to
loosen collet from taper.
4. Remove tool from collet.
5. Insert new tool into collet.
Summary of Contents for JTM-1254RVS
Page 7: ...7 4 1 Machine dimensions JTM 1254VS and JTM 1254RVS Figure 4 1 Installation Diagram...
Page 8: ...8 4 2 Overview and terminology JTM 1254VS and JTM 1254RVS Figure 4 2 Overview...
Page 19: ...19 Figure 9 6...
Page 22: ...22 12 1 1 JTM 1254VS Upper Head Assembly Exploded View...
Page 26: ...26 12 2 1 JTM 1254RVS R8 Upper Head Assembly Exploded View...
Page 30: ...30 12 3 1 JTM 1254VS Lower Head Assembly Exploded View...
Page 34: ...34 12 4 1 JTM 1254RVS R8 Lower Head Assembly Exploded View...
Page 38: ...38 12 5 1 JTM 1254VS Base Machine Exploded View...
Page 41: ...41 12 6 1 JTM 1254RVS R8 Base Machine Exploded View...
Page 52: ...52 427 New Sanford Road LaVergne Tennessee 37086 Phone 800 274 6848 www jettools com...


