


14
Maintenance
Never perform maintenance on
this machine before turning switch off and
removing plug from power source. Failure to
comply may cause serious injury!
Cleaning the Filter Bag – DC-1100A/RC
Wearing a particle mask or
respirator for protection against fine dust
particles during cleaning is highly recommended.
During first use and after cleaning, the filter bag may
allow some dust to escape. This is normal and will
stop after a short period of time.
Clean both the filter and collector bags frequently to
keep the collector's performance at its optimum. To
clean:
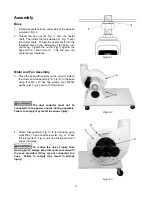
1. Disconnect the machine from the power source.
2. Unhook the filter bag from the hanger and shake
the bag so that the majority of the dust falls into
the collector bag.
3. Loosen the retaining strap, and remove the filter
bag from the housing.
4. Turn the bag inside out and clean.
5. Turn the bag outside in and re-attach to the
housing using the retainer strap to secure.
Removing the Collector Bag –
DC-1100A/RC
1. Disconnect the machine from the power source.
2. Remove the collector bag by pushing the ring of
the collector bag upwards and pulling the bag
out at an angle.
3. Empty the contents into an appropriate
container.
4. Turn the bag inside out and clean.
5. Turn the bag outside in and insert into the
housing.
To replace the collector bag, refer to the
Collector
Bag Installation – DC1100A/RC
section.
Use the proper type hose to connect the dust
collector to the machine being operated. Dryer vent
hose is not acceptable for this purpose. Contact your
nearest JET distributor for the full line of JET
Dust
Collector Hoses and Accessories
. Customize your
installation and obtain maximum performance with
JET's dust hoods, hoses, clamps, fittings, and blast
gates.
Cleaning the Filter – DC-1100C/RC
Never perform maintenance on
this machine before turning switch off and
removing plug from power source. Failure to
comply may cause serious injury!
Clean both the filter and collector bags frequently to
keep the collector's performance at its optimum.
To clean the filter, turn the handle a couple of
rotations so the dust falls into the collector bag.
Removing the Collector Bag –
DC-1100C/RC
Wearing a particle mask or
respirator for protection against fine dust
particles during cleaning is highly recommended.
1. Disconnect the machine from the power source
outlet.
2. Remove the collector bag by pushing the ring of
the collector bag upwards at an angle and
pulling the bag and snap ring out.
3. Empty the contents into an appropriate
container.
To replace the collector bag, refer to the
Collector
Bag Installation – DC-1100C/RC
section.
Motor
Make frequent inspections of the motor fan and blow
out (with low pressure air hose) or vacuum any
accumulation of foreign material in order to maintain
normal motor ventilation.
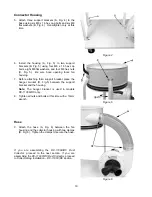
Connecting the Dust Collector to a
Machine
Use the proper type hose to connect the dust
collector to the machine being operated. Dryer vent
hose is not acceptable for this purpose. Contact your
nearest JET distributor for the full line of JET Dust
Collector Hoses and Accessories. Customize your
installation and obtain maximum performance with
JET's dust hoods, hoses, clamps, fittings, and blast
gates.
Grounding the Dust Collection System
The dust collection system includes the dust collector
and the hose, or ductwork you use to connect the
tools. The dust collector is grounded though the
ground wire in the cord. The hose or ductwork you
use to connect the tool to the dust collector must also
be grounded. To assist in grounding your system
you can purchase the JET “Dust Collector Grounding
Kit” stock # JW1053 through JET Distributors.


