background image

22

Vertical Band Saw

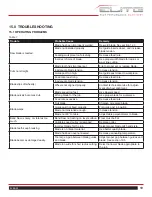
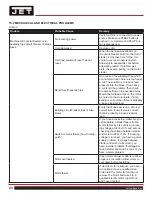
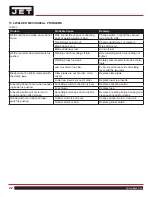
15.4 WELDER MECHANICAL PROBLEMS

Table 4

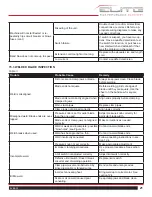
Trouble

Probable Cause

Remedy

Weld could not be made. Jaws do not 
move.

Wire connection is poor; connecting 
point of welding switch is bad.

Change switch, or grind the connect-
ing port with a fi le.

Transformer burned out.

Change transformer, or rewire it.

Blade has oil on it.

Wipe off any oil.

Blade ends have rust.

Grind off rust.

Weld area melts when weld switch is 
pushed.

Welding switch is cutting off late.

Screw welding switch connecting nut 
tighter.

Welding press too weak.

Rotate pressure selector knob accord-
ingly.

Jaw movement too slow.

Put some oil on rear side of welding 
lever and the two jaws.

Blade cannot be tightly clamped with 
the clamp jaws.

Clamp jaws are out of order, or de-
cayed.

Replace clamp jaws.

Lower jaw inserts are out of order.

Replace lower jaw inserts.

Annealing doesn’t occur when anneal-
ing button is pushed.

Annealing switch connection is poor.

Replace annealing switch.

Fuse blown.

Replace fuse.

Annealing button will not return to 
correct position after release.

Annealing button has dust or debris 
around it.

Remove annealing button housing and 
clean out any dust or debris.

Grinder will not run when Grinder 
switch is pushed.

Grinder motor is burnt out.

Change grinder motor or rewire it.

Grinder switch is bad.

Replace grinder switch.

Summary of Contents for 891100

Page 1: ...tions and Parts Manual Vertical Band Saw Model EVBS 20 JET 427 New Sanford Road LaVergne Tennessee 37086 www jettools com Ph 855 336 4032 Part No M 891100 REV D 10 2018 Copyright 2018 JET This pdf document is bookmarked ...

Page 2: ...y defects in workmanship or materials subject to the limitations stated below This warranty does not cover failures due directly or indirectly to misuse abuse negligence or accidents normal wear and tear improper repair alterations or lack of maintenance HOW TO GET TECHNICAL SUPPORT Please contact Technical Service by calling 1 855 336 4032 Please note that you will be asked to provide proof of in...

Page 3: ...DEATH INJURIES TO PERSONS OR PROPERTY OR FOR INCIDENTAL CONTINGENT SPECIAL OR CONSEQUENTIAL DAMAGES ARISING FROM THE USE OF OUR PRODUCTS SOME STATES DO NOT ALLOW THE EXCLUSION OR LIMITATION OF INCIDENTAL OR CONSEQUENTIAL DAMAGES SO THE ABOVE LIMITATION OR EXCLUSION MAY NOT APPLY TO YOU JET sells through distributors only The specifications listed in JET printed materials and on official JET websit...

Page 4: ... 13 11 5 KERF 13 11 6 WIDTH 13 11 7 BLADE BREAKAGE 13 12 0 WELDER OPERATION 13 12 1 SHEARING 13 12 2 REMOVING TEETH 14 12 3 WELDING 14 12 4 ANNEALING 15 12 4 1 CARBON STEEL BLADES 16 12 4 2 CARBON STEEL HARD BLACK BLADES 16 12 4 3 BI METAL BLADES 16 12 5 BLADE GRINDING 16 12 6 SECONDARY ANNEALING 17 12 7 WELDER CLEAN UP 17 13 0 BAND SAW OPERATION 17 13 1 BLADE BREAK IN PROCEDURE 17 13 2 SETTING BL...

Page 5: ...diately after maintenance is complete 19 Check damaged parts Before further use of the machine a guard or other part that is damaged should be carefully checked to determine that it will operate properly and perform its intended function Check for alignment of moving parts binding of moving parts breakage of parts mounting and any other conditions that may affect its operation A guard or other par...

Page 6: ... the manual should ac company it This means that if precautions are not heeded it may result in minor injury and or possible machine damage This means that if precautions are not heeded it may result in serious or even fatal injury WARNING This product can expose you to chemicals including lead which is known to the State of California to cause cancer and birth defects or other reproductive harm F...

Page 7: ...min max in 1 8 1 Table Size LxW in 24x22 Table Height in 39 3 8 Table Tilt 10 L 45 R Overall Dimensions LxWxH in 40x29x77 1 2 Net Weight lbs 1 102 Gross Weight lbs 1 356 The specifications in this manual were current at time of publication but because of our policy of continuous improvement JET reserves the right to change specifications at any time and without prior notice without incurring oblig...

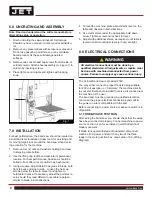
Page 8: ...ero should they read different once table is perpen dicular to blade in both directions 4 To level the machine place a machinist s level on the table and observe in both directions 5 Use metal shims under the appropriate hold down screw Tighten screw and recheck for level 6 Adjust with additional shims as required until table is level when all mounting screws or nuts are tight 8 0 ELECTRICAL CONNE...

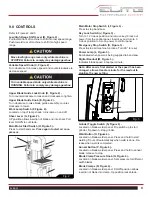
Page 9: ... to control panel Emergency Stop Switch K Figure 3 Press to stop all machine functions Turn 90 to reset Power Lamp L Figure 3 Illuminated when power is being supplied to band saw Digital Readout M Figure 3 Indicates blade speed in feet per minute Note After saw is first started or the speed has been changed allow at least a minute for the readout to stabilize the new setting Grinder Toggle Switch ...

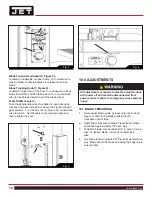
Page 10: ...on underside of upper frame Turn clockwise to tension blade counterclockwise to release tension on blade Blade Tracking Knob T Figure 5 Located at upper rear of the saw Turn clockwise to track blade toward front of the blade wheel Turn counterclock wise to track blade toward rear of the blade wheel Table Tilt Mechanism Take the appropriate wrench supplied in accompanying tool box and pass through ...

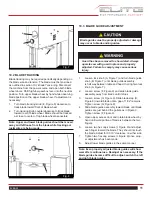
Page 11: ... lock knob A Figure 7 2 Loosen screw F Figure 9 and slide blade guide assembly away from blade until it stops 3 Loosen screw G Figure 9 Slide blade stop H Figure 9 toward blade until a gap of 1 32 remains Tighten screw G Figure 9 4 Slide blade guide assembly toward blade until blade guides are just behind the gullets as in Figure 9 Tighten screw F Figure 9 5 Open upper access door and rotate blade...

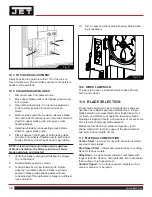
Page 12: ... tension knob Rotate wheel by hand and make sure blade is properly seated in blade guides Blade guides will have to be adjusted if the replacement blade is a different type and width 10 Turn on saw and check blade tracking Adjust track ing if necessary 10 6 WORK LAMP BULB The work lamp uses a standard medium base 60 watt bulb not provided 11 0 BLADE SELECTION Proper blade selection is just as impo...

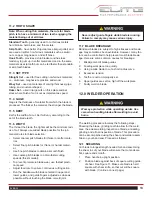
Page 13: ...arger gullet and are used on softer non ferrous materials such as alumi num copper magnesium and soft brass Hook Tooth provides a chip breaker and has less tendency to gum up in softer materials Used in the same materials as skip tooth but can be fed faster than standard or skip tooth blades 11 3 SET TYPE Straight Set used for free cutting non ferrous materials i e aluminum magnesium plastics and ...

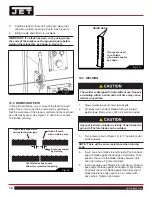
Page 14: ...e used to cut blade grind ends square as shown Fig 13 Fig 11 12 3 WELDING 1 Clean welder jaws and lower jaw inserts 2 Carefully clean ends of blade which will contact welder jaws Remove any dirt oil scale and oxide 3 Turn pressure knob Figure 14 to 0 position point ed downward NOTE There will be some resistance when turning knob 4 Insert one end of blade into left clamp Position back edge of blade...

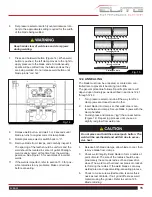
Page 15: ...nd clamp jaws during welding 12 4 ANNEALING The blade must now be annealed or cooled at a con trolled rate to prevent it becoming too brittle The general procedure follows Specific procedure will depend upon blade type as described in sections 12 4 1 through 12 4 3 1 Turn pressure selector knob all the way to left so clamp jaws are closest to each other 2 Insert blade into clamps so that weld area...

Page 16: ...to comply may cause serious injury Always heed the indicator light when glowing it warns that the grinder motor is running 12 4 3 BI METAL BLADES 1 Heat blade slowly by jogging the annealing switch button until weld just begins to emit light dull red color The desired color may not always be visible in normal room light always shade the weld area with your hand 2 Cool the weld quickly by releasing...

Page 17: ...t generated during the cut then feed rate is excessive If chips are slightly curled and not colored by heat then the blade is sufficiently sharp and is cutting at its most efficient rate Bad Grindings Fig 18 12 6 SECONDARY ANNEALING Anneal the weld 2 to 3 times again after grinding 12 7 WELDER CLEAN UP It is important that the welder jaws be kept clean at all times The jaws and inserts must be wip...

Page 18: ...e tables after each day s use 14 1 LUBRICATION SCHEDULE Upper Blade Guide Shaft lightly grease weekly Clean after each day s use Speed Change Handle grease monthly with a light film on teeth and threads Variable Pulley insert a light weight grease into the grease fitting located on end of pulley shaft Blade Tension Screw grease monthly Before doing maintenance on the machine discon nect it from th...

Page 19: ... wheel alignment Blade quickly becomes dull Blade speed too fast Use slower speed Wrong blade for the job Use proper blade for workpiece Feed rate excessive Decrease feed rate Blade warps Dull blade Sharpen or replace blade Guide post not fixed properly Fix guide post in position Blade not tensioned enough Increase tension Blade not 90 to table Adjust table perpendicular to blade Band Saw is noisy...

Page 20: ...h the full load amps on the motor as noted on the motor plate If amp setting is correct then there is probably a loose electrical lead Building circuit breaker trips or fuse blows Verify that band saw is on a circuit of correct size If circuit size is correct there is probably a loose electrical lead Switch or motor failure how to distin guish If you have access to a voltmeter you can separate a s...

Page 21: ... jaws Align ends properly before clamping Worn clamp jaws Replace clamp jaws Clamp jaws not aligned correctly Align jaws correctly Misaligned weld Blade ends are over lapped Pressure knob is set for wider blade than the one used Adjust pressure knob correctly for particular blade width Blade ends or clamp jaws not aligned correctly Make corrections as needed Weld breaks when used Weld is weak and ...

Page 22: ...r knob accord ingly Jaw movement too slow Put some oil on rear side of welding lever and the two jaws Blade cannot be tightly clamped with the clamp jaws Clamp jaws are out of order or de cayed Replace clamp jaws Lower jaw inserts are out of order Replace lower jaw inserts Annealing doesn t occur when anneal ing button is pushed Annealing switch connection is poor Replace annealing switch Fuse blo...

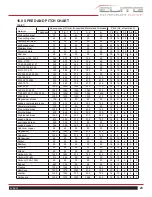
Page 23: ...03 3004 1500 1500 1500 1385 1220 18 10 6 3 3 2024 5052 1500 1500 1500 1500 610 18 10 6 3 3 Magnesium bronze 125 75 40 25 20 14 8 6 3 3 Leaded commercial bronze 915 610 450 305 150 14 8 6 3 3 Commercial bronze 150 105 60 30 20 14 8 6 3 3 Free cutting brass 1220 915 610 450 300 14 8 6 3 3 Forging brass 610 460 335 245 150 14 8 6 3 3 High leaded brass 1065 825 565 410 260 14 8 6 3 3 Leaded brass 610 ...

Page 24: ...s or reach our service department call 1 855 336 4032 Monday through Friday 8 00 a m to 5 00 p m CST Having the Model Number and Serial Number of your machine available when you call will allow us to serve you quickly and accurately JET 427 New Sanford Road LaVergne Tennessee 37086 www jettools com Phone 855 336 4032 ...

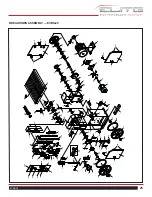
Page 25: ...25 141 25 98 31 1 16 58 84 14 17 2 87 37 42 47 38 39 35 48 50 36 41 44 45 34 40 29 4 7 18 9 8 5 6 13 28 15 32 19 10 11 19 20 61 64 62 18 3 27 12 101 109 110 115 110 43 142 24 33 100 106 120 130 126 124 122 123 121 131 128 133 133 1 135 132 118 127 139 134 137 139 119 138 129 127 53 57 59 54 52 117 46 48 97 96 49 66 69 74 56N 88 70 111 102 109 110 75 85 80 72 78 68 65 86 ...

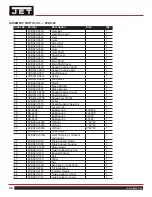
Page 26: ...S2012 0740 Shaft Housing 1 23 VBS2012 0790 Speed Lever Right 1 24 EVBS20 0770 Pulley 1 25 EVBS20 7310 Speed Readout Detector 1 26 EVBS20 9221 Lever Knob 1 27 BB 6008 Ball Bearing 6008ZZ 1 28 BB 6206 Ball Bearing 6206ZZ 1 29 BB 6303 Ball Bearing 6303Z 1 30 BB 6304 Ball Bearing 6304Z 1 31 EVBS20 L4030 Oil Seal 7 30 40 1 32 EVBS20 L5230 Oil Seal 7 30 52 1 33 EVBS20 L5840 Oil Seal 8 40 58 1 34 EVBS20 ...

Page 27: ... 1 66 VBS2012A 302 Rubber Tire 2 67 VBS2012 3030 Taper Sleeve 1 68 VBS2012 3040 Wheel Locking Nut 1 69 VBS2012A 305 Upper Wheel 1 70 VBS2012 3060 Upper Wheel Lock 1 71 VBS2012 3080 Slide Block Housing 1 72 VBS2012 3090 Slide Block Seat 1 73 VBS2012 3100 Slide Block Guide 2 74 VBS2012 3110A Upper Wheel Slider 1 75 EVBS20 3116 Slider Screw Shaft 1 76 VBS2012 3120 Wheel Elevate Shaft 1 77 VBS2012 312...

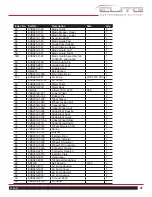
Page 28: ...0 9600 Chip Funnel 1 113 VBS2012 9780 Brusher Bracket 1 114 VBS2012 9790 Chip Brusher 1 115 EVBS20 9850 Key For Rear Door 1 116 EVBS20 9880 Chip Collector 1 117 EVBS20 9900 Magnifying Glass 1 118 EVBS20 6490 Timer 1 119 EVBS20 6510 Brake Resistor 1 120 EVBS20 6515 Blade Speed Adjust Knob 1 121 EVBS20 6530 Inverter 1 122 VBS2012 6602 Push Button Off 1 123 EVBS20 6605 Push Button On 1 124 VBS2012 66...

Page 29: ...ty 136 EVBS20 6770 Wire Housing 1 137 EVBS20 6771 Ground Seat 1 138 EVBS20 6798 Electric Box 1 139 EVBS20 6799 Wiring Plate 1 140 EVBS20 140 Bi metal blade not shown 1 4 x0 025 x151 5 14 18VT 1 141 EVBS20 141 Sensor 1 142 EVBS20 142 Table Insert 1 ...

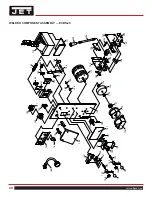
Page 30: ... 187 168 170 142 165 164 166 167 171 149 150 148 199 198 195 196 173 193 192 197 194 191 194 190 190 193 178 179 177 176 175 174 181 182 145 172 147 156 154 146 151 187 158 152 151 157 155 153 158 159 186 O P E R A T IO N O F S A W W E L D E R WELDER COMPONENT ASSEMBLY EVBS 20 ...

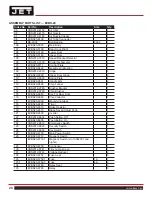
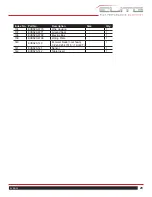
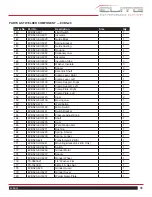
Page 31: ...6 EVBS20 EV 6110 Clamp Plate Right 1 157 EVBS20 EV 6111 Clamp Plate Left 1 158 EVBS20 EV 6120 Cam 2 159 EVBS20 EV 6130 Moving Jaw 1 160 EVBS20 615 Weld Button 1 161 EVBS20 HV 6160 Micro Switch 1 162 EVBS20 EV 6161 Switch Bracket 1 163 EVBS20 EV 6170 Pressure Adjust Knob 1 164 EVBS20 EV 6180 Shaft 1 165 EVBS20 EV 6200 Cam 1 166 EVBS20 EV 6210 Weld Tension Arm 1 167 EVBS20 EV 6211 Bushing 1 168 EVBS...

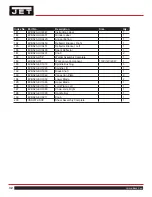
Page 32: ... EVBS20 HV 9291 Knob 2 188 EVBS20 WCP Welder Assembly Complete 1 189 EVBS20 WL Work Lamp Component 110V 12V 20W 1 190 EVBS20 EV 1910 Spindle Bushing 3 191 EVBS20 EV 1920 Spindle Lift 1 192 EVBS20 EV 1930 Blade Shaft 1 193 EVBS20 EV 1940 Vanes Iron Plate 2 194 EVBS20 EV 1950 Lower Blade 2 195 EVBS20 EV 1960 Upper Blade 1 196 EVBS20 EV 1970 Joint Plate Left 1 197 EVBS20 EV 1980 Chain Joint Right 1 1...

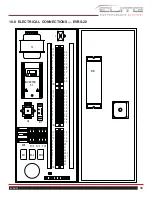
Page 33: ...7 6 8 11 10 12 T2 QS TB1 TB2 E P C 9 1 5 3 2 4 7 6 8 11 10 12 TB3 KA2 KM2 KA1 FU1 FU2 34 33 32 31 29 28 27 27 9 25 24 21 20 19 19 19 18 17 16 16 15 15 11 13 12 W U V L1 L2 L3 INVERTER KIT S1 L21 L11 11 11 BR KM1 FU3 18 0 ELECTRICAL CONNECTIONS EVBS 20 ...

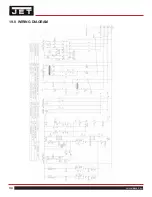
Page 34: ...34 Vertical Band Saw 19 0 WIRING DIAGRAM ...

Page 35: ...35 EVBS 20 NOTES ...

Page 36: ...36 Vertical Band Saw NOTES ...

Reviews: