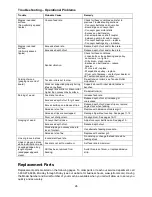
background image


14

Operating Controls 

On/Off Switch (Sanding Drum) 

To start the sander, pull 

switch

 (A, Fig. 17) out. To 

stop the sander, push switch in. This switch 
operates the sanding drum only. The conveyor is 
controlled separately. 

Switch Lockout 

For safety and to prevent unauthorized use of the 
sander, pull out the 

key

 (B, Fig. 17). Press 

switch


(A, Fig. 17) to OFF position before removing the 
key. When the key is removed, the drum cannot be 
started. 

Note:

 The conveyor belt can still run when the key 

is removed).  

To replace the key, slide it back into the switch until 
it snaps. 

Conveyor 

The conveyor speed is contolled by the conveyor 

speed rate control knob

 (E, Fig. 18) which sets the 

conveyor speed from stopped (knob fully 
counterclockwise) to 10fpm (knob fully clockwise). 

Drum Height Control 

Drum height is controlled by the 

height adjustment 

handwheel

. Rotating the handwheel counter-

clockwise lowers the drum; clockwise raises it. 

One revolution of the handwheel moves the drum 
approximately 1/16”. 

Oscillator Switch 

Referring to Figure 18: 

The 22-44OSC sander can be operated as a 
simple sander or as an oscillating sander. 

When operating as a linear sander, the sander 
drum rotates as the conveyor slides the workpiece 
through. When in the oscillating mode, in addition 
to the operation described, the sander drum head 
oscillates from left to right as shown in Figure 18. 

For linear


sanding mode: 

1.  Sander must be turned off. 

2. Pull 

the 

oscillator switch

 (A) OUT. 

Note:

 Before pulling the oscillator switch out for 

linear sanding mode, turn the oscillator switch to 
manually position the sanding drum to center or 
where otherwise desired. 

3. Turn 

machine 

on. 


Figure 17 


Figure 18 

For oscillating sanding mode: 

1.  Sander must be turned off. 

2. Press 

oscillator switch

 (A) IN and at the same 

time rotate the switch (either direction) until the 

pins

 (B) protruding from the oscillator switch 

shaft engage in the 

detent

 (C) of the pulley 

base. 

3. Turn the feed 

rate control knob

 (E) fully 

clockwise. 

Note:

 The feed rate must be set to maximum 

when in the oscillation mode. 

4.  Turn the machine on. 


Summary of Contents for 22-44 OSC

Page 1: ...tions and Parts Manual Oscillating Drum Sander Model 22 44OSC JET 427 New Sanford Road Part No M 659006K LaVergne Tennessee 37086 Revision D 03 2016 Ph 800 274 6848 ECR 16020409184 www jettools com Co...

Page 2: ...nal action needed JET has Authorized Service Centers located throughout the United States For the name of an Authorized Service Center in your area call 1 800 274 6846 or use the Service Center Locato...

Page 3: ...16 Checking Drum Alignment 16 Fine Tuning Drum Alignment 17 Tension Roller Alignment 17 Tension Roller Pressure Adjustment 18 Drum Height Control Adjustment 18 Operation 19 Basic Operating Procedure 1...

Page 4: ...romium from chemically treated lumber Your risk of exposure varies depending on how often you do this type of work To reduce your exposure to these chemicals work in a well ventilated area and work wi...

Page 5: ...d safest performance Follow instructions for lubricating the machine and changing accessories 28 Always feed stock against the rotation of the drum 29 Keep your hands clear when feeding parts onto the...

Page 6: ...ses Minimum board length in 2 1 4 Maximum board thickness in 4 Minimum board thickness in 1 32 Motor and Electricals Conveyor motor 1 30HP 0 45A 40 RPM 43 inch lb torque direct drive D C Drum motor TE...

Page 7: ...The illustration below shows the major components and features of the 22 44OSC Sander These are referenced throughout the manual and will help to familiarize you with the operation and functions of th...

Page 8: ...ed throughout the Assembly section of this manual for reference conven ience Shipping Contents Main Container Contents Contents shown in Figure 1 1 Handwheel A 1 TufTool B 1 Drum Head C 1 Conveyor Tab...

Page 9: ...Secure the left side of the rear plate G to the left stand side F1 with two each 5 16 hex cap screws L2 and 5 16 flat washers P2 Hand tighten only PPPPP 4 Secure the right side of the rear plate G to...

Page 10: ...the conveyor D onto the sander base C1 Align the four holes in the conveyor D with the four holes in the sander base 3 Secure the conveyor in place with four 5 16 x 3 4 socket head cap screws K four 5...

Page 11: ...d and attached to the left outboard side of the drum Then the strip is wrapped around the drum and the second taper is made for attachment to the right inboard side of the drum Note You can use the or...

Page 12: ...t is holding the paper tight Figure 13 11 Insert the tapered end of the abrasive strip into the slot and fastener It may be necessary to trim the tapered end of the abrasive strip so that it does not...

Page 13: ...e a damaged or worn cord immediately As received from the factory your drum sander is intended for use on a 20 amp 110V dedicated circuit which has an outlet and a plug that look like the ones illustr...

Page 14: ...of the handwheel moves the drum approximately 1 16 Oscillator Switch Referring to Figure 18 The 22 44OSC sander can be operated as a simple sander or as an oscillating sander When operating as a line...

Page 15: ...Insufficient belt tension will cause slippage of conveyor belt on the drive roller during sanding operation the conveyor belt is too loose if it can be stopped by hand pressure applied directly to th...

Page 16: ...cket until the distance between the roller and the straight edge are equal from side to side then tighten the bracket Checking Drum Alignment The sanding drum must be aligned parallel to the conveyor...

Page 17: ...ons of the fine tune knob are needed to change drum alignment for wider over 22 sanding When sanding narrow stock less than 22 loosen the four screws Figure 22 and turn fine tune adjustment knob count...

Page 18: ...Fig 24 at this position 3 If only outfeed tension roller causes snipe only tighten rear outfeed hex nuts on each end of drum at this position then raise sanding drum another 3 4 turn of the handle 4...

Page 19: ...be sanded under the drum and lower drum until it contacts the stock Drum should still rotate by hand Without changing drum height finish feeding the stock under the sander Start sanding drum and sand...

Page 20: ...one session Be aware that the sander will remove cups and crowns in the workpiece consider this when measuring and processing stock to the same thickness Sanding Multiple Pieces At Once When sanding m...

Page 21: ...Keeping the Machine Clean For best results make cleaning the sander a regular shop procedure Allowing excess build up of dust and debris can adversely affect performance through the loading of the abr...

Page 22: ...bottom slot of the Tracker Note When installed properly only the bottom lip of the Tracker will be visible The top slot is to be used if the bottom slot wears out 8 Install second Tracker opposite the...

Page 23: ...ts open pores Cleaning Abrasive Strips Regularly clean the abrasive strips on the drums with commercially available cleaning sticks following the manufacturer s directions When cleaning also brush the...

Page 24: ...Conveyor motor oscillates Motor not properly aligned Loosen housing bolts run motor retighten bolts Transfer rod collar is worn Replace transfer rod collar Drive roller bent Replace drive roller Drum...

Page 25: ...rive roller Roller bushings elongated due to excessive wear Replace bushings Abrasive strip is loose Strip caught on inside edge of slot or on inboard side of drum Re adjust the strip end in the slot...

Page 26: ...elt surface Re adjust roller s Burning of wood Feed rate too slow Increase feed rate Excessive depth of cut for grit used Reduce depth of cut or increase grit coarseness Excess build up on abrasive st...

Page 27: ...27 Drum Head Assembly Exploded View...

Page 28: ...t Screw 5 16 18x3 8 4 21 2244OSC 121B Coupler serial 11121604 and higher 1 22 2244OSC 122 Needle Bearing 1 23 80 3138 Fine Tune Adjustment Knob 1 24 2244OSC 124 Set Screw 10 24x3 8 4 25 2244OSC GBA Ge...

Page 29: ...Drum Carriage 1 80 21 1173 Fastener Abrasive Outboard 1 81 TS 0254061 Button Head Socket Screw 1 4 20x1 3 82 TS 0267021 Set Screw 1 4 20x1 4 1 83 2244OSC 183 Lower Fixed Drum Carriage 1 84 TS 0254041...

Page 30: ...30 Conveyor and Motor Assembly Exploded View...

Page 31: ...19 72 2004 ON OFF Drum Switch 1 20 30 0122 Shaft Coupler 1 21 TS 0267021 Set Screw 1 4 20x1 4 2 22 40 4903 Controller Base Bracket 1 23 40 4022W Control Housing Base Cover 1 24 10 4004 12 Hex Washer H...

Page 32: ...Worm 1 9 BB 6001ZZ Ball Bearing 6001ZZ 2 10 2244OSC 210 Retaining Ring 1 11 2244OSC 211 Set Screw 10 24x1 4 2 12 2244OSC 212 Clutch Bushing 1 13 BB 6004ZZ Ball Bearing 6004ZZ 1 14 2244OSC 214 Pulley...

Page 33: ...60051 Hex Cap Screw 3 8 16x1 4 4 TS 0051011 Hex Cap Screw 5 16 18x1 2 12 5 TS 0680031 Flat Washer 5 16 12 6 2244OSC 306 Bottom Plate 1 7 2244OSC 307 Rear Plate 1 8 2244OSC 308 Front Plate 1 9 80S 416...

Page 34: ...2 Index No Part No Description Size Qty 1 2244PLUS 501 Table 2 2 2244PLUS 502 Base Bracket 2 3 TS 0060051 Hex Cap Screw 3 8 16x1 4 4 TS 0680041 Flat Washer 3 8 4 5 TS 0151011 Carriage Bolt 1 4 20x3 4...

Page 35: ...35 Wiring Diagram...

Page 36: ...36 427 New Sanford Road LaVergne Tennessee 37086 Phone 800 274 6848 www jettools com...

Reviews: