JHI-A7-06-0001
Have questions? Call us at 562-467-0260 or email [email protected]
27
6.2.6.2 Ducted
Fan
34.
Assemble the ducted fan unit per the
manufacturer’s instructions.
Note:
This
aircraft is intended for use with the JHI
Turbax 46 ducted fan system.
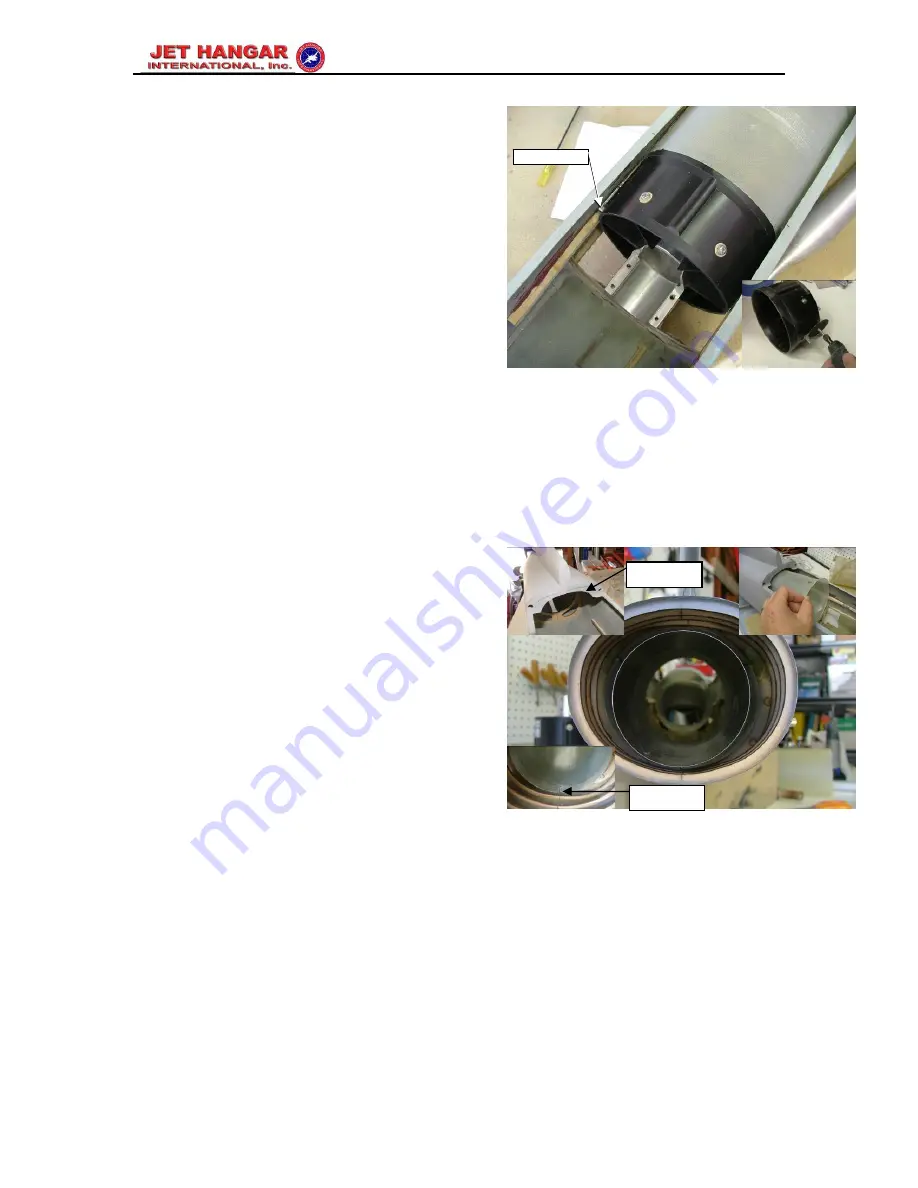
Trim the aluminum mounting rails on the fan
back approximately 11/32”.
Note:
This is
necessary for the fan to fit inside the
fuselage.
Drill two new mounting holes into each of the
mounting rails.
Test fit the ducted fan into the fuselage. Trim
any interference material as required to get
the fan to set in place.
Note:
The fan shroud
is intended to fit inside of the inlet duct.
Mark and drill the required mounting holes for
the fan.
Drill the fan mounting holes and temporarily
mount the fan in place.
Before removing the fan for the next steps,
mark the location of the trailing edge of the
aluminum fan mounts and the trailing edge of
the fan shroud.
Note:
Pay particular attention to information in
the Turbax instruction booklet regarding tail
pipe length and hook-up!
35.
Locate the two fiberglass exhaust ducts.
Note:
It is a two piece duct system with the
largest diameter mating to the rear of the fan
and tapering down to the smallest diameter at
the aircraft exhaust.
Remove the scale exhaust cone by flexing
the fiberglass and removing the three wire
pins from their tubes.
Test fit the rear exhaust liner into the aircraft
pushing the liner as far back as possible to
achieve a snug fit.
Note:
Remove
interference material as required at the
trailing edge of the wing saddle to allow duct
to slip into place.
Trim the exhaust side of the liner to fit in
place as required. The liner should extend
approximately ¼” beyond the rear bulkhead.
Note:
The prototype model required that
approximately 1” be trimmed from the
exhaust.
Once trimmed, mark the three locations for
the scale exhaust cone attachments. Using a
Dremel cutoff wheel, cut slots at each
location in the direction of the exhaust flow.
Note:
This is only required if installing the
scale exhaust cone into the aircraft for static
display or flight.
Mark Location
Remove
Material
Cut Slot 3
Places
Summary of Contents for A-7D/E Corsair II
Page 39: ...JHI A7 06 0001 Have questions Call us at 562 467 0260 or email larrywjhi jethangar com 39...
Page 41: ...JHI A7 06 0001 Have questions Call us at 562 467 0260 or email larrywjhi jethangar com 41...
Page 45: ...JHI A7 06 0001 Have questions Call us at 562 467 0260 or email larrywjhi jethangar com 45...
Page 46: ...JHI A7 06 0001 Have questions Call us at 562 467 0260 or email larrywjhi jethangar com 46...
Page 47: ...JHI A7 06 0001 Have questions Call us at 562 467 0260 or email larrywjhi jethangar com 47...
Page 48: ...JHI A7 06 0001 Have questions Call us at 562 467 0260 or email larrywjhi jethangar com 48...
Page 50: ...JHI A7 06 0001 Have questions Call us at 562 467 0260 or email larrywjhi jethangar com 50...
Page 54: ...JHI A7 06 0001 Have questions Call us at 562 467 0260 or email larrywjhi jethangar com 54...
Page 55: ...JHI A7 06 0001 Have questions Call us at 562 467 0260 or email larrywjhi jethangar com 55...
Page 61: ...JHI A7 06 0001 Have questions Call us at 562 467 0260 or email larrywjhi jethangar com 61...
Page 62: ...JHI A7 06 0001 Have questions Call us at 562 467 0260 or email larrywjhi jethangar com 62...
Page 63: ...JHI A7 06 0001 Have questions Call us at 562 467 0260 or email larrywjhi jethangar com 63...
Page 64: ...JHI A7 06 0001 Have questions Call us at 562 467 0260 or email larrywjhi jethangar com 64...
Page 65: ...JHI A7 06 0001 Have questions Call us at 562 467 0260 or email larrywjhi jethangar com 65...
Page 66: ...JHI A7 06 0001 Have questions Call us at 562 467 0260 or email larrywjhi jethangar com 66...


