background image

16

VX6020

QUICK START GUIDE


Turning the Unit ON or OFF

Press the front panel Power/Volume/Mute control knob to turn the unit ON.  

To turn the unit OFF, press and hold the front panel Power/Volume/Mute control 

knob for 2 seconds.

Selecting an Audio/Video Source, Bluetooth, Navigation 

Steering Wheel Controls or Backup Camera

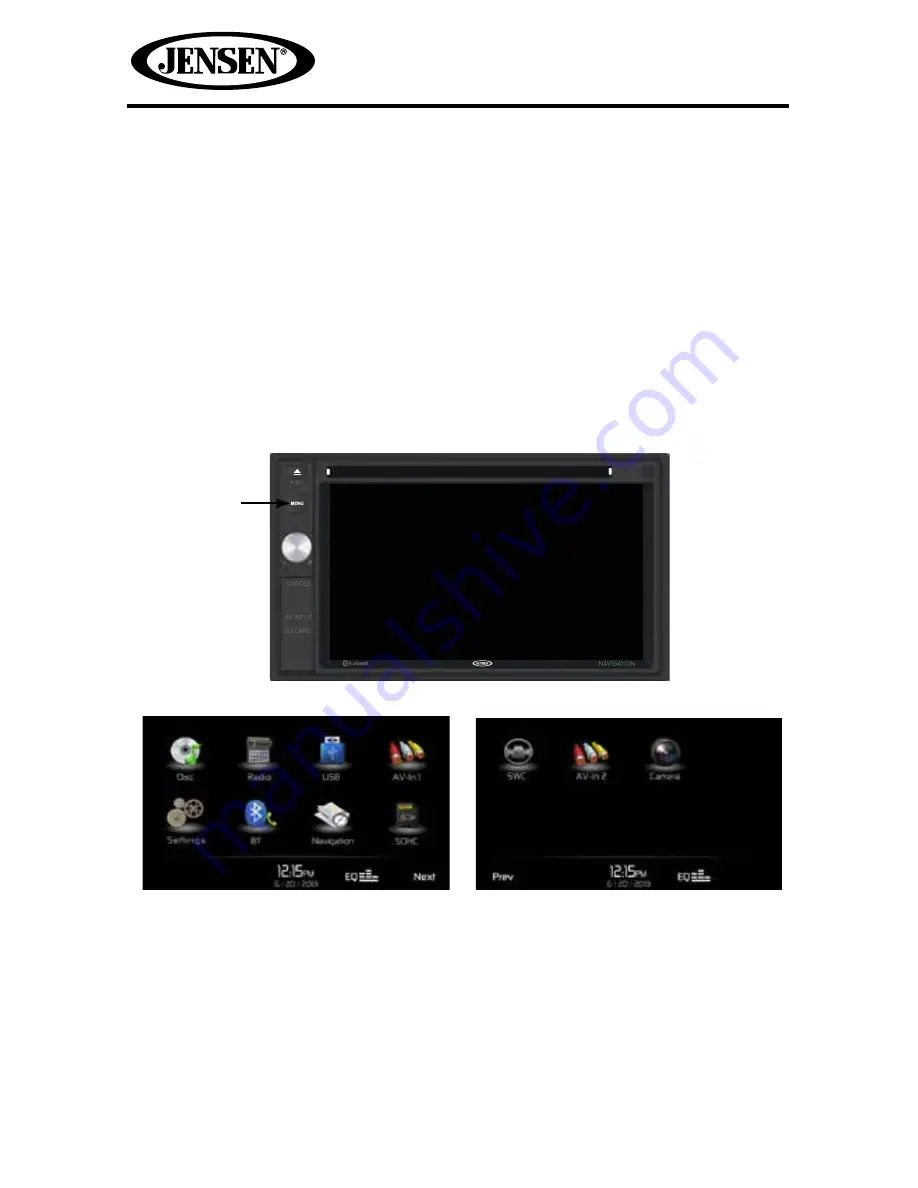
To access an Audio/Video  source:

1.  Press the front panel MENU button or touch the SRC icon to view the Main 

Menu Screen.

2. Touch the desired source icon on one of the two main menu screens. 

Screen 1 of 2: Disc, Radio, USB, AV-IN1, Bluetooth (BT), Navigation, or SDHC.  

Touch Next at the bottom of the screen to access Screen 2 of 2: Steering Wheel 

Control (SWC), AV-IN2, or Camera. 

MENU

Button

Figure 5. VX6020 

Main Menu Screen

Screen 1

Screen 2

Summary of Contents for VX6020

Page 1: ...VX6020 Operating Instructions watts peak 40W x 4 Owner s Manual...

Page 2: ...2 VX6020...

Page 3: ...SB AND SD CARD CONTROLS 50 AV In1 AV In2 CONTROLS 55 BLUETOOTH OPERATION 56 NAVIGATION QUICK START GUIDE 64 STEERING WHEEL CONTROL SWC OPERATION 68 REAR CAMERA OPERATION 69 TROUBLESHOOTING 70 DISC ERR...

Page 4: ...installed and used in accordance with the instructions may cause harmful interference to radio communications However there is no guarantee that interference will not occur in a particular installatio...

Page 5: ...isc Menu Selection Repeat Track Repeat Disc Audio Disc Language Pic Control CD MP3 WMA CD Text Compatible ID3 Tag Compatible Directory Search MP3 WMA Only Burn up to 1500 MP3 and WMA Files onto a DVD...

Page 6: ...afety and convenience and A2DP for streaming music from your smartphone or other Bluetooth device One Composite Video Output for Additional Screens Front Panel Audio Video Input Ten Band Tone Equalize...

Page 7: ...the video display function while driving the vehicle This is a violation of federal law WARNING Never disassemble or adjust the unit WARNING Topreventinjuryfromshockorfire neverexposethisunittomoistur...

Page 8: ...r 5 MINI USB SLOT Used to connect iPod MP3 player connection adapter 6 AV INPUT CONNECTOR This connector accepts a 3 5 mm jack through which signals from various audio video devices can be applied to...

Page 9: ...rily to mute the audio Press the knob again to restore the audio 11 MENU Button Press this button to access the Main touch screen menu Press and hold to switch to Navigation screen 12 Eject Button Pre...

Page 10: ...10 VX6020 REMOTE CONTROL 30 29 32 31 26 25 28 27 23 20 24 22 21 19 18 16 15 14 13 9 10 7 8 11 12 1 2 3 4 17 5 6 20 Figure 2 VX6020 Remote Control...

Page 11: ...file 7 ANGLE Button Press to display and select different camera angles in DVD mode Each time the button is pressed the angle changes NOTE The numbers of angles vary from disc to disc Not all discs co...

Page 12: ...Button Press this button to access the root menu of a DVD or CD during playback The disc will return to normal playback and the root menu will disappear if no selection is made within 10 seconds This...

Page 13: ...ncreasing tuning frequency Press this button while in iPod mode to pause playback starts playback of a music file 29 DISC Button Press this button to enter Disc mode radio mode and scroll though prset...

Page 14: ...nit through a 3 5mm jack The unit can increase or decrease the volume of the connected device all other controls are done on the connected device Select AV In 1 mode to access auxiliary devices AV In2...

Page 15: ...e or is available separately NOTE When connecting an iPod iPhone to the Mini USB to USB Adapter Cable the user must also insert the devices 3 5 mm jack into the A V input connector for video playback...

Page 16: ...tion Steering Wheel Controls or Backup Camera To access an Audio Video source 1 Press the front panel MENU button or touch the SRC icon to view the Main Menu Screen 2 Touch the desired source icon on...

Page 17: ...rmation An audible beep tone confirms each function selection The beep tone can be disabled through the Setup menu Muting the Audio Press the front panel Power Volume Mute control knob to mute the aud...

Page 18: ...he unit is reset while a DVD is playing the unit will return to Main Menu once the reset is complete Image Display Settings Video Output Modes The table below shows the video output mode for each play...

Page 19: ...19 VX6020 This page intentionally left blank...

Page 20: ...lizer adjustment screen Equalizer EQ 10 Band 1 TouchtheEqualizer EQ icontoview andselectadesiredacousticalpresetlevel Optimal Classic Rock Jazz Techno Pop or Flat NOTE The equalizer will automatically...

Page 21: ...ance control settings 18 Left to 18 Right The setting can also be changed by touching screen within the grid to move the green sphere Fade This feature is used to fade the audio output levels between...

Page 22: ...ce to make selection then touch again to confirm selection General Sub menu Features Radio Region USA China Japan Europe Europe LW and Orient OIRT USA frequencies AM Frequency Spacing 9 kHz 10 kHz AM...

Page 23: ...irst screen will appear with instructions 2 Follow the instructions on the screen touching and momentarily holding finger or a stylus to the center of the target for 2 seconds Repeat as the target mov...

Page 24: ...lock appears in the top right corner of the screen during certain operations NOTE The AM PM indication will change as you continue to adjust the hour past 12 Date Touch the Date icon and use the p or...

Page 25: ...supported by the DVD then the default language is used On Screen Display OSD Touch English Spanish or French to select the language for the OSD Display DVD Audio If available this feature allows the...

Page 26: ...function ON or OFF Auto Answer Touch ON or OFF to turn the Bluetooth Auto Answer function ON or OFF Pairing Code This feature allows the user to create a unique 4 digit code for pairing Bluetooth devi...

Page 27: ...the Set Password Code icon and the Password entry screen will appear 2 Use the keyboard enter a unique 4 digit Password NOTE If a wrong digit is entered touching the green arrow will remove the numbe...

Page 28: ...ncrease or decrease the relative volume of the audio output of each source individually DVD Touch the DVD icon to enter the setting then use the p or q icons to increase or decrease the relative volum...

Page 29: ...ncrease or decrease the relative volume level between 6 to 6 iPod Touch the iPod icon to enter the setting then use the p or q icons to increase or decrease the relative volume level between 6 to 6 Th...

Page 30: ...o cannot be displayed on the main TFT screen unless the parking brake is applied If you attempt to play a DVD while the vehicle is moving the TFT screen displays Warning It is illegal to view video wh...

Page 31: ...The player will repeatedly play the part between Point A and Point B Touch A B a third time to cancel A B repeat and resume playback Audio Touch this icon to select an audio language for DVD playback...

Page 32: ...touching q icon The user can select a chapter or title The title or chapter can be selected by touching the corresponding number for a title or chapter After entering the numbers touch the OK icon If...

Page 33: ...image Multi Language Discs DVD Only Changing Audio Language If you are watching a disc recorded in multiple languages touch AUDIO on the TFT LCD screen to choose a language Each time the icon is touch...

Page 34: ...btitle languages available on the disc maximum of 32 Number of angles provided maximum of 9 Aspect ratios available LB stands for Letter Box and PS stands for Pan Scan In the example on the left the 1...

Page 35: ...tings Menu CD Disc Information Display Displays the artist the title of the track and the title of the album More p q Touch the p q icons to display the next or previous page of the Disc menu Previous...

Page 36: ...displayed on the on the TFT LCD screen Track Total Playback Time The total playback time of track is displayed on the main CD screen CD List Touching the List icon will display the CD List Screen The...

Page 37: ...umbers touch the OK icon If a wrong digit is entered touching the green arrow will remove the number After touching OK playback will begin Controlling Playback Inserting a Disc Upon inserting a CD dis...

Page 38: ...previously described for CD discs Media and File Requirements This player allows you to play back MP3 and WMA files recorded onto CD R RWs DVD R RWs and DVD R RWs For CD RW discs please make sure it...

Page 39: ...ism operation occurs press and hold the icon to reset the loading mechanism Normal operation resumes Playing MP3 WMA Files After inserting a MP3 WMA disc files will play in the sequence of the Root di...

Page 40: ...local distant setting Stereo Displays stereo radio signal reception FM1 Displays the current preset frequency band P 1 through P6 Displays the current preset frequency within the preset frequency ban...

Page 41: ...nd activate local and distant station reception When the Local function is on only radio stations with a strong local radio signal are played Direct Entry Touch this icon to the display the Direct Ent...

Page 42: ...ntry 18 Soft RGB 25 Weather 5 Talk 12 Oldies 19 Language 26 Test 6 Rock 13 Soft 20 Religious Music 27 Alert 7 Classic Rock 14 Nostalgia 21 Religious Talk Direct Entry Tuning When the Direct Entry icon...

Page 43: ...ould like to store the current station The station frequency is displayed at the top of the menu The preset number will appear highlighted The station frequency will be stored in the highlighted prese...

Page 44: ...already stored in that band NOTE If stations have already been set as favorites activating the Auto Store feature will erase those stations and enter the new strong stations Local Distance Radio Stat...

Page 45: ...45 VX6020 This page intentionally left blank...

Page 46: ...iPod iPod touch or iPhone is plugged into the front panel mini USB connector Also the iPod can be accessed from the Main Menu Screen by touching the iPod icon only available when an iPod or iPhone is...

Page 47: ...appear below the icon and the all the audio tracks will repeat Touch this icon again and single track will repeat The icon on the TFT LCD screen will light and small number 1 will appear below the ico...

Page 48: ...lay the folder file hierarchy Touch the folder icon and the contents of the folder will be displayed Touch the file s icon to select a file Touch the icon again to confirm and open the file Controllin...

Page 49: ...be adjusted to suit the users preferences The adjustments are accomplished by touching the or icons to decrease or increase the desired setting The settings have range of 1 to 20 NOTE The Picture Adj...

Page 50: ...flash memory devices and portable hard drives The unit supports up to 32GB SD cards however SD cards larger than 32GB may not be recognized Portable hard drives hard drives must be formatted to FAT32...

Page 51: ...Touch the p q icons to display the next or previous page of the SD USB menu Previous Touch this icon to play the previous track Play Pause Touch this icon to begin playback Touch this icon again to pa...

Page 52: ...peat Touch the icon again the repeat function will be cancelled The icon on the main TFT LCD screen will dim and playback of the remainder of the tracks will resume EQ Equalizer Touch this icon to acc...

Page 53: ...Entry When the Direct Entry icon is touched the Direct Entry Screen appears The user can manually select a track by touching the corresponding number After entering the track numbers touch the OK ico...

Page 54: ...an be adjusted to suit the users preferences The adjustments are accomplished by touching the or icons to decrease or increase the desired setting The settings have range of 1 to 20 NOTE The Picture A...

Page 55: ...can increase or decrease the volume of the connected device All other controls are done on the connected device NOTE Audio Video device must be connected to the unit using an audio video adapter cabl...

Page 56: ...to the following guidelines for successful operation Before using Bluetooth functions you must pair your mobile phone to the VX6020 unit see Pairing the Bluetooth System with Your Mobile Phone and Uni...

Page 57: ...Indicates the device that is paired with the unit Indicates whether the unit is connected with a Bluetooth device Touch to connect to a Bluetooth device Touch to disconnect from a Bluetooth device VX6...

Page 58: ...ne with the Unit Your mobile phone can initiate a search for new devices and pair to the unit The following paragraphs describes the pairing process NOTE The following procedures are generic Procedure...

Page 59: ...should appear asking connect to the unit Yes or NO Touch Yes The mobile phone and the unit should connect The mobile phone should display a message similar to Device Connected and the mobile phone an...

Page 60: ...umber dialed will be displayed on the screen 4 To end the call touch the icon Answering an Incoming Call To answer an incoming call touch the 31 icon For best reception speak loudly and clearly into t...

Page 61: ...eceived numbers stored on your wireless phone if your wireless phone allows the function To access the Re ceived list touch the Received Calls menu option The last received number is the first number...

Page 62: ...mobile phone or a PMP using a Bluetooth connection NOTE PleasequitA2DPmodebeforeattemptingtomakeaphonecall asunexpected results may occur depending on your mobile phone model The unit can control a Bl...

Page 63: ...ion e g elapsed playing time song title song index etc cannot be displayed on this unit Since there are a number of Bluetooth audio players available on the market operations with your Bluetooth audio...

Page 64: ...s section of this manual Step 1 Access the navigation function To access the Navigation function press the front panel Menu button then touch the Navigation icon Step 2 Start Up After the iGO primo so...

Page 65: ...uchaseditingorcanceling your route setting a start point for the route picking route alternatives avoiding partsoftheroute simulatingnavigationoraddingthedestinationtoyourFavorites Tap to customize th...

Page 66: ...you are near your destination the destination is indicated by a checkered flag symbol Refer to the XV6020 Navigation Operating Manual to become familiar with the many options available on your iGO pr...

Page 67: ...67 VX6020 This page intentionally left blank...

Page 68: ...All SWC Keys can be programmed Keys can be reassigned via the program ming interface 2 Touch a key and a screen of the functions will appear that are assignable to keys 1 16 a Select each key and ass...

Page 69: ...is accessed by the gear selector being placed in reverse or by the unit s menu the message No Signal will be displayed and the following screen will appear When the camera is installed the rear view i...

Page 70: ...ow Increase volume level Improper MUTE connection Review wiring diagram and check MUTE connection Speakers damaged Replace speakers Heavily biased volume balance Adjust the channel balance to the cent...

Page 71: ...ns Check wiring and correct Prolonged image or improper height width ratio display Improper aspect ratio setup Use correct aspect ratio setting TUNER Weak station searching Auto antenna is not fully e...

Page 72: ...compatible disc is used Use compatible disc Disc rating exceeds Parental Lock rating limit Change Parental Lock settings to lower restriction Disc region code is not compatible with unit Use disc with...

Page 73: ...th label side up Disc not present in loading compartment Insert disc Bad Disc Disc is dirty Clean disc with soft cloth Disc is upside down Insert disc with label side up Unknown disc Disc format is no...

Page 74: ...can be damaged by foreign objects 5 Do not attempt to use a 8 cm 3 CD Single disc in this unit either with or without an adaptor as damage to the player and or disc may occur Such damage is not covere...

Page 75: ...75 VX6020 This page intentionally left blank...

Page 76: ...tion Output 1Vp p 75 ohm Input 1Vp p 75 ohm FM Tuner Tuning Range 87 5MHz 107 9MHz Mono Sensitivity 30dB 9dBf Quieting Sensitivity 50dB 15dBf Alternate Channel Selectivity 70dB Signal to Noise Ratio 1...

Page 77: ...n Operating Temperature 20C 65C Fuse 15 amp mini ATO type DIN chassis dimensions 7 X 7 X 4 178mm x 178mm x 100mm CEA Power Ratings Power Output 13 Watts RMS x 4 channels into 4 Ohms 1 THD N Signal to...

Page 78: ...78 VX6020 NOTES...

Page 79: ...79 VX6020...

Page 80: ...323 4815 www jensenmobile com 2013 Audiovox Printed in China VX6020 Common Replacement Parts Owner s Manual Install Manual and Warranty Card 30613880 Wire Harness Pwr Spk GPS Antenna Line Out USB Ada...

Reviews: