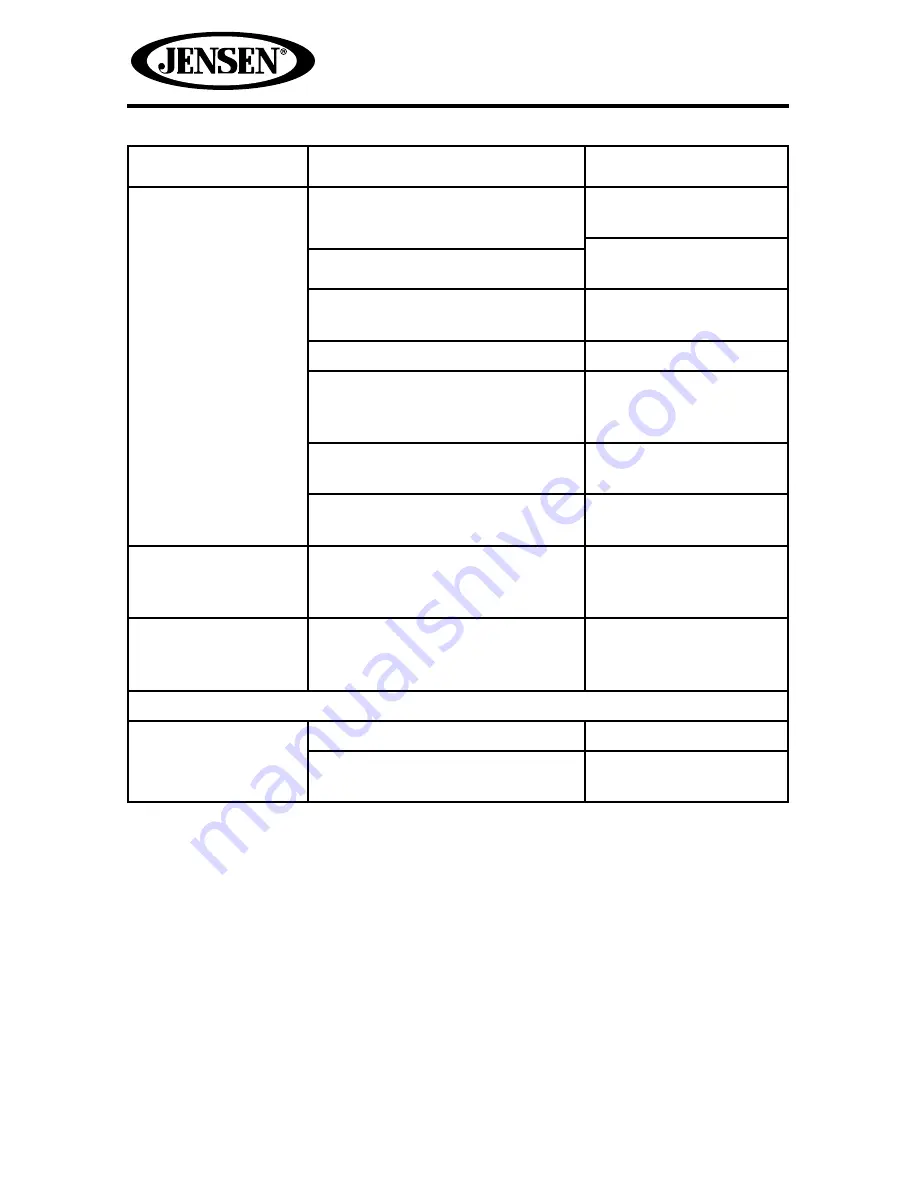
background image

46

VM9126

Problem

Cause

Corrective Action

Disc does not play 

back

Disc is warped or scratched

Use disc in good 

condition
Clean disc with soft 

cloth

Disc is dirty or wet

Laser pickup is dirty

Clean laser pickup with 

cleaning disc

Incompatible disc is used

Use compatible disc

Disc rating exceeds Parental 

Lock rating limit

Change Parental Lock 

settings to lower 

restriction

Disc region code is not 

compatible with unit

Use disc with proper 

region code

Disc is inserted upside down

Insert disc with label 

side up

PBC cannot be 

used during VCD 

playback

PCB is not available on the disc

No repeat or 

searching while 

playing VCD

PCB is on

Turn PCB off

MP3

Interruption 

occurred during 

playback

Disc is dirty or scratched

Clean disc or replace

File is damaged/bad recording

Recreate disc with 

good files

Summary of Contents for VM9126

Page 1: ...VM9126 Operating Instructions 160 watts peak 40W x 4 ...

Page 2: ...arn how to use all the features of your new Jensen VM9126 Mobile Multimedia Receiver for maximum enjoyment Features 3 Controls and Indicators 5 Operating Instructions 6 Settings Menu 12 Tuner Operation 19 DVD VCD Video Operation 23 DVD CD Audio Operation 29 MP3 WMA Operation 33 iPod Operation 39 Rear Camera Operation 43 Troubleshooting 44 Error Messages 47 Care and Maintenance 48 Specifications 49...

Page 3: ... CD DA Only Random Repeat and Intro Play Pause Stop Next Track and Previous Track AM FM USA Europe Latin America Asia Frequency Spacing 30 Station Presets 18 FM 12 AM Auto Stereo Mono Local Distance Auto Store Preview Scan iPod iPhone iPod iPhone via USB High Speed Direct Connect Interface to Access iPod Playlists Artists Albums and Songs Play music and view video photo files from your iPod Video ...

Page 4: ...mera Once the camera is connected and operating properly the CAMERA source mode will become active While the camera is not installed the CAMERA option appears gray indicating the function is not available WARNING Never install this unit where operation and viewing could interfere with safe driving conditions WARNING To reduce the risk of a traffic accident except when using for rear view video cam...

Page 5: ... Power On Off Button Rotate to adjust the volume Press momentarily to activate the MUTE function Press again to resume normal listening Press to turn the unit ON Press and hold to turn the unit OFF 8 Remote Sensor 9 USB SD AV Interface Connector Cover 10 USB Interface Connector Connect a USB device for playback of music video files 11 SD Interface Connector Insert an SD card for playback of music ...

Page 6: ...ess the rotary encoder button again to restore the volume MUTE is displayed on the LCD Adjusting the volume or using any of the audio setup features cancels the mute function If the MUTE wire is connected audio output mutes when a telephone call is received by the car phone Playing Source Selection Source Menu You can use the touch screen to change the source through the SOURCE MENU To access the ...

Page 7: ...e Decrease To increase or decrease the volume level turn the rotary encoder on the front panel When the volume level reaches 0 or 40 a beep sounds indicating that the adjustment limit has been reached The TFT screen displays the volume level for 3 seconds Programmable Turn On Volume This feature allows the user to select a turn on volume setting regardless of the volume setting prior to turning th...

Page 8: ...equalizer Equalizer Press the EQ button 4 on the front panel to display the equalizer screen Table 1 Equalizer Adjustments Setting Adjustable Range Function BASS 14 to 14 Reduces or increases the bass frequency sound level Touch the or buttons to adjust the settings MID 14 to 14 Reduces or increases the mid range frequency sound level Touch the or buttons to adjust the settings TREBLE 14 to 14 Red...

Page 9: ...t the settings 12 5 kHz 15 kHz 17 5 kHz Equalizer Presets User Applies a preset sound level to the unit s audio output signal Touch the or button to change the setting NOTE The equalizer will automatically change to USER when individual audio functions are adjusted Acoustic Urban Rave Latin Dance Hip Hop Rock To exit the equalizer touch the X button on the top left corner of the screen or press an...

Page 10: ... or button to change the setting Fade 16 to 16 Balances the audio output levels between the front and back side of the vehicle Touch the or button to change the setting Sub 14 to 14 Reduces or increases the subwoofer sound level Touch the or buttons to adjust the settings To exit the balance fader touch the X button on the top left corner of the screen or press and hold the rotary encoder touch th...

Page 11: ...he reset is complete Image Display Settings Video Output Modes Table 2 shows the video output mode for each playing source Table 2 Video Output Modes Playing Source Video Output Modes AM FM TUNER YCbCr Mode DVD YCbCr Mode AUX IN CVBS Mode CVBS Composite Video Baseband Signal Parking Brake Inhibit When the pink Parking wire is connected to the vehicle Parking Brake circuit the front TFT monitor wil...

Page 12: ...nguage Audio RDS etc The features available for adjustment under the highlighted sub menu option will appear in the left of the screen Adjusting a Feature 1 Touch an item on the touchscreen to select the feature to be adjusted Touch the or icon to view the previous or next feature page if applicable An options list appears on the right 2 Touch the option field for the feature you want to adjust Th...

Page 13: ...pacing 100 kHz FM Frequency Band 87 5 MHz 108 0 MHz China AM Frequency Spacing 9 kHz AM Frequency Band 522 kHz 1620 kHz FM Frequency Spacing 100 kHz FM Frequency Band 87 5 MHz 108 0 MHz S Amer2 AM Frequency Spacing 5 kHz AM Frequency Band 520 kHz 1600 kHz FM Frequency Spacing 100 kHz FM Frequency Band 87 5 MHz 108 0 MHz Europe AM Frequency Spacing 9 kHz AM Frequency Band 522 kHz 1620 kHz FM Freque...

Page 14: ... appears in the top right corner of the screen during certain operations NOTE The AM PM indication will change as you continue to adjust the hour past 12 Beep Off No beep sounds On When turned on an audible beep tone confirms each function selection TsCal Yes Press to access the touch screen calibration function Wallpaper Engine Buttons Allows the user to select a screen background The Wallpaper w...

Page 15: ...ult language is used Setting Options Function Language English Display appears in English Subtitle English DVD subtitles automatically appear in English when available Auto DVD subtitles appear according to the default subtitle language specified on the disc Off DVD subtitles do not appear Audio English Audio is heard in English when the option is available DVD Menu English DVD menu if applicable ...

Page 16: ...ay override higher ratings by using your password 2 G 3 PG 4 PG 13 5 PG R 6 R 7 NC 17 8 Adult Load Factory Reset Select Reset to restore the factory default settings for the Rating system only To reset the password access the RATING menu and enter the current password Once the correct password is entered you can access the Password field and enter a new one NOTE Record the password and keep it in ...

Page 17: ...ency to set a cut off frequency for the subwoofer s LPF low pass filter 120 Hz 160 Hz BASS Q 1 0 Adjust the Q Bandwidth of the Bass response of the selected BCF Bass Center Frequency 1 25 1 5 2 0 MID Q 0 5 Adjust the Q Bandwidth of the Midrange response of the selected MCF Midrange Center Frequency 0 75 1 0 1 25 Source Radio Choose a source for which you would like to increase or decrease the rela...

Page 18: ...enu Features The Demo mode is on and set to Auto run by default The Demo mode will display various user interface TFT display pages such as the Radio Disc Aux In and Camera sources The Demo mode will also display the Equalizer and Settings menu pages Touching any portion of the touch screen will pause the Demo mode temporarily If the touch screen is not pressed again within 30 seconds the Demo mod...

Page 19: ...fo This indicator provides three types of information PS RT and PTY PTY displays the program category of the current station such as category news sports talk etc RT PS provide the current song title current song title performing artist and station call letters 9 Radio frequency indicator 10 Touch to seek forward 11 Touch to tune forward one step 12 Touch to tune backward one step 13 Touch to seek...

Page 20: ...ocal function is on only radio stations with a strong local radio signal are played CT Clock Time RDS feature When enabled the radio system clock is synchronized with broadcasters time signal setting the clock automatically In some regions where daylight savings time is not adhered to the system clock will be off by 1 hour In these cases set CT to OFF and manually set the clock Switching to Radio ...

Page 21: ... buttons store and recall stations for each band All six stored stations P1 P6 for the current band appear on the screen Storing a Station 1 Select a band if needed then select a station 2 Touch the on screen Mem to access the preset screen 3 Touch the preset number in which you would like to store the current station or touch X to cancel and close the menu The station frequency is displayed at th...

Page 22: ...amiliar with the local stations Preview Scan SCAN To scan the AM or FM band for a preview of available stations in your particular area touch SCAN The scan function will play the first 5 seconds of each station When a desired station is reached touch SCAN again Play of the selected station will continue and the preview scan will stop Local Radio Station Seeking LOC When the Local function is on on...

Page 23: ...brake is applied If you attempt to play a DVD while the vehicle is moving the TFT screen displays Warning It is illegal to view video while driving or operating a motor vehicle Set parking brake to view video Controlling Playback To access the on screen controls touch the bottom 1 3 of the screen while a DVD is playing Touch to view a second page of controls ...

Page 24: ...x8 and x20 Touch the icon again to resume normal play 10 Touch to move to previous chapter 11 Touch to begin playback Press the icon again to pause playback 12 TITLE Touch to select a different title for playback Select a title using the touch screen 13 DISP Touch to display playback information on the screen including the media playing and current playback time 14 EQ Touch for quick access to the...

Page 25: ...t to eject the disc The unit automatically reverts to Tuner mode You may eject a disc with the unit powered off The unit will remain off after the disc is ejected Resetting the Loading Mechanism If the disc loads abnormally or an abnormal core mechanism operation occurs touch and hold to reset the loading mechanism Normal operation resumes Accessing DVD Mode To switch to DVD mode when a disc is al...

Page 26: ...n screen controls to select a different title for playback Select a title using the touch screen Moving Through Chapters Touch to advance to the next chapter on the DVD Touch button to move to the previous chapter Direct Chapter Track Selection To select a chapter track directly touch the on screen to display the direct entry menu Enter the desired chapter track using the on screen number pad Touc...

Page 27: ...to toggle the PBC function On Off Once PBC is on playback starts from track one of the play list NOTE When PBC is activated fast forward slow playback and previous next track are available Repeat and direct track selection are not available When PBC is activated selecting random scan or search playback automatically deactivates PBC Playback Information During DVD and VCD playback touch DISP on the...

Page 28: ...ber of subtitle languages available on the disc maximum of 32 Number of angles provided maximum of 9 Aspect ratios available LB stands for Letter Box and PS stands for Pan Scan In the example on the left the 16 9 video can be converted to Letter Box video Indicates the region code where the disc can be played Region 1 USA Canada East Pacific Ocean Islands Region 2 Japan Western Europe Northern Eur...

Page 29: ...tion about these topics Media Requirements The VM9126 will play music or other audio files from the following disc media CD DA CD R RW DVD DVD R RW DVD R RW Upon inserting a disc with the TFT screen open the disc and track title if available along with the track number and playing time appear on the screen CD TFT Display The on screen indicators and touch key areas for CD playback are outlined bel...

Page 30: ...ack 9 Pause Play icon Touch to pause playback Touch again to resume playback 10 Previous icon Touch to play the previous track 11 List icon Touch to display the Playlist screen 12 Elapsed time Indicator Displays the elapsed and total playing time of the current track playing 13 Track Indicator Displays the current track number playing and total number of tracks on disc 14 Settings icon Touch to vi...

Page 31: ...en allows you to directly search for music on your disc Touch a track title if available or track number to begin playback of that track Touch to view the previous playlist page Touch to view the next playlist page Touch to return to menu page 1 ...

Page 32: ...icon to stop disc play To resume playback touch the Pause Play icon Pausing Playback Touch the Pause Play icon to suspend or resume disc play Moving Through Tracks Touch the Next icon to advance to the next track on the disc Touch the Previous button to move to the previous track Repeat Playback Touch the icon to alter repeat mode according to the following DVD Repeat Single Repeat Folder Repeat A...

Page 33: ...extension 3 characters Joliet 64 characters If the file or folder name does not conform to ISO 9660 file system standards it may not be displayed or played back correctly Use the following settings when compressing audio data for your MP3 disc Transfer Bit Rate 128kbps Sampling Frequency 48kHz When recording MP3 up to the maximum disc capacity disable additional writing For recording on an empty d...

Page 34: ...e USB SD ports will recognize most USB SD flash memory devices and portable hard drives The unit supports 8GB SD cards however SD cards larger than 8GB may not be recognized Portable hard drives hard drives must be formatted to FAT32 and NTFS is not supported 1 Locate the USB SD connector on the front of the radio 2 Lift the protective cover to reveal the USB SD slots 3 Insert the USB SD device in...

Page 35: ...35 VM9126 Menu Page 1 Menu Page 2 MP3 WMA TFT Display The on screen indicators and touch key areas for MP3 WMA playback are outlined below ...

Page 36: ... Play icon Touch to pause playback Touch again to resume playback 10 Previous icon Touch to play the previous track 11 List icon Touch to display the Playlist screen 12 Playback Information Display Displays song artist album and elapsed total playing time of the current track playing 13 Track Indicator Displays the current track number playing and total number of tracks on disc USB device 14 Setti...

Page 37: ...iew the contents of the directory or touch a track title file name to begin playback of that file Touch to view the previous playlist page Touch to view the next playlist page Touch to return to menu page 1 Search Playlist by File Type 1 Touch the MUSIC icon 2 Touch MUSIC PHOTO or VIDEO The list of files that appear will be filtered by the type of file selected ...

Page 38: ... burning option if available This slower burning speed will help eliminate buffer errors and increase disc reading reliability Also use folders when burning large numbers of songs files to a disc for easy music navigation Select the Disc at Once option and close your disc Stopping Playback Touch the Stop icon to stop playback To resume playback touch the Pause Play icon Pausing Playback Touch the ...

Page 39: ...6th 5th 4th and 3rd Generation iPod classic and iPod with video The unit will automatically switch to iPod mode when an iPod iPod touch or iPhone is plugged into the front USB connector NOTE For basic iPod connectivity you can use the white 30 pin to USB iPod cable that came with your Apple device For iPod video or photo playback you must purchase the jLink USB cable To return to the iPod menu fro...

Page 40: ...ENU and select a new playback source 2 ll Indicates whether media is playing or paused 3 Dance Indicates the current equalizer setting 4 EQ Touch for quick access to Equalizer level settings 5 Clock 6 00 00 39 Elapsed playing time for the current file 7 Repeat icon Indicates the repeat function is enabled 8 Random icon Indicates the random function is enabled 9 Toggle icon Touch to toggle between ...

Page 41: ...bled 8 2 23 File number and total number of files on the disc 9 Song title album and performing artist 10 02 01 Elapsed playing time and playback progress bar for current file 11 4 20 Total laying time for current file 12 Preview Window Displays album art if available 13 Repeat icon Touch to alter repeat mode as follows Repeat Single Repeat Folder Repeat All Repeat Off 14 Random icon Touch to alte...

Page 42: ...ering the desired track number Touch the check mark to enter your selection To exit the screen without changing the file touch the X To clear your entry and start over touch the back arrow NOTE To transmit the video from your iPod to the VM9126 screen you must set the following options through the iPod video settings menu TV Out On TV Signal NTSC and Widescreen On NOTE After disconnecting your iPo...

Page 43: ...d in reverse or by the unit s menu the message VIDEO NOT DETECTED will appear indicating the function is not available When the camera is installed the rear view image of what is behind the vehicle will appear when the vehicle is placed in reverse gear When leaving reverse gear the unit displays the previous screen The rear camera image can be adjusted from Normal to Mirror using the Setup menu se...

Page 44: ...oo low Increase volume level Improper MUTE connection Review wiring diagram and check MUTE connection Speakers damaged Replace speakers Heavily biased volume balance Adjust the channel balance to the center position Speaker wiring is in contact with metal part of car Insulate all speaker wiring connections Poor sound quality or distortion Pirated disc is in use Use original copy Speaker power rati...

Page 45: ...nal connections Check wiring and correct Prolonged image or improper height width ratio display Improper aspect ratio setup Use correct aspect ratio setting TUNER Weak station searching Auto antenna is not fully extended Connect the auto antenna control cable properly Auto antenna not properly connected Connect the auto antenna control cable properly LOCAL function is activated Turn LOCAL function...

Page 46: ...ental Lock rating limit Change Parental Lock settings to lower restriction Disc region code is not compatible with unit Use disc with proper region code Disc is inserted upside down Insert disc with label side up PBC cannot be used during VCD playback PCB is not available on the disc No repeat or searching while playing VCD PCB is on Turn PCB off MP3 Interruption occurred during playback Disc is d...

Page 47: ...sert disc with label side up Disc not present in loading compartment Insert disc Bad Disc Disc is dirty Clean disc with soft cloth Disc is upside down Insert disc with label side up Unknown disc Disc format is not compatible with this unit Region Error DVD is not compatible with region code of unit Error Illegal mechanism operation Press EJECT key for 5 seconds to reset loading mechanism ...

Page 48: ...e damaged by foreign objects 5 Do not attempt to use a 3 8 cm CD Single disc in this unit either with or without an adaptor as damage to the player and or disc may occur Such damage is not covered by the Warranty on this product 6 The CD player may not operate properly in extreme hot or cold If such conditions occur allow the interior of the vehicle to reach a normal temperature before using playe...

Page 49: ...ction Output 1Vp p 75 ohm Input 1Vp p 75 ohm FM Tuner Tuning Range 87 5MHz 107 9MHz Mono Sensitivity 30dB 9dBf Quieting Sensitivity 50dB 15dBf Alternate Channel Selectivity 70dB Signal to Noise Ratio 1 kHz 58dB Image Rejection 80dB Stereo Separation 1 kHz 30dB Frequency Response 30Hz 15 kHz 3d AM Tuner Tuning Range 530 kHz 1720 kHz Sensitivity 20dB 15uV Signal to Noise Ratio 1 kHz 50dB Image Rejec...

Page 50: ...on Operating Temperature 20C 65C Fuse 15 amp mini ATO type DIN chassis dimensions 7 X 7 X 4 178mm x 178mm x 100mm CEA Power Ratings Power Output 13 Watts RMS x 4 channels into 4 Ohms 1 THD N Signal to Noise Ratio 70dBA below reference Reference 1 Watt 4 Ohms Frequency Response 20 Hz 20 kHz 3dB Aux Input used as reference input Reference Supply Voltage 14 4VDC Specifications subject to change witho...

Page 51: ...51 VM9126 NOTES ...

Page 52: ...1788 Technical Assistance 1 800 323 4815 www jensenmobile com 2012 Audiovox Printed in China VM9126 Common Replacement Parts Owner s Manual Install Manual and Quick Start Guide 30613780 Wire Harness 30313780 Trim Rings 30413760 Hardware Bag 30513270 128 9175 ...

Reviews: