background image

Audiovox Electronics Corporation

Hauppauge, NY 11788

Technical Assistance: 1-800-323-4815

www.jensen.com

 © 2007 Audiovox

Ver. 052107

Printed in China

All manuals and user guides at all-guides.com

Summary of Contents for MP6512i

Page 1: ...llation and Operation Manual SAT SAT SAT Loudness LOUD LO DX D N A B MENU ENTER PRESS 2 INT 1 3 RPT 4 RDM 5 DN RADIO READY D I S P C R S MP6512i All manuals and user guides at all guides com a l l g u i d e s c o m ...

Page 2: ...All manuals and user guides at all guides com ...

Page 3: ...Front Panel Release 6 Operation 7 Tuner Operation 10 CD Player Operation 12 MP3 WMA Operation 13 Satellite Radio Operation 17 iPod Operation 19 Remote Control 20 Care and Maintenance 21 Troubleshooting 22 Specifications 23 All manuals and user guides at all guides com ...

Page 4: ...ii All manuals and user guides at all guides com ...

Page 5: ...ng Title can be displayed iPod JLinkDirect High Speed Direct Connect Interface To Access iPod Playlists Artists Albums Songs Intuitive Interface for Easy iPod Navigation Power Management Charges iPod While Connected Requires jLinkCable Sold Separately MediaLink2 Under Dash Interface Allows Portable Media Devices to be Connected MediaLink2 Includes the Following connectivity jLinkDirect 8 pin DIN f...

Page 6: ...16 18 gauge speaker wire Preparation 1 Disconnect Battery Before you begin always disconnect the battery negative terminal NOTE If the MP6512i is to be installed in a car equipped with an on board drive or navigation computer do not disconnect the battery cable If the cable is disconnected the computer memory may be lost Under these conditions use extra caution during installation to avoid causing...

Page 7: ...st the radio as outlined in th instructions 2 Install the radio mounting plate assemb according to the instructions in the insta 3 Attach the support strap to the radio and Universal Installation instructions 4 Replace the dashboard trim panel ISO Installation This unit has threaded holes in the chassis side panels which may be used with the original factory mounting brackets of some vehicles to m...

Page 8: ...ht back until they lock then pull the radio out If removal keys are inserted at an angle they will not lock properly and will not release the unit Technical Assistance If you require assistance contact Technical Support at 1 800 323 4815 from 8 30am to 7 00pm EST Monday through Friday and from 9 00am to 5 00pm EST on Saturday All manuals and user guides at all guides com ...

Page 9: ...ted jLink iPod Cable Sold Separately iPod Nano iPod Mini iPod iPod Video 3 5mm Audio Only SAT L SAT R SAT DATA BUS DATA BUS WIRING NOTE The amplifier in this radio is only designed for use with four speakers Never combine bridge outputs for use with two speakers Never ground negative speaker leads to chassis ground Failure to wire exactly as shown may cause electrical damage to the radio NOTE Only...

Page 10: ...ving the front panel store it in the supplied carrying case and take it with you when you leave the car The motorized mechanism will close automatically after 10 seconds Re attaching the Front Panel To re attach the front panel make sure the electrical terminals on the back of the panel are free of dust and dirt as debris could cause intermittent operation or other malfunctions Position the right ...

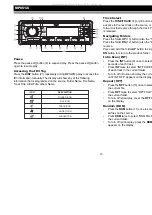
Page 11: ...e volume turn the rotary encoder 22 clockwise To decrease the volume turn the rotary encoder counter clockwise When volume is adjusted the volume level will be shown on the display panel as a number ranging from 0 lowest to 46 highest Press the MENU button 22 to access the audio menu Turn the rotary encoder to step through the following audio functions bass BAS mid range MID treble TRE balance BAL...

Page 12: ... adjust the balance from 12L full left to MENU button 22 to access the audio men BAL appears in the display Press the ME and then turn the rotary encoder to adjust th right speakers L R represents a center Fader To adjust the fader from 12F full front to MENU button 22 to access the audio men FAD appears in the display Press the ME and then turn the rotary encoder to adjust th rear speakers F R re...

Page 13: ...hen turn the rotary encoder 22 to select the desired level When this option is selected the unit will revert to the adjusted volume each time the unit is turned on Beep Tone The beep tone feature allows the selection of an audible beep tone to be heard each time a button is pressed on the face of the radio BEEP ON is the default setting To turn the audible beep off 1 Press the MENU button 22 to se...

Page 14: ...e station is now stored and can be recalled by pressing the corresponding preset button Repeat for the remaining five presets on the current band and for presets on the other four bands Preview Scan Press the SCAN button 16 to scan all stro The unit will stop at each station for five sec next station Press SCAN again to stop sca station Automatic Store AS Select six strong stations and store them ...

Page 15: ...o view the current PTY category 2 Use the TUNE TRACK or buttons 19 to move through the list of available categories 3 After 2 seconds of inactivity the radio will automatically scan and play the first station it locates in the selected category NOTE PTY is a new broadcast technology that may not be extensively available in your area All manuals and user guides at all guides com ...

Page 16: ...n adaptor as damage to the player and or the disc may occur Such damage will not be covered by the warranty on this product Pause Press the pause button 8 to suspend disc play Press the pause button again to resume disc play Track Select Press the TUNE TRACK or buttons 17 for less than one second to advance to the next track on the CD The selected track number will appear on the display Press and ...

Page 17: ...in the long file name format For a list of available characters see the instruction manual of the writing software and the section Entering File and Folder Names below The media reproducible on this unit has the following limitations Maximum number of nested folders 8 Maximum number of files per disc 999 Maximum number of folders per disc 255 MP3 WMA files written in formats other than those liste...

Page 18: ... the unit will display folders 3 4 6 and 8 but not 2 and 7 since they do not contain any tracks directly Folder 5 is not recognized at all since it is at the fourth level Loading an MP3 WMA Disc After the disc is loaded CD Read is displayed then MAX followed by the number of tracks is displayed The unit will then display ID3 information pertaining to the last selected category Folder File Track Ar...

Page 19: ... and hold the folder UP button to skip DN button to return to the previous folder Intro Scan INT Press the INT button 9 once to select seconds of each track Press INT twice to select INT FOLDER of each track in the current folder To turn off intro scan and play the curre until INT OFF appears on the display Repeat RPT Press the RPT button 10 once to selec the current file Press RPT twice to select...

Page 20: ...he disc The folder names will be displayed on the LCD Press MENU for less than three seconds to access the sub folders or files Turn the rotary encoder to navigate then press the select knob to confirm and begin file play During navigation search turn the rotary encoder to the left to move back to the last upper level of a folder Direct Character Search 1 Press the AS button 15 three times The LCD...

Page 21: ...e TUNE TRACK button 19 to access channel 000 The screen displays RADIO ID followed by the ID number Selecting a Station Press the TUNE TRACK or button station Press and hold the TUNE TRACK one second to fast forward or fast reverse t Preset Stations Press the BAND button 3 to change betwe Each band stores up to six preset stations of 18 preset stations Store a Station 1 Select a band if needed the...

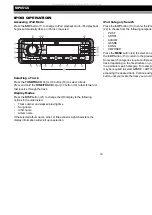
Page 22: ...ry 4 Once a category is selected turn the rotary encoder to select stations in the current category 5 Press MENU to select the displayed channel Display Modes Press the DISP button 21 to change the mode to the following options in the order listed Channel Name Genre News Sports Hits Kids etc Artist name Song Name If the selected channel name artist or title exceeds eight characters the display inf...

Page 23: ...um name If the selected album name artist or title exceeds eight characters the display information will scroll upon selection iPod Category Search Press the 6 UP button 13 to enter the iPod 22 to choose from the following categories PLIST ARTIST ALBUM GENRE SONG CMPOSER Press the MENU button 22 to select an op the 6 UP button 13 to return to the previou Some search categories require multiple se ...

Page 24: ...the SRC button The remote control can operate within a distance of 3 5m Replacing the Battery When the range of operation of the card rem stops functioning replace the battery with a observe the proper polarity as indicated be SCAN 1 2 INT 3 RPT 4 DISP SRC AS RDM VOL 5 6 EQ BAND PTY MUTE SEL MENU CH CAT REMOTE SENSOR 1 All manuals and user guides at all guides com ...

Page 25: ... driving on very rough roads This will not scratch or damage the disc and normal play will resume when the rough conditions cease Compact Discs CD R and CD RW Capability Depending on media type and method of re RWs may be incompatible with this unit Aft session must be closed Please refer to yo procedures for closing a disc session Revie familiarize yourself with the correct recordin recommend usi...

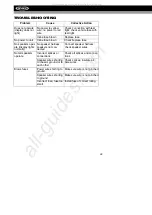
Page 26: ...speaker harness speakers not con nected Connect speaker harness check speaker wires Not all speakers operate Incorrect splices or connections Check all splices and connec tions Speaker wires shorting to chassis ground or to each other Check splices insulate all bare wires Blows fuses Power wire shorting to ground Make sure wire is not pinched Speaker wires shorting to ground Make sure wire is not ...

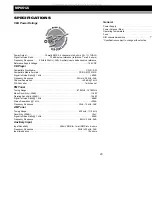
Page 27: ... Converter 1bit channel FM Tuner Tuning Range 87 5MHz 107 9MHz Mono Sensitivity 30dB 11dBf Quieting Sensitivity 50dB 15dBf Signal to Noise Ratio 1 kHz 58dB Stereo Separation 1 kHz 30dB Frequency Response 30Hz 12kHz 3dB AM Tuner Tuning Range 530 kHz 1710 kHz Sensitivity 20dB 15uV Signal to Noise Ratio 1 kHz 50dB Frequency Response 50Hz 2kHz 3dB Auxiliary Input Input Sensitivity 400mV RMS for 1 watt...

Page 28: ...24 All manuals and user guides at all guides com ...

Page 29: ... installation mishandling misuse neglect accident blown fuse battery leakage theft or improper storage Products whose factory serial number bar code label s or markings have been removed or defaced Damage resulting from moisture humidity excessive temperature extreme environmental conditions or external natural causes Please review the Care and Maintenance section of your Installation and Operatio...

Page 30: ...Audiovox Electronics Corporation Hauppauge NY 11788 Technical Assistance 1 800 323 4815 www jensen com 2007 Audiovox Ver 052107 Printed in China All manuals and user guides at all guides com ...

Reviews: