background image


.


INSTALLATION

It's a good idea to read all of the instructions before beginning the installation. We 
recommend having your Jensen JWM45 installed by a reputable RV dealership.

NOTE: Before cutting the mounting hole, make sure the area behind the 
mounting location is clear of wires, fuel and vacuum or brake lines.

You will need these tools and supplies to install your JWM45:

Select a mounting location, taking care to avoid the following:

To prevent a short circuit, be sure to turn off the ignition and remove the negative
(-) battery cable prior to installation.

Ÿ

Phillips screwdriver

Ÿ

Wire cutters and strippers

Ÿ

Tools to remove existing radio (screwdriver, socket wrench set or other tools)

Ÿ

Electrical tape

Ÿ

Crimping tool

Ÿ

Volt meter/test light

Ÿ

Crimp connections

Ÿ

16 gauge wire for power connections

Ÿ

16-18 gauge speaker wire

Ÿ

Four M3x20mm (3/32 x 0.75") screws

Ÿ

Places exposed to heat-radiating appliances such as electric heaters

Ÿ

Adjacent to other equipment that radiates heat

Ÿ

Poorly-ventilated or dusty places

Ÿ

Moist or humid locations

Tools and Supplies

Disconnecting the Battery

Selecting the Mounting Location

Preparing the Opening

5

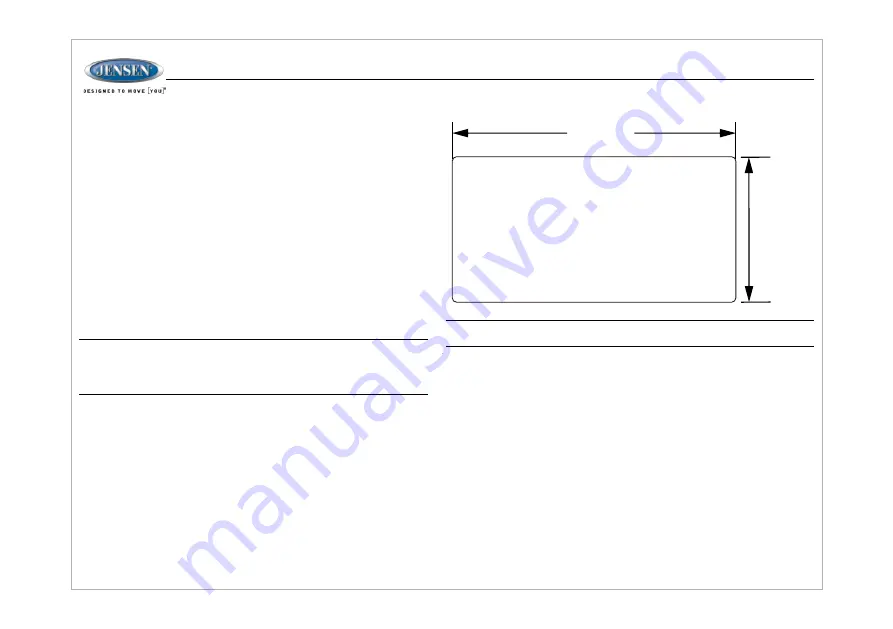
Use the mounting hole diagram ( right) to measure and cut a mounting hole, then 
mount the unit using four M3x20mm screws.

NOTE: If the JWM45 is to be installed in a vehicle equipped with an onboard 
drive or navigation computer, do not disconnect the battery cable. If the 
cable is disconnected, the computer memory may be lost. Under these 
conditions, use extra caution during installation to avoid causing a short 
circuit.

MOUNTING SCREWS M3X20
PHILIPS TYPE ROUND
HEAD 4 PLACES

7.323"+0.023"

-

-

3.465"+0.023"

JWM

45

Summary of Contents for JWM45

Page 1: ...Installation and Owner s Manual MOBILE AUDIO SYSTEM JWM45...

Page 2: ...ion Tuner Operation Disc Operation CD Operation DVD VCD Operation MP3 USB Operation Bluetooth Operation Remote Control Operation DVD Setup Menu Care and Maintenance Troubleshooting Speci cations FCC N...

Page 3: ...Avoid inserting any foreign objects into the slot of this player Failure to observe this may cause malfunction due to the precise mechanism of this unit Use Authorized Service Centers Do not attempt t...

Page 4: ...und CDs for this unit and do not use any special shape CDs Use of special shape CDs may cause the unit to malfunction Do not stick paper or tape on the disc Do not use CDs with labels or stickers atta...

Page 5: ...Volt meter test light Crimp connections 16 gauge wire for power connections 16 18 gauge speaker wire Four M3x20mm 3 32 x 0 75 screws Places exposed to heat radiating appliances such as electric heater...

Page 6: ...RIGHT SPEAKER GRAY BLACK FRONT RIGHT SPEAKER N A N A WHITE BLACK FRONT LEFT SPEAKER WHITE FRONT LEFT SPEAKER N A N A N A N A N A N A BLUE AMP REMOTE 12VDC 100mA RED 12VDC SWITCHED BLACK GROUND N A N A...

Page 7: ...em menu The unit will automatically exit the system menu after 5 seconds of inactivity Rotate the VOL encoder knob control clockwise to increase or counter clockwise to decrease the volume output The...

Page 8: ...nutes To set the Sleep Time press the SLEEP button 26 and the sleep time will appear in the display with the number representing the minutes SLEEP 15 Press SLEEP button repeatedly to change the sleep...

Page 9: ...ary should the unit display an error code Connect HDMI cable to JENSEN TV with ARC function and JWM45 radio head unit If the set up and operation is correct the TV audio will come out from the speaker...

Page 10: ...Audio out No HDMI ARC Audio Out TV CEC Mode OFF TV Audio Receiver OFF TV Audio Receiver ON TV CEC Mode ON Audio Recevier ON No Audio Out No Audio Out No Audio Out No Audio Out No Audio Out No Audio Ou...

Page 11: ...a band if needed then select a station Press and Hold a 1 6 preset button for 2 seconds the preset number will appear on the display Recall a Station Select a band if needed Press a 1 6 preset button...

Page 12: ...AY Press the u II button on the control panel 3 or remote control 17 to end fast forward or reverse and resume normal playback Press the AS PS button 6 during disc play to play the rst 10 seconds of e...

Page 13: ...current disc T 00 34 37 remaining playing time for current disc DVD VCD OPERATION Press the EJECT button 13 to stop DVD play and eject the DVD Insert a disc label side up into the disc slot 11 and the...

Page 14: ...g and current playback time Pressing the button to display additional information as indicated below TT 5 8 5 8 indicates the fth of 8 titles on the DVD is currently playing CH 2 16 2 16 indicates tha...

Page 15: ...B connector 12 is at the right side of the panel Insert a USB device to automatically access USB mode and begin playback The LCD will display LOADING and USB while les are initially loaded When USB is...

Page 16: ...te control to access the programmed playback screen Repeat RPT Random Shuffle RDM Remote Control Direct Track Entry To select a track directly use the number pad on the remote control 9 For single dig...

Page 17: ...established through your phone menu by selecting the JWM45 for connection LOCKED UNLOCKED The JWM45 can store up to 5 devices for BT connection The devices are stored in FIFO First In First Out order...

Page 18: ...tooth device is disconnected due to the power being turned off or if the device is disconnected inadvertently the unit will automatically search for the matching BT mobile phone when the power is rest...

Page 19: ...selection Use 1 6 to access preset stations Silence Audio output Press and hold to turn LOUDNESS feature on off Silence Audio output Press and hold to turn LOUDNESS feature on off Select next previou...

Page 20: ...tem MENU Access system MENU Access system MENU Access Audio Menu options Access Audio Menu options Access Audio Menu options Select source for playback Select source for playback Select source for pla...

Page 21: ...nguage Set the OSD language to one of the following English German Spanish French or Portuguese Audio Language Set the audio language to one of the following Chinese English Japanese French Spanish Po...

Page 22: ...e Adjust the hue of the screen from the following levels 6 4 2 0 2 4 or 6 Saturation Adjust the saturation of the screen from the following levels 12 10 8 6 4 2 or 0 Sharpness Adjust the sharpness of...

Page 23: ...ce AM reception will deteriorate when passing under a bridge or when passing under high voltage lines Although AM is subject to environmental noise it has the ability to receive at great distance This...

Page 24: ...er Output Power 6W x 8 Output Impedance Compatible with 4 8 ohms speakers 4 ohm load minimum DVD Frequency Response 20 20 000 Hz Channel Separation 50 dB S N Ratio 65 dB Distortion 0 5 General Power S...

Page 25: ......

Reviews: