background image


JRV215N 


29 


BLUETOOTH OPERATION 

Bluetooth technology has the capability to wirelessly synchronize and transfer data among 

devices. The Bluetooth audio capabilities can be used for mobile phones hands free applications 

Bluetooth has many profiles and the unit is compatible with most Bluetooth enabled mobile 

phones. Before attempting to use the Bluetooth functions on the unit, please make sure your 

mobile phone supports Bluetooth functions. 


NOTE: The line-of-sight distance between this unit and your mobile phone must be 8 feet 
(2.4 meters) or less for sending and receiving voice and data via Bluetooth wireless 
technology. 

 
Please make sure your mobile phone supports Bluetooth functions (Headset or Handsfree 
profiles or both). Adhere to the following guidelines for successful

 operation. 


Before using Bluetooth functions, you must pair your mobile phone to the "JRV215N" 
Head unit (see 

“Pairing a Bluetooth Device”).To ensure the best reception for pairing and 

re-connection, please make sure the mobile phone battery is fully charged before you 
begin. 


Try to perform pairing within a few minutes of the mobile phone being turned on. 


Once the unit has been paired with the mobile phone, the unit's model number"JRV215N" 
will be displayed on the mobile phone. 


To achieve the best performance, always keep the mobile phone within 3 meters of the 
head unit. 


Always keep a clear path between the mobile phone and the head unit. Never place a 
metal object or any other obstacle between the mobile phone and the head unit. 


Some mobile phones (like Sony Ericsson) 

may have a "Power saving Mode” option. 

PLEASE DO NOT use the power saving mode with the JRV215N. 


Before accepting or making a call, make sure your mobile phone's "Bluetooth function" is 
turned on. 


To ensure the best conversation quality/performance, stay within one meter of the 
microphone when talking. 


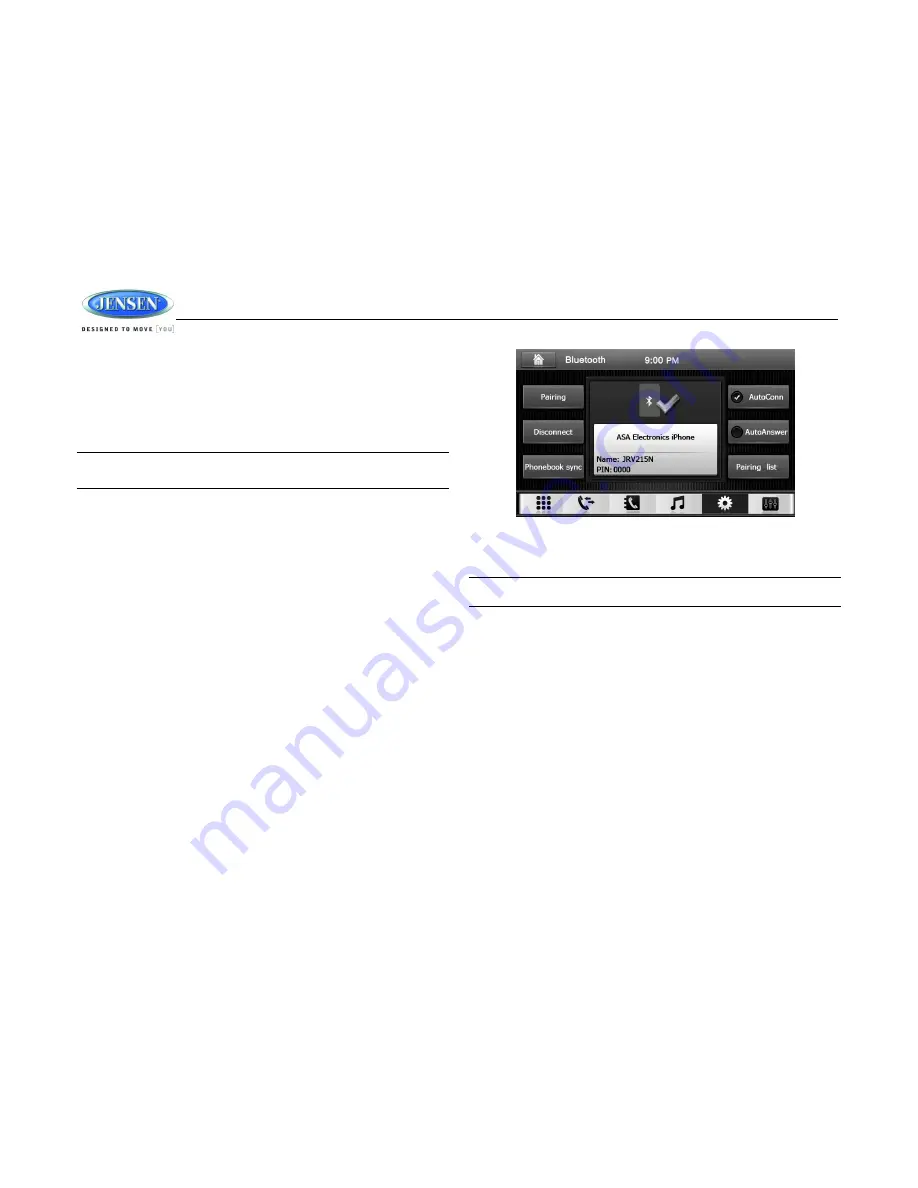
To manually disconnect the mobile phone from the head unit, touch the "Disconnect" icon 
and the device will be disconnected but still paired. 

Bluetooth User Interface 

Press the

 MENU

 button (1) on the front panel or touch the home icon on-screen to go to Home 

menu. Then touch the on-screen button (9) in the home menu to enter Bluetooth mode. 


Pairing a Bluetooth Device 

Your mobile phone can initiate a search for new devices and pair to the unit. The following 

instructions describe the pairing process. 


NOTE: The following procedures are generic. Procedures for pairing mobile phones from 

different manufacturers may vary. 


1. 

Press the 

MENU 

button on the front panel to access the Home menu. 

2. 

Touch the Bluetooth icon to enter the Bluetooth mode. 

3. 

Touch pairing icon to enter pairing state 

4. 

Access the mobile phone Bluetooth function and set the function to ON. 

5. 

Set the mobile phone Bluetooth discover mode to ON. (Note: Some discovery modes 
have a time limit usually a minute before they are automatically turned off.) 

6. 

When the mobile device has completed its search, the mobile device will display the 
Bluetooth device name (JRV215N) 

7. 

A prompt to pair should appear on your mobile phone. Accept the request and initiate the 
process. (Note: Some mobile phones require a "pass key" or pairing code to connect. If 
your phone requires a pass key or pairing code, you will need to enter this number. The 
default pairing code for many mobile phones is"0000".The default code for the unit 
is"0000".) 

8. 

A prompt to enter a PIN number or passkey for the unit should appear. The default 
passkey for the unit is"0000" 

9. 

At this point a prompt stating that pairing was successful should appear. Another prompt 
should appear asking to connect to the unit, Yes or No. Press Yes. The mobile phone and 
the unit should connect. The mobile phone should display a message similar to "Device 
Connected" and the mobile phone and the unit are now connected.JRV215N will appear 
on the mobile phone list of devices. 

Summary of Contents for JRV215N

Page 1: ...JRV215N TOUCH SCREEN MOBILE NAVIGATION MULTIMEDIA AND OBSERVATION SYSTEM Installation and Operation Manual...

Page 2: ...asic Operation 11 System Menu 13 AM FM RBDS Controls 17 Weather Band Operation 18 DVD VCD CD MP3 Operation 20 SiriusXM Radio Operation 22 iPhone iPod USB Operation 27 Bluetooth Operation 29 Zone 2 Ope...

Page 3: ...ehicle Give the interior a chance to cool down before starting playback Do not mount radio with close proximity of engine compartment Use the Proper Power Supply This product is designed to operate wi...

Page 4: ...he vehicle is parked in a safe location The iGo primo software s map database provides information on suggested routes without regard to factors that may affect your driving experience or the time req...

Page 5: ...gard any unsafe hazardous or illegal route suggestions The device does not include analyze process consider or reflect any of the following a Legal restrictions such as vehicular type weight height wi...

Page 6: ...nalized Disc Maintenance A dirty or defective disc may cause sound dropouts while playing Before playing wipe the disc using a clean cloth working from the center hole towards the outside edge Never u...

Page 7: ...s necessary until the sleeve easily slides into the opening Do not force the sleeve into the opening or cause it to bend or bow Check that there will be sufficient space behind the dashboard for the r...

Page 8: ...s for the unit Removing the unit To remove the radio after installation 1 Make sure the ignition is turned off and then disconnect the cable from the vehicle s battery negative terminal 2 Insert the r...

Page 9: ...NT SPEAKER 11 RIGHT FRONT SPEAKER 12 RIGHT FRONT SPEAKER 13 NC 14 PARKING BRAKE 15 12V ACC SWITCHED 16 12V BATTERY WARNING Do not connect the 12VDC ACC SWITCHED wire to the battery This wire MUST be c...

Page 10: ...JRV215N 10 Recommended Camera Installation Configurations 3 Cameras Setup 1 Rear Camera Setup...

Page 11: ...T button 4 The reset button should be activated for the following reasons initial installation of the unit when all wiring is completed function buttons do not operate error symbol on the display Mute...

Page 12: ...een arrows to adjust the Month Day Year Hour Minute and AM PM only when using a 12 hour clock 4 Touch when finished Auxiliary Input To access an auxiliary device 1 Connect an audio source to the AUX I...

Page 13: ...2 Settings menu Options Function General Touch to enter the General settings menu Time Touch to enter the Time settings menu Panel Touch to enter the Panel settings menu Audio Touch to enter the Audio...

Page 14: ...screen button to turn ON OFF the dimming control When ON this will allow the display to automatically dim to NIGHT level when the vehicle s headlights are on Please note that not all vehicles support...

Page 15: ...Q Rock Classic Jazz Dance Pop User Flat default flat Touch the on screen arrows to select your favorite preset EQ Loud On Swipe the on screen button to turn ON OFF the loudness Treble 15 to 15 default...

Page 16: ...he rear camera audio Weather Band Sub menu The following weather band sub menu options can be adjusted Table 8 Weather Band sub menu Settings Options Function Alarm On Off Swipe the on screen button t...

Page 17: ...e any stations already stored in that band Preset Scan 1 Select a band if needed 2 Touch the AS PS button to scan stations stored in the current band The unit will pause for ten seconds at each preset...

Page 18: ...c Area Message Encoding SAME data is also broadcast prior to alert broadcasts SAME data contains information about the geographic region affected by the alert the type of alert and its effective time...

Page 19: ...JRV215N 19 Your radio is capable of being programmed with up to 7 different FIPS location codes The default code has been programmed at the factory 000000 to respond to all messages within your area...

Page 20: ...ay options DVD REP Chapter REP Title REP All Audio settings Touch the to open the Audio Settings menu Menu play Touch the to change to play the disc menu For DVD touch this button to enter the disc ME...

Page 21: ...m shuffled order RDM ON Press again to stop random play RDM OFF List Touch the button to enter CD or MP3 list menu Scroll up and down through the list using the arrows and touch to enter the desired f...

Page 22: ...ne and hear the SiriusXM Preview Channel on channel 1 You can then activate by phone or on line In the USA contact SiriusXM Listener care Visit www siriusxm com activatenow Call SiriusXM Listener Care...

Page 23: ...ocking channels and the method to access the locked channels is described below 1 Touch the Lock icon to enter the following screen 2 Enter a 4 digit password and then press the icon The screen will s...

Page 24: ...list 1 Turn on the JRV215N 2 Enter SiriusXM mode 3 Press the Home icon then enter Settings 4 Select Time 5 Select Time Settings 6 Set the date as 01 01 2000 then press the to save 7 Press the home ic...

Page 25: ...reconnect the tuner and then contact your dealer Scrolling Subscription Updated press any key to continue Subscription Updated The radio has detected a change in your SiriusXM subscription status Pres...

Page 26: ...ol page 18 for more information on the Parental Control feature and how to access locked channels Enter Code followed by Enter Lock Code User prompted to enter the lock unlock code Enter the four digi...

Page 27: ...automatically when the unit is turned on if iPod is connected via the iPod USB cable Turn off the iPod by disconnecting it from the cable or by turning the ignition off When the ignition is turned of...

Page 28: ...Touch the during playback to repeat play the current file Touch again for normal play Shuffle Play Touch the during playback to play all files in random shuffled order Touch again for normal play Aud...

Page 29: ...eter of the microphone when talking To manually disconnect the mobile phone from the head unit touch the Disconnect icon and the device will be disconnected but still paired Bluetooth User Interface P...

Page 30: ...to transfer audio from the unit back to the mobile phone touch the icon again to return to the audio from the mobile phone to the unit Volume Control While talking turn the rotary knob on the front p...

Page 31: ...from a mobile phone or a portable multimedia player PMP sometimes referred to as a MP3 player The unit allows you to playback audio files from your mobile phone or a PMP using a Bluetooth connection N...

Page 32: ...ch to disconnect Touch again to reconnect 3 Phonebook sync Touch to sync the phonebook 4 AutoConn Touch to set the Auto Connect function on or off 5 AutoAnswer Touch to set Auto Answer function on or...

Page 33: ...r USB icon is in greyscale that playback mode is currently unavailable Zone 2 disc DVD VCD Operation Insert a disc label side up into the disc slot 12 and go to Zone 2 Disc the LCD display will show t...

Page 34: ...ables on the back of the radio Video input is accessible for both the AUX 1 and AUX 2 mode through the VIDEO IN cable at the back of the unit Go to Zone 2 AUX 1 or AUX 2 to enter the AUX 1 or AUX 2 mo...

Page 35: ...Volume Adjustment In camera mode if Camera 1 is not triggered the front audio output will be the from the last audio source played Rotate the VOL control 1 to adjust the volume of the audio source Whe...

Page 36: ...l pad Bluetooth DIAL PHONE Press to dial a phone number Bluetooth CLEAR Press to clear dialed numbers Bluetooth HANG UP PHONE Hang up call RPT Repeat directory track all RPT A B Repeat A B DVD Previou...

Page 37: ...aced relatively close to the ignition system engine This type of noise can be easily detected because it will vary in intensity of pitch with the speed of the engine Usually the ignition noise can be...

Page 38: ...operation keys do not work The built in microcomputer is not operating properly due to noise Press the RESET button Sound skips The installation angle is more than 30 degrees Adjust the installation a...

Page 39: ...5 to 107 9 MHz Frequency Coverage Europe 87 5 to 108 MHz Sensitivity S N 30dB 4 V Image Rejection 45 dB Stereo Separation 25 dB AM MW Frequency Range USA 520 1710 KHz Frequency Range Europe 522 1620...

Page 40: ...ASA Electronics Corporation www asaelectronics com www jensenrvdirect com 2014 ASA Electronics Corporation v 240614...

Reviews: