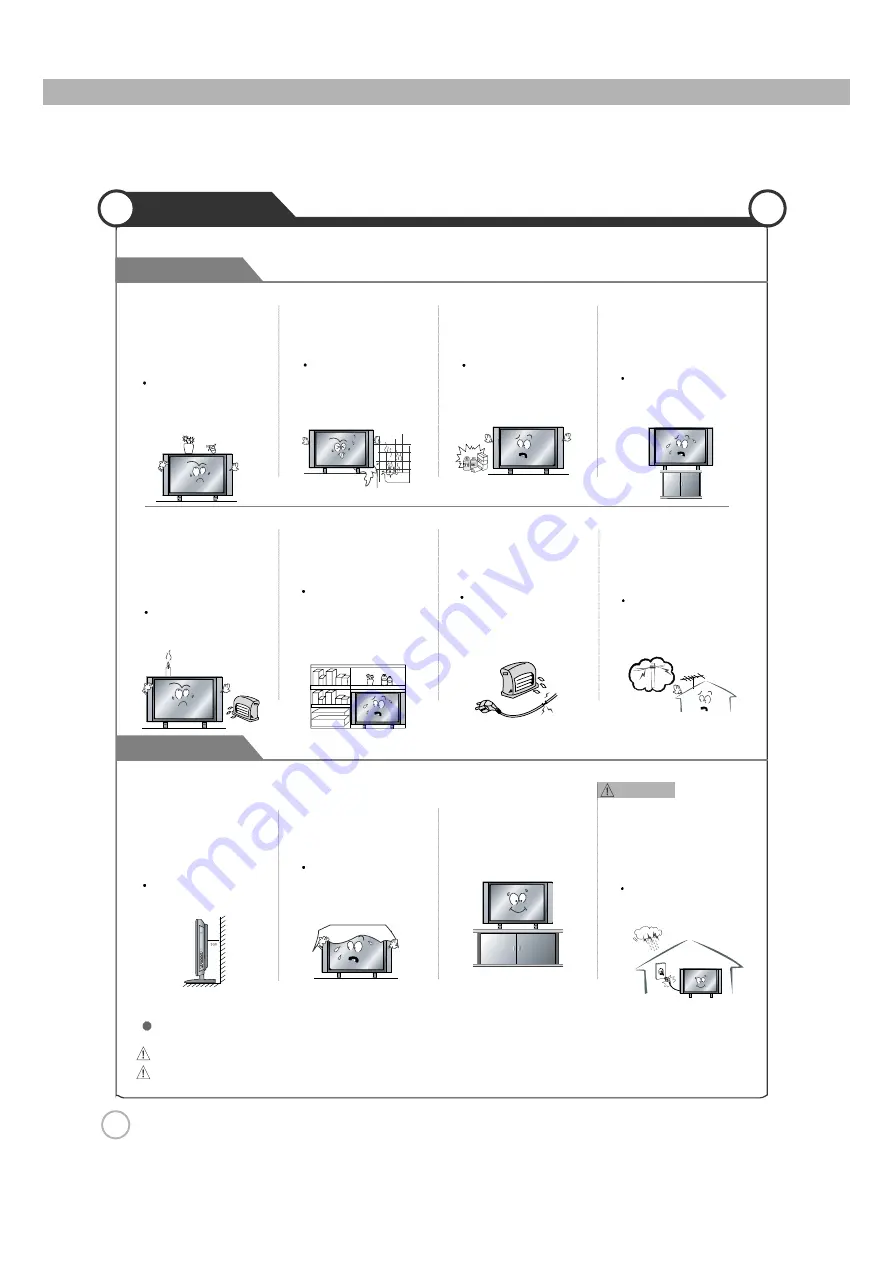
background image

4

Installation

Cautions

Warnings

Warnings

Do not place the unit where it
is exposed to rain, excessive
moisture or grease. 

Doing so may result in fire,
electric shock, malfunction,
or deformation.

Do not use or store flamm
able or combustible materials
near the unit.

Doing so may result in fire
or explosion.

Do not place the unit on an
unstable surface, such as a
wobbly stand or sloped table, or
on any surface whose area is
smaller than the bottom area of
the unit.

If a child climbs on the unit, it could
topple and fall onto the child,
resulting in serious injury to the
child or damage to the unit. Place
the unit on a flat stable surface.

Do not place containers with
liquids such as flower vases,
soft drink cans, or medicine
bottles or small metallic objects
on top of the unit.

If liquid enters the unit or any
metal object falls into the unit,
it may result in short-circuit,
fire, or electric shock.

Do not place the unit in a
poorly ventilated enclosure,
such as a cabinet.

Doing so poses a serious
risk of fire.

Do not run power cords near
heat-producing appliances
such as radiators, stoves, or
irons.

The excessive heat could
melt the insulation and
expose live wires, resulting
in fire or electric shock.

Install the antenna away from
high-voltage power lines and
communication cables and
make sure it is installed
securely.

If the antenna touches a power
line, contact with the antenna
could result in fire, electric
shock, serious injury, or death.

Do not place a burning candle,
burning anti-mosquito incense,
or lighted cigarette on top of the
unit. Do not place the unit near
any heat source such as a
fireplace or space heater.

Doing so poses a serious
risk of fire.

Install the unit at an adeq-
uate distance from the
wall to ensure sufficient
ventilation.

If the temperature inside

the unit rises, it may res-
ultin fire.

Do not cover the unit with
a tablecloth, curtain, or
other material.

If the temperature inside

the unit rises, it may result

in fire.

Be sure to place the unit
on a level surface.

Form a drip loop where the
coaxial antenna cable enters
your building to prevent rainwater
from traveling along the cable
and coming in contact with the
antenna input terminal.

If rainwater finds its way inside
the unit, it may result in fire or
electric shock.

The following precautions are divided into "Warnings" and "Cautions".

Warning : Ignoring this precaution may result in death or serious injury.
Caution : Ignoring this precaution may result in injury or property damage.

Summary of Contents for JE3208

Page 1: ...32 LCD TV User s Guide Please observe all safety precautions when using this product Please read this manual carefully before using this product JE3208 ...

Page 2: ......

Page 3: ... shock when a short circuit or overload occurs If necessary install a ground fault circuit breaker Never ground to a telephone line lightning rod or metal gas pipe Doing so may result in fire electric shock or other hazards Do not bend the power cord excessively or place heavy objects on it Doing so may result in fire or electric shock Always unplug the unit before cleaning Not doing so may result...

Page 4: ...he insulation and expose live wires resulting in fire or electric shock Install the antenna away from high voltage power lines and communication cables and make sure it is installed securely If the antenna touches a power line contact with the antenna could result in fire electric shock serious injury or death Do not place a burning candle burning anti mosquito incense or lighted cigarette on top ...

Page 5: ...immediately If you notice any unusual odors or smoke around the unit immediately disconnect the unit from the outlet and contact the service center Failure to do so may result in fire or electric shock When moving the unit be sure to turn off the unit and unplug the power cord from the wall outlet Moving the unit with the power cord connected to the outlet may cause damage to the cord resulting in...

Page 6: ...e or the third prong is provided for your safety When the provided plug does not fit into your outlet consult an electrician for replacement of the obsolete outlet 10 Protect the power cord from being walked on or pinched particularly at plugs convenience receptacles and the point where they exit from the apparatus 11 Only use the attachments accessories specified by the manufacturer 12 Use only w...

Page 7: ...m of the building as close to the point of the cable entry as practical NOTE TO CABLE TV INSTALLER Apparatus with Class I construction shall be connected to a Mains socket outlet with a protective earthing connection 13 Unplug this apparatus during lightning storms or when unused for long periods of time CAUTION TO REDUCE THE RISK OF ELECTRIC SHOCK DO NOT REMOVE COVER OR BACK NO USER SERVICEABLE P...

Page 8: ...icular installation If this equipment does cause harmful interference to radio or television reception which can be determined by turning the equipment off and on the user is encouraged to try to correct the interference by one or more of the following measures Reorient or relocate the receiving antenna Increase the separation between the equipment and receiver Connect the equipment into an outlet...

Page 9: ...n Menu Button OSD Menu Display Button Source Button Input Source Select Button Front View Accessories The configuration of the components may look different from the following illustration Power Cord AV Cable User s Guide Battery 1 5V AAA 2 User s Guide Remote Control DTV EPG MTS CC V CHIP SCALE ...

Page 10: ...b Pr jack AV1 AUDIO L R and VIDEO jacks AV2 AUDIO L R and VIDEO jacks S VIDEO jack Back View 1 2 3 4 5 6 7 8 9 AUDIO L R output jacks 10 Press on the back of the LCD TV to first To turn on the LCD TV Be sure to turn off the power and unplug both units from the wall outlet before making any connections Power on Power off ...

Page 11: ...se refer to A and B Installation of the LCD TV in an improperly ventilated location can cause a fire or damage to the LCD TV due to increased temperature Do not install on an unstable location with support area smaller than the LCD TV Please refer to the desktop stand user s manual for details of installation Contact your dealer to purchase the Adjustable angle wall mount required for wall mounted...

Page 12: ...12 Installing an Antenna User Guidance Information ...

Page 13: ......

Page 14: ...ss DTV to display the DTV ATSC OSD menu during DTV ATSC mode EPG Press EPG to display the program guide MTS Press MTS to select Stereo SAP or Mono Note This button can only be used under NTSC mode V CHIP Press V CHIP to choice the rating SCALE Cycles among scale mode 16 9 ZOOM1 ZOOM2 4 3 PANORAMA ...

Page 15: ... 4 Check if any three wavelength lamp special fluorescent or neon sign is turned on near the LCD TV CAUTION Risk of explosion if battery is replaced by an incorrect type Dispose of used batteries according to the national code Recycling program The remote control should be operated within 30feet 7m and 30 to the left and the right of the IR receiver at the front of the LCD TV Used batteries should...

Page 16: ...Connect the LCD TV s Composite In terminal to the VCR s Composite Out terminal using the Composite cable Make sure the color of the terminals and the color of the cable are the same Use the S Video cable for higher picture quality Connection terminals of other equipments differ by manufacturer and model Composite Cable S Video Cable R L VIDEO R L VIDEO Connecting to the Composite terminal Connecti...

Page 17: ......

Page 18: ...onent connection cable Y Pb Pr between the LCD TV and DVD Player Connecting from HDMI terminal to HDMI terminal S Video cable can be used if there is an S Video terminal Connecting to the component terminal Connecting to the S Video terminal Connecting to the HDMI terminal R L DVD Pr Pb Y R L DVD Pr Pb Y HDMI connecting cable R L DVD Pr Pb Y Playing the DVD 1 Turn on the LCD TV and press on the re...

Page 19: ......

Page 20: ... Selecting Input Source Press Press button on the remote control Use to move to the desired input source Press to select You can select between the TV signal and the input signal of other equipments connected to the TV Use this function to switch to the input source you wish to view SOURCE Press on the back of the LCD TV to first TV AV1 AV2 SVIDEO YPBPR DTV VGA HDMI If you select TV you can receiv...

Page 21: ...Press to go back to the channel you were previously viewing channel up channel down Press again to hear the sound again Press on the remote control Press again to disappear Display shows information about current channel if it is provided by the broadcaster To go back to the previous channel increases the volume decreases the volume You will see all the channels that the TV has memorized CH CH RET...

Page 22: ......

Page 23: ...emote control to display the main menu and use the LEFT and RIGHT buttons to select 3 Select Channel item first then press the DOWN button to select Auto Scan and press the ENTER button 4 The Auto Scan automatically store the receivable channels Press the DTV button at any time to interrupt the memorization process Caption Channel Setup Lock Caption Channel Caption Analog CC Digital CC Auto Scan S...

Page 24: ...closed caption options Service 1 Service 2 Service 3 Service 4 Service 5 Service 6 Auto Scan Automatically store the receivable channels Press the TV button at any time to interrupt the memorization process Caption Allows to customize the settings for caption option Setup Picture Size Allows you to select picture size between Auto and Full Time Zone Allows selection of regional TV systems of USA P...

Page 25: ... appropriate for all ages PG Parental Guidance Suggested May contain material not suited for younger viewers PG 13 Contains content that may not be appropriate for viewers under the age of 13 R Restricted Contains adult content no one under 17 admitted without parent NC 17 No one 17 and under admitted X Adults only MPAA Can English Can French The Movie rating MPAA is used for original movies rated...

Page 26: ... DOWN buttons to select the rating you want and press the ENTER button to select Blocked Rating or Unblocked Rating Use DOWN button to select the Change PIN item then press ENTER The screen will display as following Input the new 4 digital password and input it again to confirm The screen will display New Pin Success Change PIN Confirm ...

Page 27: ...tting and press the MENU to exit the menu The PICTURE menu includes the following options Move Picture Mode Brightness Contrast Saturation Shapness Hue Normal Select Exit Picture Picture Mode Cycles among picture display modes User Normal Soft Vivid Brightness Controls the overall brightness of the picture Contrast Controls the difference between the brightest and darkest regions of the picture Sa...

Page 28: ...tons to change the setting and press the MENU to exit the menu Move Sound Mode Volume Bass Treble Balance Surround Normal Select Exit Sound On The SOUND menu includes the following options Sound Mode Cycles among sound display modes User Normal News Movie Volume To adjust the volume Bass Controls the relative intensity of lower pitched sounds Treble Controls the relative intensity of higher pitche...

Page 29: ...ce English Français Español Blue Back To turn the blue back on or off Timer Current Input the current time Off Times Allows you to set the off times to turn off the unit automatically On Times Allows you to set the on times to turn on the unit automatically On channel The number of the current channel Closed Caption Allows to select the following closed caption modes CC1 CC2 CC3 CC4 Display a prin...

Page 30: ...menu then press the RIGHT button to display the Parent Guide menu NOTE Use the Parent Guide function must enter a 4 digital password first The factory password is 0000 2 Select V CHIP Enable ON The Movie Rating includes the following options RATING DESCRIPTION G General Audiences Movie is appropriate for all ages PG Parental Guidance Suggested May contain material not suited for younger viewers PG...

Page 31: ... and press the ENTER button repeatedly to select Blocked Rating B or Unblocked Rating U Change Password Use DOWN button to select Change Password and press RIGHT Input the new 4 digital password and input it again to confirm VCHIP To select VCHIP on or off TV Rating Selects to activate the TV Rating programs Movie Rating Selects to activate the MPAA Rating programs English Rating Allows you to sel...

Page 32: ......

Page 33: ...33 Application Customizing the TV Settings Air Cable Allows selection among HRC Air STD and IRC signal sources Skip Allows addition removal of channels ...

Page 34: ...o change the setting and press the MENU to exit the menu 34 The PC menu includes the following options H Position Allow you to use LEFT and RIGHT button to adjust the H Position V Position Allow you to use LEFT and RIGHT button to adjust the V Position Clock Allow you to prolong the image Phase Allow you to adjust the definition Auto Sync Select Auto Sync and press RIGHT the unit will automaticall...

Page 35: ...and RIGHT buttons to change the setting and press the MENU to exit the menu The ADVANCED menu includes the following options Scale Cycles among scale mode 16 9 ZOOM1 ZOOM2 4 3 PANORAMA 3D NA Allows you to adjust the 3D NA among LOW Mid High Off Color temperature Adjusts color components independently to achieve a warm or cool effect Use Normal Warm Cool User Allows the user to adjust red green and...

Page 36: ...e Stripes appear on the screen Stop using wireless telephones hair driers and electric drills and it shakes The screen does not move Press the PAUSE button Check if the Pause button is pressed on external equipment Screen appears Voice is not heard 1 Press the MUTE button 2 Increase the sound level by pressing volume adjustment button 3 Check if sound terminal of external input is connected proper...

Page 37: ......

Page 38: ...ion 1 Lay the TV down with the rear facing up on a non abrasive surface 2 Remove the six screws shown in figure A with a Phillips screwdriver Figure A 3 Remove the stand from the TV by pulling it out of the cabinet See Figure B Figure B 38 ...

Page 39: ...nsert the supplied plastic stand cover as shown in Figure C and D Figure C Figure D 5 Remove the 4 screws shown in Figure E Figure E 6 Attach the wall mounting bracket not supplied using these 4 screws 39 ...

Page 40: ...www asaelectronics com ...

Reviews: