background image


JDTV-1020 User Manual, page 9 

USING THE REMOTE 


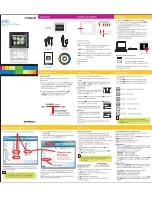
Battery Installation  

Refer to Fig.1: 
1. 

Remove the Battery Compartment Cover. 

2. 

Install  2  x  1.5V 


AAA

  (UM-4)  batteries  (not 

included)  according  to  the  polarity  diagram 
inside the battery compartment. 

3. 

Close the Battery Compartment Cover. 


Important 

w


Be sure that the batteries are installed correctly. 

w


Wrong  polarity  may  damage  the  unit  and  void  the 
warranty. 

w


For  best  performance  and  longer  operating  time, 
we  recommend  the  use  of  good  quality  alkaline-
type batteries.   


Battery Warnings


1.


Do not mix old and new batteries. 

2.


Do  not  mix  alkaline,  standard  (carbon-zinc)  or 
rechargeable (nickel-cadmium) batteries. 

3.


If  the  remote  is  not  to  be  used  for  an  extended 
period  of time,  remove  the  battery.  Old  or  leaking  battery  can cause  damage  to  the  unit 
and may void the warranty. 

4.


Do not dispose of batteries in fire, batteries may explode or leak. 

5.


Do not disassemble, crush, short-circuit or incinerate your battery as it may cause fire, 
injury, burns, explosion or other hazards. 


General Operation and Notes 

Refer to Fig.2: 

w


Always  operate the remote control by pointing  it towards the remote sensor  on the TV 

at a distance less than 20 feet (6 m) and +/- 30

°

w


The operating distance may be affected by the ambient light of the room. 

w


Do not point bright lights at remote sensor of the TV set. 

w


Do  not  place  obstacles  in  between  the  remote  control  and  the  remote  sensor  as  this 

may block the control signals. 

w


Do not use this remote control while simultaneously operating the remote control of any 

other equipment, e.g. DVD player, to avoid possible error response. 


USING THE ANTENNAS 


For  normal  outdoor  use,  screw  the  detachable  rotary  telescopic  antenna  securely  onto  the 
Antenna  Jack  of  the  TV  set  and  then  fully  extend  it  and  adjust  for  best  signal  reception. 
Interference and an unstable picture may occur if : 

w


buildings or tall trees are blocking the broadcasting signals; 

w


it is snowing, overcast or raining heavily; 

w


you are moving along with your TV set; 

w


you are operating the TV set inside a moving vehicle; 

w


there are external interferences due to other RF devices nearby. 


Notes 

w


Digital TV reception requires the TV set to be stationary while watching. 

w


Keep  the  built-in  antenna  stored  folded  and  away  from  any  fast  moving  or  current 
carrying appliances such as a working fan. 


Summary of Contents for JDTV-1020

Page 1: ...MODEL JDTV 1020 Portable ATSC Digital TV with 10 COLOR TFT LCD AND FM RADIO PLEASE READ THIS USER MANUAL COMPLETELY BEFORE OPERATING THIS UNIT AND RETAIN THIS BOOKLET FOR FUTURE REFERENCE ...

Page 2: ...tructions 5 TV Controls 6 Using the Remote 9 Using the Antennas 9 Getting Started 10 Function Menus and Settings 10 Picture 11 Audio 11 Time 11 Setup 11 Channel 12 TV Operation 13 Select a Program Channel 13 Volume Control 13 Mute Control 13 Picture Mode 14 MTS Sound Track Mode 14 Timer Setting 14 Zoom 14 INFO Information 14 FAV Favorite List 15 FM Radio Operation 15 Care and Maintenance 16 Troubl...

Page 3: ...on or pinched particularly at plugs convenience receptacles and the point where they exit from the apparatus 11 Only use attachments accessories specified by the manufacturer 12 Lightning For added protection for this apparatus during a lightning storm or when it is left unattended and unused for long periods of time unplug it from the wall outlet separate batteries from the apparatus and store th...

Page 4: ...s cause harmful interference to radio or television reception which can be determined by turning the equipment off and on the user is encouraged to try to correct the interference by one or more of the following measures Reorient or relocate the receiving antenna Increase the separation between the equipment and receiver Connect the equipment into an outlet on a circuit different from that to whic...

Page 5: ...e followings are included with your TV set w User Manual w Quick Guide w AC Adaptor 5V 2 5A w Li ion Rechargeable Battery Pack 3 7V 2900mAh w Car Cord Input 12V Output 5V 2 5A w Detachable Rotary Telescopic Antenna w External Magnetic Base Mount Antenna with F connector w Stereo Earbuds w Detachable TV Stand POWER SOURCE AND RECHARGING This TV is powered by an internal Li ion battery pack and must...

Page 6: ...the On Off Switch of the TV to OFF 2 Open the Battery Compartment Cover and carefully unplug the old battery pack from the TV unit Gently insert the plug from the new battery pack as shown Note that the plug is polarized and will only fit into the connector one way The plug should never be forced into the connector 3 Replace the battery compartment cover securely Lithium Battery Safety Instruction...

Page 7: ... function menu press to move the selection bar up the list 7 AUTO OK While in TV mode press to enter the auto scan menu Press to choose a menu item or confirm a setting 8 VOL ƒ While in TV or FM radio press to decrease the volume output While in main menu press to select previous function menu e g Audio Inside in a function menu press to change the setting of the selected menu item 9 VOL While in ...

Page 8: ...t personal or standard options 3 MENU While in TV mode press to bring up the main function menu Inside a function menu press to end setting mode Press again to return to TV mode 4 SLEEP Press to select sleep Time from 5 10 15 30 45 60 90 120 180 240 mins 5 Numeric Keys 0 9 Use this to directly enter TV channel no after pressing button 6 PREV Press to return to previous selected channel 7 VOLUME Wh...

Page 9: ...ress to choose a menu item or confirm a setting 18 ˆ While in main menu press to select the first menu item for user adjustment Inside in a function menu press to move the selection bar down the list 19 TV FM Press to toggle between TV and FM radio modes 20 INFO Press to display current program information e g channel no sound track mode etc 21 CH While watching TV press to recall the next capture...

Page 10: ...lways operate the remote control by pointing it towards the remote sensor on the TV at a distance less than 20 feet 6 m and 30 w The operating distance may be affected by the ambient light of the room w Do not point bright lights at remote sensor of the TV set w Do not place obstacles in between the remote control and the remote sensor as this may block the control signals w Do not use this remote...

Page 11: ... GETTING STARTED When first powered on and there is no channel information stored in the memory the TV screen will show a dialog for auto scan setup press OK button to start auto scan mode w Select Air or Cable source w Cable system options AUTO STD IRC HRC FUNCTION MENUS AND SETTINGS There are 5 different menus Picture Audio Time Setup and Channel w Press MENU button to bring up the main menu w P...

Page 12: ... Saving Time On or Off default 4 Time Format 12 hour default or 24 hour 5 Clock this will display the current time using information transmitted with the receiving TV program SETUP 1 Menu OSD language OSD English default French Spanish 2 Transparent 0 default 25 50 75 100 3 OSD Time Out 5sec 15sec default 30sec 45sec 60sec 4 Closed Caption a CC mode Select the CC display options from CC off defaul...

Page 13: ...s fully extended or you are using the external magnetic base antenna prior to scanning for channels i From the remote press the ˆ button to scroll down to Auto Scan ii Press the ENTER button on the remote to start the scan iii Once the scan is complete the TV will automatically start playing the lowest channel found iv You can now use the and ˆ buttons on the remote or the CH CH buttons on the TV ...

Page 14: ...ons on the remote control allow direct access to the channel you want to watch Example Channel 9 press 9 and three seconds later it will automatically switch to channel 9 You can also press the 9 followed by the ENTER button to avoid the three second delay and get instant access to the channel Channel 12 press 1 and 2 and three seconds later it will automatically switch to channel 12 You can also ...

Page 15: ... available in all channels TIMER SETTING The TV will go into standby mode automatically after the period of time you select w Press the SLEEP button on the remote and the Sleep Timer will appear on the screen w Keep pressing the SLEEP button to select different time w The sleep time can be set to one of the following times Off 5 10 15 30 45 60 90 120 180 240 Min ZOOM It is used to change the scree...

Page 16: ...ed Press the TV FM button on the TV or remote to switch to FM RADIO mode the following screen will appear Press the CH CH buttons on the TV or the ˆ buttons on the remote to select one of the items below item and press the AUTO OK button on the TV or ENTER button on the remote control to confirm The selected item will change to yellow color Control options are 1 AUTO To automatically search all th...

Page 17: ...ery is exhausted w Power On Off switch is set to off w Recharge battery with provided ac adaptor w Set Power On Off switch is set to on No picture received w Signal is weak w Receiving channel is not in service w Fully extend the rotary telescopic antenna or change to the external telescopic antenna provided w Try other TV channels Picture is pixilated w Signal is weak w Watching TV in a moving ve...

Page 18: ...onnector Audio Processing Digital Multi lingual Audio Output Built in Speakers x 2 and 3 5mm Headphone Jack Video Processing MPEG 2 Video Decoding Terrestrial NTSC TFT Color Panel Size 10 inches diagonal Resolution 800H x 480V Aspect Radio 16 9 Power For TV unit Li ion Battery Pack 3 7V 2900mAh AC Adaptor 5V 2 5A Car cord Input 12V Output 5V 2 5A For remote control 2 x 1 5V AAA UM 4 alkaline batte...

Page 19: ...ications or failure to provide reasonable care and necessary maintenance as outlined in the user manual 3 Warranty of all SPECTRA products applies to residential use only and is void when products are used in a nonresidential environment or installed outside the United States This warranty gives you specific legal rights and you may also have other rights which vary from state to state TO OBTAIN S...

Reviews: