background image


JCV2015BT 


12 


SATELLITE RADIO OPERATION 


About SiriusXM 

Only SiriusXM brings you more of what you love to listen to, all in one place. Get over 140 

channels, including commercial-free music plus the best sports, news, talk, comedy and 

entertainment. Welcome to the world of satellite radio. A SiriusXM Vehicle Tuner and 

Subscription are required. For more information, visit www.siriusxm.com in the US or 

www.siriusxm.ca in Canada. 

Switching to SiriusXM 

(Requires optional SiriusXM tuner) 
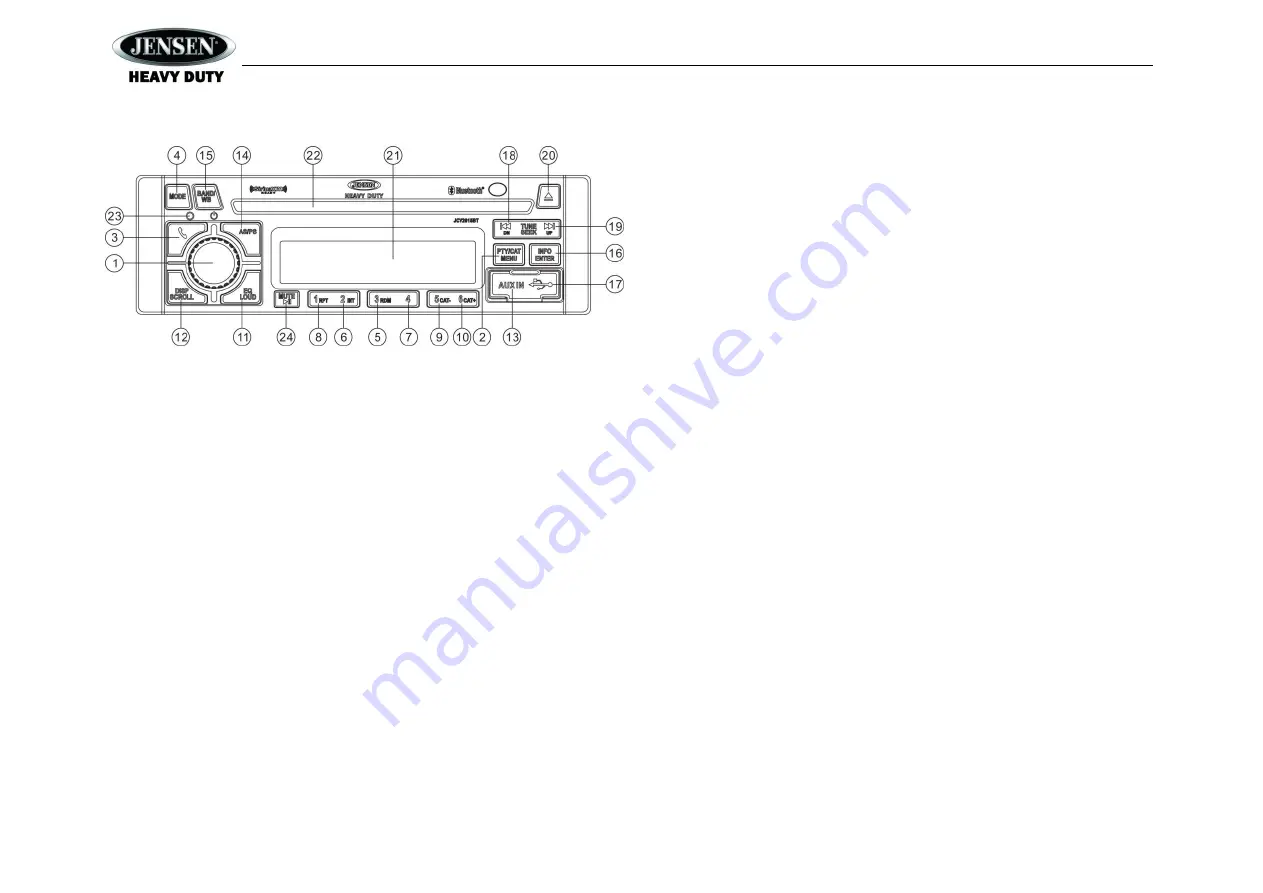
Press the 

MODE

 button (4) to change the mode to SiriusXM mode. 

Accessing your SiriusXM ID 

To display your SiriusXM radio ID, use the 

TUNE/SEEK |<<


button to tune to channel “000”. 

The screen will display “Radio ID” with the ID displayed in the middle of the LCD screen. The 
SiriusXM radio ID is 8 characters long. 

Selecting a Band 

In SiriusXM mode, press the 

BAND/WB

 button (15) to access the SiriusXM user-preset channel 

groups in the following order: SXM1, SXM2, SXM3. 

Category Tuning 

1. 

Press the 

PTY/CAT/MENU

 button (2) to access Category mode. 

2. 

While in category mode, press 

5/CAT- 

OR

 6/CAT+

 buttons (9, 10) to choose a category. 

3. 

Press the 

TUNE/SEEK |<< / >>|

 buttons (18, 19) to navigate channels in that category. 

(The current channel number within the chosen category will always be the default first 
channel tuned.) 

4. 

Press the 

INFO/ENTER

 button (16) to select the desired channel. 

Channel Up/Down Tuning 

Press the 

TUNE/SEEK |<< / >>|

 buttons (18, 19) to search for a channel. 

Press and hold

 the 

TUNE/SEEK

 buttons to fast search. 

Direct Tuning Mode 

1. 

Press and hold

 the 

INFO/ENTER

 button (16) to enter direct tuning mode. 

2. 

Press 

TUNE/SEEK |<< / >>|

 buttons (18, 19) to change the first of three digits for the 

desired channel in the direct entry screen. 

3. 

Press the 

INFO/ENTER 

button to confirm the entered digit and move to the second digit 

field. 

4. 

Press 

TUNE/SEEK |<< / >>|

 buttons to select the second digit. 

5. 

Press 

the INFO/ENTER

 button to confirm the entered digit and move to the third digit field. 

6. 

Press 

TUNE/SEEK |<< / >>|

 buttons to select the third digit. 

7. 

Press the 

INFO/ENTER

 button to confirm the three digit channel and tune to the selected 

channel. 

Storing Preset Channels 

The preset buttons (5-10) can be used to store 6 channels, allowing convenient access to your 
favorite channels. 

Programming Channels 

1. 

Select the channel you want to store in memory. 

2. 

Press and hold

 a preset button (5-10) until the corresponding preset button number   

appears. 

3. 

Repeat steps 1 and 2 to program additional channels. 

Preset Recall 

Press one of the six preset buttons (5-10) to directly select a preset channel stored in the current 
band. 

Preset Scan 

Press 

AS/PS

 button (14) to scan stations stored in all three user-preset channel groups (SXM1, 

SXM2 and SXM3). The unit will pause for 10 seconds at each preset station. 

Preset Tuning 

In Preset Tuning Mode, you can use the 

TUNE/SEEK |<< / >>|

 buttons (18, 19) to access all 

18 preset stations in sequential order. Access preset tuning mode through the system menu. 
Set Preset-

Only Tuning to “ON.” 

Alternate Display Mode 

Press the 

DISP/SCROLL

 button (12) to change the display information between single and dual 

line text display. In dual line mode, both artist and title are available for viewing. 

Press and hold

 the 

DISP/SCROLL

 button to scroll the Artist/Song Title information. 

While in category tuning list mode, press the 

DISP/SCROLL

 button in sequence to change the 

display information from Channel Name, Artist, and Song Title. 

Summary of Contents for JCV2015BT

Page 1: ...JCV2015BT AM FM RBDS WB CD USB AUX IN BT iPod Ready CAN BUS SiriusXM Ready Heavy Duty Radio Installation and Operation Manual ...

Page 2: ... for updates All programming channel lineup XM service subject to change or preemption All other marks and logos are the property of their respective owners All rights reserved Made for iPod and Made for iPhone mean that an electronic accessory has been designed to connect specifically to iPod or iPhone respectively and has been certified by the developer to meet Apple performance standards Apple ...

Page 3: ...lizer 5 settings User Flat Pop Classical Rock Electronic Bass Treble Balance and Fader Controls Output Power 45W x 4 Clock 12 24 Hour Selectable IR Wireless Remote Control Ready sold separately 2 Channel Pre amp Line Level Outputs 3 Wire Power with Non Volatile Memory and Clock Time support Auxiliary Audio Input Front 3 5mm Stereo Jack Rear Low Level Input Display Key Illumination Color Green Ambe...

Page 4: ...the equipment used for recording some CD Rs CD RWs may not play on this unit For more reliable playback please adhere to the following recommendations Use CD RWs with speed 1x to 4x and write with speed 1x to 2x Use CD Rs with speed 1x to 8x and write with speed 1x to 2x Do not play a CD RW which has been written more than 5 times Compatible Disc Types Table 1 General Disc Information Disc Type Lo...

Page 5: ...ght not give optimum performance Avoid installing the unit where it will be subjected to high temperatures from direct sunlight hot air or from a heater or subject to excessive dust dirt or vibration DIN Front Mount 1 Slide the mounting sleeve off of the chassis if it has not already been removed If it is locked into position use the removal keys supplied to disengage it The removal keys are depic...

Page 6: ... to the radio or the mounting surface and void the manufacturer s warranty 9 Test radio operation by referring to the operating instructions for the unit Removing the Unit To remove the radio after installation remove the plastic end caps insert the removal keys straight back until they click and then pull the radio out If removal keys are inserted at an angle they will not lock properly to releas...

Page 7: ...FT SPEAKER C27 AUX 1 ON OFF A4 12V IGNITION B16 REAR LEFT SPEAKER C28 POWER GROUND A5 PWR ANTENNA REMOTE AMP C17 POWER GROUND C29 NO CONNECTION A6 DIM ANALOG PWM C18 AMP REMOTE LINE C30 POWER GROUND A7 12V BATT C19 RESERVED C31 RESERVED A8 POWER GROUND C20 CELL MUTE C32 RESERVED B9 REAR RIGHT SPEAKER C21 ANALOG STEERING WHEEL CONTROL C33 RESERVED B10 REAR RIGHT SPEAKER C22 NO CONNECTION C34 RESERV...

Page 8: ...y panel Available modes include the following Tuner AM FM SXM SiriusXM iPod USB CD Auxiliary BT Audio Tuner is the default source when a prior source is no longer available NOTE iPod USB CD or Sirius XM mode will be skipped if the device is not installed NOTE SiriusXM SXM mode will be skipped when the Region menu option is set to EURO Reset The reset button should be activated for the following re...

Page 9: ... to adjust the selected digit Rear Aux Enable On Off Turn on to allow the use of auxiliary audio input at the rear of the radio chasis Preset Only Tuning On Off Tune by presets only Sirius XM Settings Menu only appears when Sirius XM tuner is connected and in SiriusXM mode Clock Autoset On Off Sets clock based on SXM data Time Zone1 Atlantic Eastern Central Mountain Pacific Alaska Daylight Saving ...

Page 10: ...ld temperatures for an extended period of time In addition the visibility of the characters on the LCD may decrease slightly The LCD display will return to normal when the temperature increases to a normal range Setting the Clock To set the clock to display the current time turn the vehicle ignition on and turn the radio on Enter the system menu and adjust the clock by selecting the Set Clock menu...

Page 11: ...s on the screen and the new stations replace any stations already stored Preset Scan Select a band Press AS PS 14 to scan stations stored in the current band The unit will pause for 5 seconds at each preset station Press AS PS again to stop scanning when the desired station is reached RBDS Operation This unit is equipped to display RBDS Radio Broadcast Data Service information when broadcast by th...

Page 12: ... 1050 Hz is received detected If no additional warning tone is received for 60 seconds the unit will switch back to the last known function mode See System Menu on page 7 to learn how to turn the WB Alert feature on SAME Decoding and Filtering Specific Area Message Encoding SAME data is also broadcast prior to alert broadcasts SAME data contains information about the geographic region affected by ...

Page 13: ...n the current folder sequentially Press 2 INT again to stop Intro Scan and resume normal play at the current track Repeat Play Press the 1 RPT button 8 during disc play to repeat the current track Press 1 RPT again to stop repeat play Random Play Press the 3 RDM button 5 during disc play to play all tracks in the current folder in random shuffled order Press 3 RDM again to stop random play Folder ...

Page 14: ...s 18 19 to change the first of three digits for the desired channel in the direct entry screen 3 Press the INFO ENTER button to confirm the entered digit and move to the second digit field 4 Press TUNE SEEK buttons to select the second digit 5 Press the INFO ENTER button to confirm the entered digit and move to the third digit field 6 Press TUNE SEEK buttons to select the third digit 7 Press the I...

Page 15: ...n lock channels by entering the Locked Channels menu 4 Upon entering the Locked Channels list you will be prompted to enter your four digit code a Press the TUNE SEEK 18 19 buttons to enter the first digit b Press the INFO ENTER button to move to the next digit c Repeat above steps to enter all 4 digits 5 After entering the code you can navigate the list using the TUNE SEEK buttons to highlight th...

Page 16: ...r SiriusXM subscription status Press ENTER to clear the message No further action is required Questions about your subscription in the United States please visit www siriusxm com activatenow or call SiriusXM Listener Care at 1 866 635 2349 Questions about your subscription in Canada please visit www siriusxm ca activatexm or call XM Listener Care at 1 877 438 96770 Chan Unavailable Channel Not Ava...

Page 17: ...ck Selecting Tracks During playback press the TUNE SEEK button 18 19 to play the previous or next track in the current category Press the TUNE SEEK button 18 once to play the song from the start position or press TUNE SEEK twice to play the previous track Pressing the TUNE SEEK button 18 during the first 2 seconds of a track will play the previous track After 2 seconds this action return to the be...

Page 18: ...ay change the Locked or Unlocked icon DISCONNECT To disconnect a paired device press the ENTER button to temporarily remove the BT link The link can be re established through your phone menu by selecting the JCV2015BT for connection DELETE To delete a device from the list press the ENTER button NOTE Device must be disconnected to be deleted BT Pair Press the ENTER button to turn BT Pair On to put ...

Page 19: ...nit will automatically receive the incoming call after 5 seconds of ringtone Transfer Call During the call press and hold the button transfer the call between the unit and the mobile device End Call Press the button to end a call The unit will return to the previous mode Reject Incoming Call To reject an incoming call press and hold the button CAN BUS FEATURES The JCV2015BT is able to communicate ...

Page 20: ...voltage lines Although AM is subject to environmental noise it has the ability to receive at great distance This is because broadcasting signals follow the curvature of the earth and are reflected back by the upper atmosphere TROUBLESHOOTING Symptom Cause Solution No power The vehicle s accessory switch is not on If the power supply is properly connected to the vehicle s accessory terminal switch ...

Page 21: ...ipment has been tested and found to comply with the limits for a Class B digital device pursuant to Part 15 of the FCC Rules These limits are designed to provide reasonable protection against harmful interference in a residential installation This equipment generates uses and can radiate radio frequency energy and if not installed and used in accordance with the instructions may cause harmful inte...

Page 22: ...ASA Electronics Corporation www asaelectronics com www jensenheavyduty com 2015 ASA Electronics Corporation v 150415 ...

Reviews: