background image

13

DVDB01

Goto Search

During DVD or VCD playback, perform the following steps to use the GOTO feature to access a 
specific location on a disc: 

Title/Chapter Search

To play a specific title/chapter:
1.

Press the 

GOTO

 button (37) button. The On Screen Display information will appear with the 

track/chapter number highlighted (

TRK 00/00

).

2.

Use the arrow (

<

>

/\

\/

)

 buttons (29) to move the cursor to the time field. 

3.

Use the numeric buttons (36) on the remote control to enter the desired title/chapter number.

4.

Press the 

ENTER

 button (30).

Time Search

To enter an exact playback starting point:
1.

Press the 

GOTO

 button (37). 

2.

When the On Screen Display information appears at the top of the screen, use the arrow (

<

>

/\

\/

)

 buttons (29) to move the cursor to the time field (00:00:00).  

3.

Use the numeric buttons (36) on the remote control to enter the playback starting point.

4.

Press the 

ENTER

 button (30).

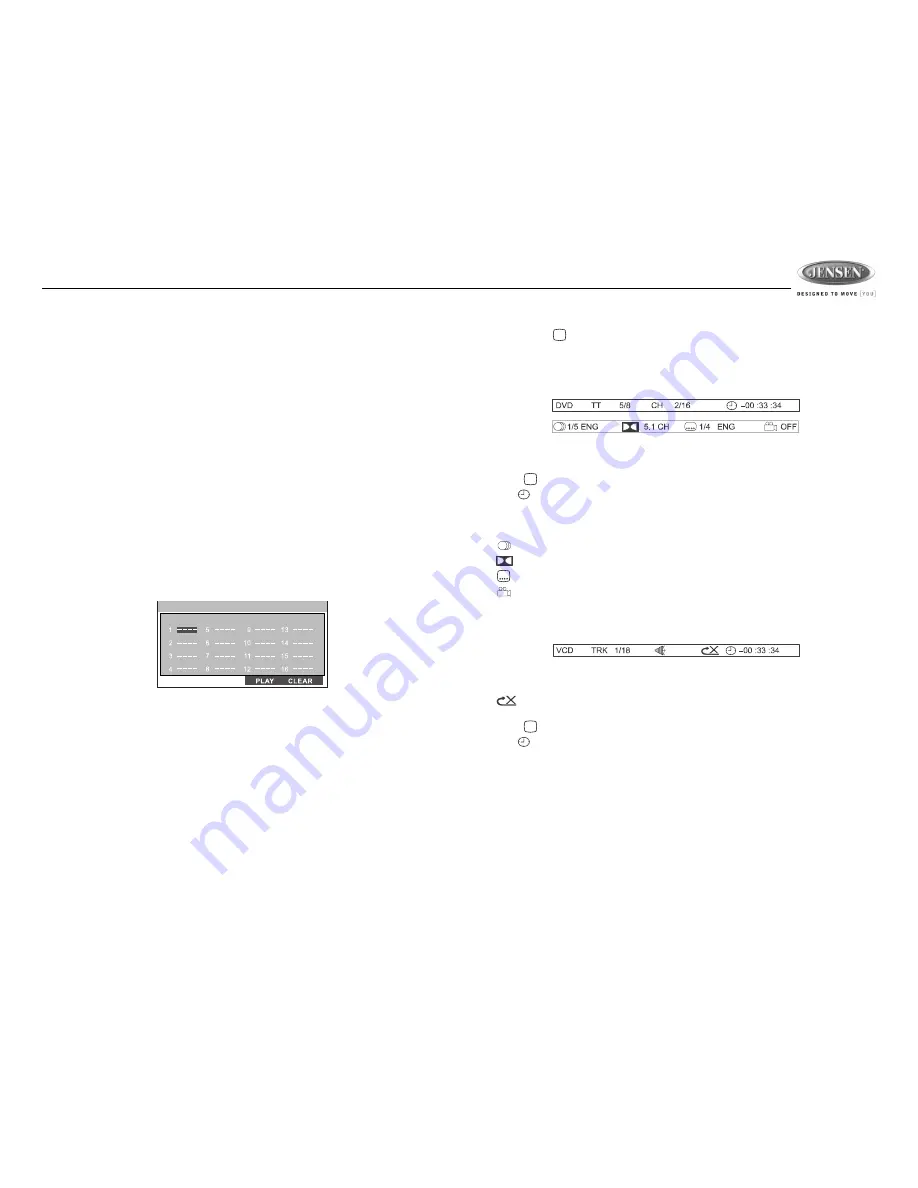
Playing in Programmed Order


(CD/VCD)

1.

Press the 

PROG

 button (18) to access the programmed playback screen:

2.

Use the arrow (

<

>

/\

\/

)

 buttons (29) on the remote control to access the fields on the 

“PROGRAM” screen. 

3.

Use the number buttons on the remote control to enter a track number in each field. 

4.

Press the 

>/||

 button (6) on the remote control or highlight “PLAY” on screen and then press 

the 

ENTER

 button (30) to begin playback in the numbered order indicated.

1.

To delete the list, highlight “CLEAR” and then press 

ENTER

. Press 

PROG

 to exit the 

programmed playback screen.

On-Screen Display Function

Press the display (

) button (17) during playback to view playback information at the top of the 

screen. 

DVD Playback Information

The following information is displayed at the top of the screen during DVD playback:

TT 5/8 – “5 / 8" indicates the fifth of 8 titles on the DVD is currently playing.

CH 2/16 – “2 / 16" indicates that the second of 16 chapters on the DVD is currently playing.

Press 

 repeatedly to view the following information: for elapsed/remaining playing time:

 00:02:18 – total elapsed playing time for disc

C –00 :34 :37 – remaining playing time

T 00:02:18 – total elapsed playing time for current track

C –00 :34 :37 – remaining playing time for current track

 1/5 ENG – English is the selected audio language out of 5 possible choices

 5.1 CH – The current language is recorded in 5.1 surround sound

 1/4 ENG – English is the selected subtitle language out of 4 possible choices

 OFF – There are no alternate angles recorded for this scene

VCD Playback Information

The following information is displayed at the top of the screen during VCD playback:

TRK ##/## – “1/18” indicates the first of 18 tracks on the VCD is currently playing.

PBC: Indicates when PBC (Playback Control) is turned on.

 – “X” indicates repeat play is OFF, “1” indicates repeat track, “D” indicates repeat 

directory, and “A” indicates repeat disc.

Press 

 repeatedly to view the following information for elapsed/remaining playing time:

 00:02:18 – total elapsed playing time for disc

C –00 :34 :37 – remaining playing time

T 00:02:18 – total elapsed playing time for current track

C –00 :34 :37 – remaining playing time for current track

PROGRAM

Summary of Contents for DVDB01

Page 1: ...DVD VCD WMA TITLE CHAPTER DTS EQ CLASSIC POP ROCK CD MP3 TRACK DVDB01 Installation and Operation Manual DVD CD MP3 Player ...

Page 2: ...tions Use the Proper Power Supply This product is designed to operate with a 12 volt DC negative ground battery system the regular system in a North American car Protect the Disc Mechanism Avoid inserting any foreign objects into the slot of this player Failure to observe this may cause malfunction due to the precise mechanism of this unit Use Authorized Service Centers Do not attempt to disassemb...

Page 3: ...ch set or other tools Electrical tape Crimping tool Volt meter test light Crimp connections 18 gauge wire for power connections 16 18 gauge speaker wire Disconnecting the Battery To prevent a short circuit be sure to turn off the ignition and remove the negative battery cable prior to installation NOTE If the DVDB01 is to be installed in a vehicle equipped with an on board drive or navigation comp...

Page 4: ...not operate recheck all wiring until problem is corrected Once the unit is properly operating turn off the ignition switch and proceed with final mounting of the chassis 6 Carefully slide the DVD player into the half sleeve making sure it is right side up until it is fully seated and the spring clips lock it into place NOTE For proper operation of the CD DVD player the chassis must be mounted with...

Page 5: ...attery When wiring is complete reconnect the battery negative terminal Removing the Unit 1 Make sure the ignition is turned off then disconnect the cable from the vehicle battery s negative terminal 2 Remove the metal strap attached the back of the unit if attached 3 Lift the top of the outer trim ring then pull it out to remove it 4 Insert both of the supplied keys into the slots at the middle le...

Page 6: ...nd connect it to a live circuit there Provides 12VDC at 300mA when DVD is on 7 Connect optional wired remote control P A REMOTE CONTROL EXTENDER CONSTANT POWER WIRE 4 red Connect to a 12 volt circuit that is only live when the ignition is on The best connection point is at the car s fuse block at the RADIO or ACCESSORY identified terminals 5 black Securely fasten the Ground wire to a grounded meta...

Page 7: ...ons NOTE When replacing a fuse be sure to use correct type and amperage to avoid damaging the DVD player The DVDB01 uses one 3 amp and one 1 amp ACC fuse located in line with the power wires YELLOW WHITE RED WHITE RED YELLOW YELLOW ...

Page 8: ...11 Mode 12 Disc Slot 13 Video In 14 Left Audio In 15 Right Audio In 16 Reset Remote Control Operation Using the Remote Control Point the remote control towards the player front face remote sensor IR 2 The operation angle is approximately 30 degrees in each direction of the front of the remote sensor DVD VCD WMA TITLE CHAPTER DTS EQ CLASSIC POP ROCK CD MP3 TRACK 3 8 1 13 2 10 12 16 11 9 6 7 4 5 14 ...

Page 9: ... hours and track up to adjust minutes 22 Change the SUBTITLE language on multi subtitle language DVD discs 23 ANGLE Change the viewing angle on multi angle DVD discs 24 MENU PBC Display the root menu stored on DVD discs Switch between PBC ON and PBC OFF on VCD discs 25 Display the SETUP menu 26 ZOOM Increase the picture size 27 10 Use to select a digit for the tens position when performing track f...

Page 10: ... button 11 on the front panel or remote control to switch between disc DVD VCD CD MP3 mode AV IN1 or AV IN2 mode Equalization Press the EQ button 33 on the remote control to activate the equalization function Continue pressing the EQ button to choose between the three equalizer modes CLASSIC POP and ROCK or to turn the equalizer function off DSP OFF Reset The RESET button 16 is located on the fron...

Page 11: ...e current title Select REP 1 to continuously repeat the current track Select REP ALL to continuously repeat all chapters tracks on the current disc After playing the last chapter track the unit will stop and display the elapsed time NOTE The REPEAT feature does not support VCD 2 0 with PBC ON PBC Play Back Control VCD Only For VCDs with play back functionality play back control PBC provides additi...

Page 12: ... playback screen On Screen Display Function Press the display button 17 during playback to view playback information at the top of the screen DVD Playback Information The following information is displayed at the top of the screen during DVD playback TT 5 8 5 8 indicates the fifth of 8 titles on the DVD is currently playing CH 2 16 2 16 indicates that the second of 16 chapters on the DVD is curren...

Page 13: ...ote control to choose the language in which you would like the subtitles to appear If no other languages are available INVALID KEY is displayed in the top left corner of the screen Menu Function DVD Only Press the MENU button 24 on the remote control while the disc is playing to display the disc root menu You can navigate with the remote control navigation keys and select a feature with the ENTER ...

Page 14: ... control to fast forward Keep pressing and releasing the button to increase the rate from 2X to 4X 8X and 20X Press the button 6 to return to regular playback Press and hold to fast forward to a specific location Release to begin playback from that point Press the button 34 on the remote control to fast backward Keep pressing and releasing the button to increase the rate from 2X to 4X 8X and 20X P...

Page 15: ...t entries press the corresponding number For two digit entries press the 10 button 27 followed by the last digit i e for file 16 press 10 and then 6 GOTO Direct File Access Use the GOTO function to access a file directly 1 Press the GOTO button 37 on the remote control The On Screen Display information will appear with the file number highlighted 2 Use the number keys on the remote control to ente...

Page 16: ... LB Image is played back in letter box style If connected to a wide screen TV black bands appear at the top and bottom of the screen 16 9 Select this option when a wide screen TV set is connected PASSWORD This item allows the selection of a new four digit code to use for security purposes RATING Select the parental control level for all DVD play The security password is required to make changes to...

Page 17: ...18 DVDB01 Audio Setup The Audio Setup menu controls the following features Key This item changes the audio output key AUDIO SETUP KEY 4 2 0 2 4 b ...

Page 18: ...e number inside the icon indicates the number lan guages on the disc maximum of 8 Number of subtitle languages available on the disc maximum of 32 Number of angles provided maximum of 9 Aspect ratios available LB stands for Letter Box and PS stands for Pan Scan In the example on the left the 16 9 video can be converted to Letter Box video Indicates the region code where the disc can be played Regi...

Page 19: ...rly until the moisture has evaporated We suggest you use a cleaning disc in this unit more frequently than in the unit in your home due to the environmental conditions of the vehicle Problem Cause Corrective Action Unit will not power on Radio Fuse blown Install new fuse with correct rating Car battery fuse blown Install new fuse with correct rating Illegal operation Press the RESET button located...

Page 20: ...be delivered to the OEM or original place of purchase with proof of warranty coverage e g dated bill of sale and serial number of the unit and vin specification of defect s transportation prepaid to an approved warranty station This warranty does not extend to the elimination of externally generated static or noise to the correction of antenna problems to costs incurred for removal or reinstallati...

Page 21: ...22 DVDB01 ASA Electronics Corporation www asaelectronics com www jensenrvdirect com 2009 ASA Electronics Corporation v 061709 ...

Reviews: