INSTALLATION
5
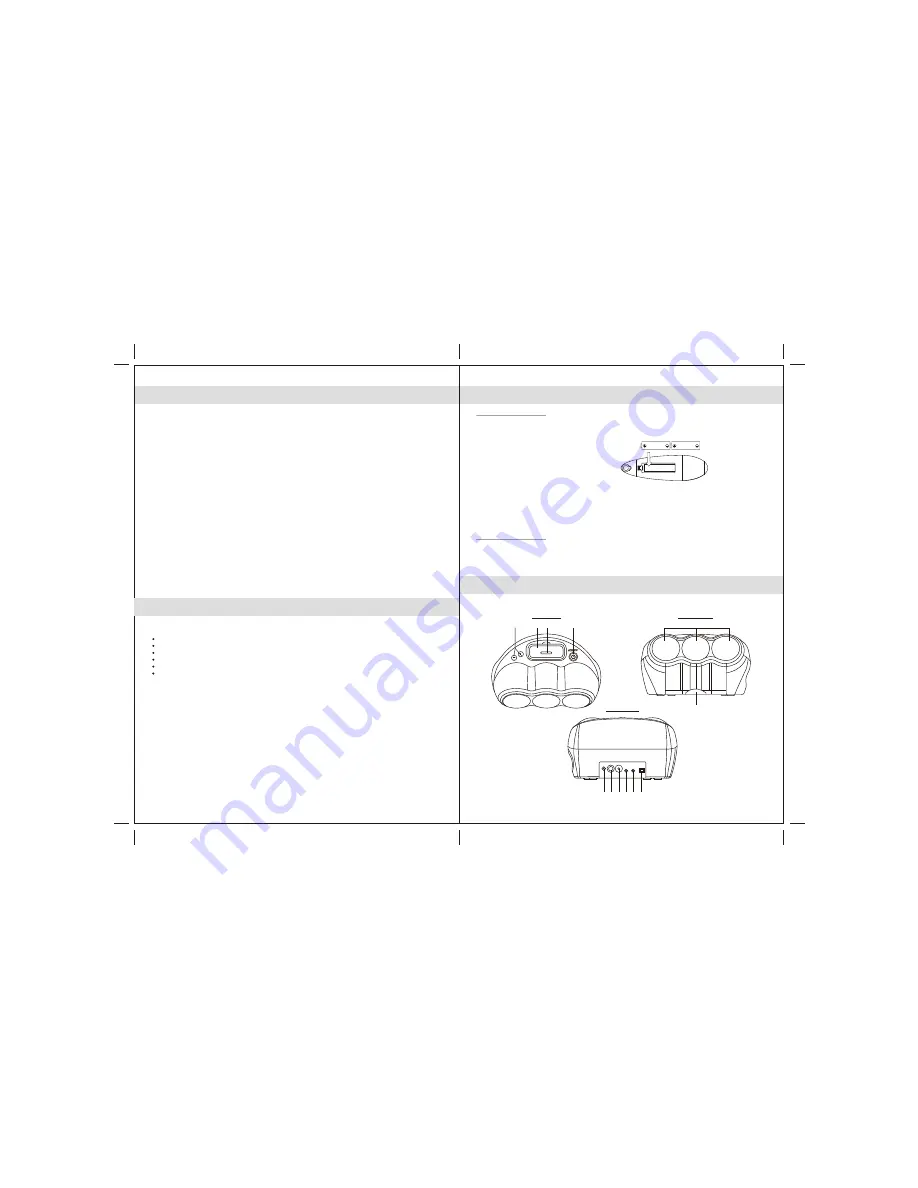
Remote Control battery
The battery compartment is located on the bottom of the Remote Control.
(1) Remove the battery compartment door.
(2) Follow the polarity diagram shown inside the compartment and install 2 x "AAA" batteries
(included).
(3) Replace the battery compartment door.
WARNING:
- Be sure that the batteries are installed correctly. Wrong polarity may damage the Remote Control.
- Do not mix old and new batteries.
- Do not mix alkaline, standard (carbon-zinc) or rechargeable (nickel-cadmium) batteries.
- Only batteries of the same or equivalent type as recommend are to be used.
- If the Remote Control is not to be used for an extended period of time, remove the battery.
- Do not dispose of batteries in fire, batteries may explode or leak.
AC Adaptor Connection
The unit is powered by an external AC Adaptor with an output of 15V DC , 1100 mA (included).
(1) Firmly and securely plug the AC Adaptor into AC main outlet.
(2) Insert the AC Adaptor output plug to the power input jack on the back of the unit.
LOCATION OF CONTROLS
Main Unit
Front view
Rear view
COMPLIANCE WITH FCC REGULATIONS
This device complies with Part 15 of the FCC Rules. Operation is subject to the following two conditions:
(1) This device may not cause harmful interference, and (2) this device must accept any interference
received, including interference that may cause undesired operation.
In accordance with FCC requirements, changes or modifications to this unit not expressly approved by the
party responsible for compliance could void the user's authority to operate the equipment.
NOTE:
This equipment has been tested and found to comply with the limits for a Class B Digital Device, pursuant
to Part 15 of the FCC Rules. These limits are designed to provide reasonable protection against harmful
interference in a residential installation. This equipment generates, uses and can radiate radio frequency
energy and, if not installed and used in accordance with the instructions, may cause harmful interference
to radio communications. However, there is no guarantee that interference will not occur in a particular
installation. If this equipment does cause harmful interference to radio or television reception, which can be
determined by turning the equipment off and on, the user is encouraged to try to correct the interference by
one or more of the following measures:
- Reorient or relocate the receiving antenna.
- Increase the separation between the equipment and receiver.
- Connect the equipment into an outlet on a circuit different from that to which the receiver is connected.
- Consult the dealer or an experienced radio/TV technician for assistance.
4
PRODUCT FEATURES
JiSS-330 is a Docking Speaker Station for iPod which incorporates the following features :
Player / Re-charger for
iPod , iPod
mini and
iPod
nano
Interchangeable iPod Adaptors
Video Line-out provides video signal output when iPod with video is docked
Audio line-in for connecting other digital audio player
Built-in 3 High Fidelity Speakers with surround sound effect.
Subwoofer output signal is available for the connection of an external active(self-powered)
subwoofer.
7 8
9 10 11 12
1
2
3
4
Top view
5
6


