background image

1. Functions Introduction

Functions Introduction and Settings

Functions Introduction and Settings
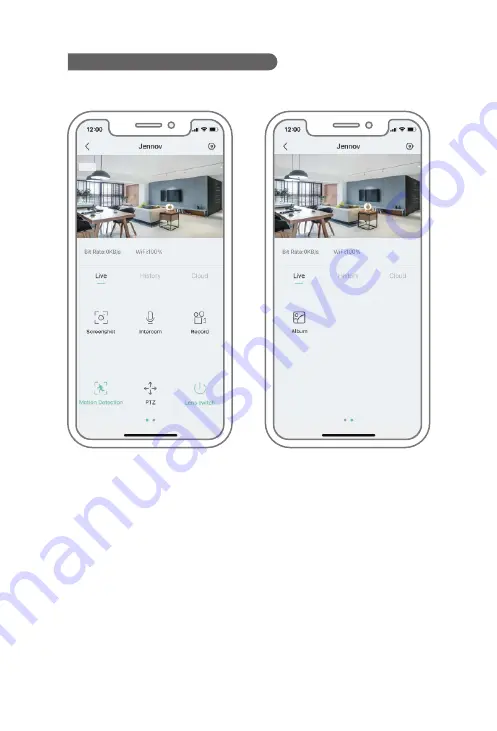
Screenshot: Save the screenshot of the current picture in the mobile phone.
Intercom: Press and hold intercom to realize two-way audio.
Video Recording: This video needs to be recorded into the mobile phone memory.
Motion Detection: When this function is enabled, the video or mobile phone will get 
message alarm push when any moving object is detected.
PTZ: It controls the camera to rotate up, down, left and right.
Lens Switch: Turn on and off the viewable monitoring screen 
(usually used to share users).
Photo Album: The contents of screenshots can be viewed here.

 - 11-

Summary of Contents for P31

Page 1: ...mera C 2022 006 E Be sure to read this book before installing or using the surveillance camera Keep the book in a safe place so that you can read it whenever necessary Please read carefully before use...

Page 2: ...ign Up Set up Wifi for the Camera Functions Introduction and Settings FAQ FCC Statement TABLE OF CONTENTS P19 P18 P11 P06 P05 P03 P02 P01 What s Included and APP Setup Product Overview Camera Installa...

Page 3: ...ng Sticker Sticker User Manual What s Included Cloud Edge App installation and Setup Search Cloudedge on apple store or google play to download the app from Google play from Apple store or Scan the fo...

Page 4: ...ng to the direction shown in the diagram Micro SD Card might JAM if inserted incorrectly and device could be damaged SD Card Port Support micro SD card for local storage Max 128GB Reset button Used to...

Page 5: ...light 2 It is not recommended to use the power extension cable connect the camera 3 Before installing the camera please match the WiFi at home before installation 4 The camera must be installed in a 9...

Page 6: ...stallation Power Drill not provided Drill Bit Wall Positioning stickersx Expansion bolts Camera Screw Test the Wifi signal at installation position Use cell phone to test Wifi signal quality at the in...

Page 7: ...in the cloud is totally optional and is really not necessary when using an onboard Micro SD card 1 Open the APP to sign up an account Go to the login interface and click Sign UP 2 Sign up with your em...

Page 8: ...ore please ensure you connect to a 2 4 GHZ signal on your network as shown in the below illustration Jennov 2 4 Jennov 5G x Dual frequency 2 4G and 5g Wi Fi dual bands are integrated The router automa...

Page 9: ...1 2 3 2 Log in to Cloudedge then tap the icon in the center Tap Camera to add device 07...

Page 10: ...vice to be unrecognized and fail to add 3 Reset device and wait for a flashing RED indicator light then tap Next 4 Select the Wi Fi needs to be connected Wi Fi in your house enter the password and cli...

Page 11: ...2 1 3 5 Use the camera to scan the QR code on your mobile phone as noted below When the scan is complete you will hear a prompt tone then push Next 09...

Page 12: ...10...

Page 13: ...dio Video Recording This video needs to be recorded into the mobile phone memory Motion Detection When this function is enabled the video or mobile phone will get message alarm push when any moving ob...

Page 14: ...he video format will become dark blue When there is no one else the video format is light blue 2 Motion Detection Video Recording When there is a moving object the recording format will change to dark...

Page 15: ...modes of 1 2 3 and minute can be set Alarm Area Alarm Area You can select the area need to be alarm If checked the alarm will be triggered when an object enters or exits the set alarm area Audible And...

Page 16: ...m Working Mode The saving time of alarm video is 1 minute by default three modes of 1 2 3 and minute can be set The recording time of motion detection can be set The default is 1 minute three modes of...

Page 17: ...ight Vision Mode 1 Automatic Default daytime is color and nighttime is infrared mode 2 Daytime full color mode color during daytime the infrared light will not turn on at night nor will the white ligh...

Page 18: ...or you can click add directly Share by scanning QR code or entering account Note 1 The accounts to be shared also need to download the app cloudedge to register 2 The one who was shared has only part...

Page 19: ...1 In the viewing interface long press the device interface and a prompt will pop up Click delete 2 Enter the settings pull down to the bottom and click delete 7 Delete Device 17...

Page 20: ...eleted by the App Q How to connect the camera to another router A First remove and reset the device on the App and then configure the device again by the App Q Why doesn t the device identify the SD c...

Page 21: ...nstructions may cause harmful interference to radio communications However there is no guarantee that interference will not occur in a particular installation If this equipment does cause harmful inte...

Page 22: ...e and send it to the email support jennov com Then your free warranty will take effect During the warranty period if any parts of product are damaged please contact us immediately and we will provide...

Reviews: