3
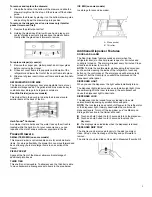
Audio Reference
This table is for quick reference only. See corresponding sections
for details. In case of inconsistency, section details will prevail.
Tone Assignment
POWER ON
Cooling system is turned on every time
the product is powered on.
POWER OFF
Cooling system is turned off.
KEY PRESS
User presses a valid button.
INVALID (ERROR)
User presses 2 or more valid buttons at
the same time. Count-down interruption
for press-and-hold buttons. User presses
pad when dispensing is not allowed.
ENGAGE
Acknowledgment of entry into any mode
or completion of dispensing.
DISENGAGE
Acknowledgment of exit from any mode.
ALERT
Power Outage alert, Door Ajar alert.
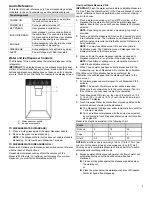
Water and Ice Dispenser Controls
The Dispenser UI is located above the external dispenser of the
refrigerator.
IMPORTANT:
The display screen on the dispenser control panel
will turn off automatically and enter “sleep” mode when the control
buttons and dispenser paddles have not been used for 2 minutes
or more. Touch any control button to reactivate the display screen.
A. Water dispenser paddle
B. Ice dispenser paddle
TO DISPENSE WATER (STANDARD)
1.
Press a sturdy glass against the water dispenser paddle.
2.
Remove the glass to stop dispensing.
NOTE:
The Dispense Water button does not enable standard
dispensing. It only functions in Measured Fill mode.
TO DISPENSE WATER (MEASURED FILL)
Measured Fill allows you to dispense a specified amount of water
with the touch of a few buttons.
Household water pressure may affect the accuracy of the
Measured Fill feature. For optimum performance of your water
dispenser, you must first calibrate Measured Fill.
How to calibrate Measured Fill:
IMPORTANT:
Flush the water system before calibrating Measured
Fill. See “Flush the Water System” in the Owner’s Manual. For best
results, calibration should be performed when water is not being
used in the house.
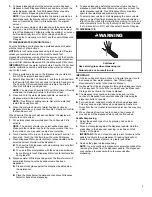
1.
Place a sturdy measuring cup (1-cup [237 mL] size) on the
dispenser tray centered in front of the ice/water dispenser
paddle. Ensure that you do not have any Measured Fill preset
selected.
NOTE:
Depending on your model, a measuring cup may be
provided.
2.
Touch and hold the Measured Fill button for 3 seconds to enter
into Calibration mode. The Calibration and Measured Fill icons
will illuminate and remain lit while the Measured Fill feature is
being calibrated.
NOTE:
You may touch Measured Fill to exit at any time in
Calibration mode. The Calibration icon will disappear and the
display will return to the Home screen.
3.
Press and hold the water dispenser paddle, as needed, to
dispense water to the 1-cup fill line in the measuring cup.
NOTE:
If overfilling or spilling occurs, discard the water and
restart the calibration process.
4.
When 1 cup of water has been correctly dispensed into the
measuring cup, touch Measured Fill to confirm the calibration.
When Measured Fill calibration has been confirmed, the
Calibration icon will disappear and the display will return to the
home screen.
1.
Put a sturdy glass under waterspout. Touch Measured Fill to
activate.
NOTE:
The amount of water you select will be dispensed.
Make sure the container can hold the entire volume. If ice is in
the container, you may need to adjust your selection.
2.
Touch Measured Fill to turn on, then touch to select 8 oz (0.2
L), 16 oz (0.5 L), or 24 oz (0.7 L). Touch the fourth time to exit
Measured Fill display.
3.
Touch Dispense Water (center button) or press paddle and the
selected amount of water will be dispensed.
�
The Measured Fill dispenser will automatically time out after
1 minute of inactivity.
�
You can refill several glasses with the same measurement
by continuing to touch Dispense Water (center button) after
each glass fill.
Measured Fill options are listed in the following chart:
Units
Ounces
8
16
24
Cups
1
2
3
Liters
0.2
0.5
0.7
NOTE:
Most coffee cups (commonly 4 to 6 oz [118 to 177 mL] per
cup) are not the same size as a measuring cup (8 oz [237 mL]).
You may need to recalibrate Measured Fill to underfill or to avoid
unintentionally overfilling coffee cups.
4.
Dispense water. While dispensing water, the flow of water will
automatically stop once the desired volume has been
dispensed.
�
Press a sturdy glass against the dispenser paddle below
the waterspout.
or
�
Place the glass below the waterspout and touch Dispense
Water for hands-free dispensing.


