Active
Passive
Dummy
Semi-Active/Passive
Lay the hardware out on a clean, flat surface next to the door panel(s). Skim over instructions to ensure all parts are included and needed tools are
within reach.
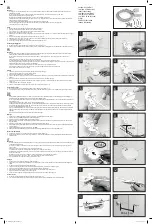
Semi-Active/Passive Door
1.
From the exterior
, align
and insert the tailpiece
to coordinate with the
deadbolt cylinder. Press
the semi-active/passive
trim plate against the
exterior face of the door
panel and hold into place.
2. Align the thumb turn on
the interior trim plate to
coordinate with the angle
of the tailpiece. Press the
interior trim plate against
the interior face of the
door panel and hold into
place. Insert the attachment screws into the top and bottom holes of the
interior trim plate.
3. Tighten the attachment screws until snug.
Continue to Step 4 on next page.
INSTALLATION OF TRIM SET ON AN ACTIVE, SEMI-ACTIVE/PASSIVE OR PASSIVE DOOR
Active Door
1. Align the keyway
tailpiece to coordinate
with the deadbolt
cylinder. Press the active
key trim plate against the
exterior face of the door
panel and hold in place.
2. Align the thumb turn on
the interior trim plate
to coordinate with the
angle of the key cylinder
tailpiece. Press the interior
trim plate against the
interior face of the door panel and hold in place. Insert the attachment
screws into the top and bottom holes of the interior trim plate.
3. Tighten the attachment screws until snug.
Continue to Step 4 on next page.
Harleston
™
Belmar
™
Whitby
™
1
Installation Instructions
for Swinging Patio Door Hardware (JII-90011)
Active
key
trim
plate
Exterior
Interior
Exterior
Interior
Semi-
Active/
Passive
trim
plate
Tailpiece
Thumb
turn
Thumb
turn