background image

Using the Remote Control.

1. Press the MODE button on the Remote Control.

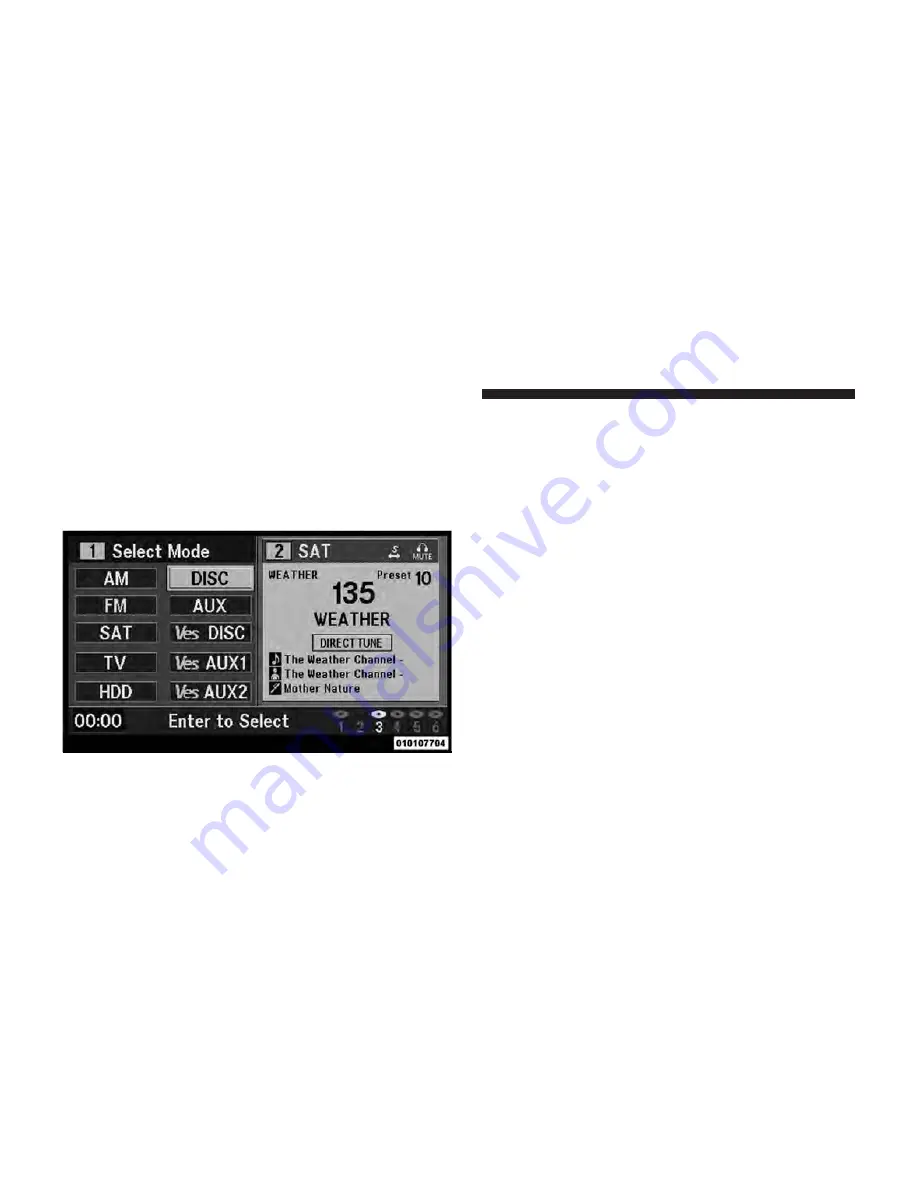
2. While looking at Screen 1 or 2, highlight DISC by
either pressing Up/Down/Left/Right buttons or by re-
peatedly pressing the MODE button, then press ENTER.

NOTE:

Channel/Screen 1 select mode information is shown
on the left side of the screen.

Channel/Screen 2 select mode information is shown
on the right side of the screen.

The VES™ will retain the last setting when turned off.

Using the Touch-Screen Radio controls

1. Press the MENU hard-key on the radio faceplate.

2. Touch the Rear VES soft-key to display the Rear VES
Controls. If a channel list is displayed, press the HIDE
LIST soft-key to display the Rear VES Controls screen.

Select DISC mode on the VES screen.

56

Uconnect™ Multimedia - Video Entertainment System (VES)™

Summary of Contents for Uconnect

Page 1: ...USER S MANUAL UconnectTM...

Page 2: ......

Page 3: ...TABLE OF CONTENTS SECTION PAGE 1 INTRODUCTION 3 2 Uconnect Phone 7 3 Uconnect Multimedia Video Entertainment System VES 39 4 Voice Command 97 5 INDEX 103 1 2 3 4 5...

Page 4: ......

Page 5: ...INTRODUCTION CONTENTS Introduction 4 1...

Page 6: ...ertainment System VES is designed to give your family years of enjoyment You can play your favorite DVDs watch SIRIUS Backseat TV if equipped listen to audio over the wireless head phones and play a v...

Page 7: ...al you may miss important information Observe all WARNINGS The information given in this manual is subject to change Before operating this Uconnect system for the first time please read this manual ca...

Page 8: ......

Page 9: ...ne CONTENTS Uconnect phone If Equipped 8 Operation 10 Phone Call Features 19 Uconnect phone Features 22 Advanced Phone Connectivity 27 Things You Should Know About Your Uconnect phone 29 General Infor...

Page 10: ...r phone as you enter or exit your vehicle and enables you to mute the system s microphone for private conversation WARNING Any voice commanded system should be used only in safe driving conditions fol...

Page 11: ...few seconds the system will present a list of menu options Listen to the choices and give your command after the beep Voice Command Button Actual button location may vary with the ra dio The individua...

Page 12: ...and can be said Setup Phone Pairing For each feature explanation in this section only the combined form of the voice command is given You can also break the commands into parts and say each part of th...

Page 13: ...refer ence your cellular phone Owner s Manual The Uconnect website may also provide detailed instruc tions for pairing The following are general phone to Uconnect Phone pairing instructions Press the...

Page 14: ...rity three and priority five phones are present in the vehicle the Uconnect Phone will use the priority three cellular phone when you make a call You can select to use a lower priority cellular phone...

Page 15: ...7 The pairing procedure starts Refer to the user s manual of your Bluetooth phone to complete the pro cedure 8 You will then be asked to set a priority for the paired phone If there is more than one p...

Page 16: ...the person you want to call After the Ready prompt and the following beep say the name of the person you want to call For example you can say John Doe where John Doe is a previ ously stored name entr...

Page 17: ...u The Uconnect phone will allow you to enter up to 32 names in the phonebook with each name having up to four associated phone numbers and designations Each language has a separate 32 name phonebook a...

Page 18: ...book is downloaded SIM card phonebook is not part of the Mobile phone book This downloaded phonebook cannot be edited or deleted on the Uconnect Phone These can only be edited on the cellular phone Th...

Page 19: ...ctions on how to drop the Bluetooth connection If the phonebook entry is longer than 24 characters it will only use the first 24 characters Edit Uconnect Phonebook Entries NOTE Editing names in the ph...

Page 20: ...e Ready prompt and the following beep say Phonebook Delete After you enter the Phonebook Delete menu you will then be asked for the name of the entry that you wish to delete You can either say the nam...

Page 21: ...k Press the button to begin After the Ready prompt and the following beep say Phonebook List Names The Uconnect Phone will play the names of all the phonebook entries including the downloaded phone bo...

Page 22: ...ently in progress and you have another incoming call you will hear the same network tones for call waiting that you normally hear when using your cellular phone Press the button to place the current c...

Page 23: ...calls have been joined into one conference call Three Way Calling To initiate three way calling press the button while a call is in progress and make a second phone call as described under Making a S...

Page 24: ...nition key is switched to OFF a call can continue on the Uconnect Phone either until the call ends or until the vehicle battery condition dictates cessation of the call on the Uconnect Phone and trans...

Page 25: ...are in an emergency and the cellular phone is reachable Pick up the phone and manually dial the emergency number for your area If the phone is not reachable and the Uconnect Phone is operational you m...

Page 26: ...tton to begin After the Ready prompt and the following beep say Towing Assistance NOTE The towing assistance number dialed is based on the country where the vehicle is purchased 1 800 528 2069 for the...

Page 27: ...to enter in a touch tone sequence on your cellular phone keypad you can press the button and say the sequence you wish to enter followed by the word Send For example if required to enter your PIN foll...

Page 28: ...epeat a phone number before you dial it Press the button to begin After the Ready prompt and the following beep say Setup Confirmations The Uconnect Phone will play the current confirmation prompt sta...

Page 29: ...ar the audio Mute Un Mute Mute OFF When you mute the Uconnect Phone you will still be able to hear the conversation coming from the other party but the other party will not be able to hear you In orde...

Page 30: ...etup Phone Pairing When prompted say List Phones The Uconnect Phone will play the phone names of all paired cellular phones in order from the highest to the lowest priority To select or delete a paire...

Page 31: ...button at any time while the list is being played and then choose the phone you wish to delete Things You Should Know About Your Uconnect Phone Uconnect Phone Tutorial To hear a brief tutorial of the...

Page 32: ...ings enter the Voice Training session via the above procedure and follow the prompts Voice Command For best performance adjust the rearview mirror to provide at least 1 2 in 1 cm gap between the overh...

Page 33: ...ebook Downloaded and Uconnect Phone Lo cal name recognition rate is optimized when the entries are not similar Numbers must be spoken in single digits 800 must be spoken eight zero zero not eight hund...

Page 34: ...rmance may be compromised with the convertible top down Bluetooth Communication Link Cellular phones have been found to lose connection to the Uconnect Phone When this happens the connec tion can gene...

Page 35: ...Voice Tree 2 Uconnect Phone 33...

Page 36: ...34 Uconnect Phone...

Page 37: ...2 Uconnect Phone 35...

Page 38: ...three four five six seven eight nine star plus pound add location all Voice Commands Primary Alternate s call cancel confirmation prompts continue delete dial download edit emergency English erase al...

Page 39: ...ne phone pairing pairing phonebook phone book previous record again Voice Commands Primary Alternate s redial return to main menu return or main menu select phone select send set up phone settings or...

Page 40: ...owing conditions Changes or modifications not expressly approved by the party responsible for compliance could void the user s authority to operate the equipment This device may not cause harmful inte...

Page 41: ...All Vehicles Except Caravan Town Country If Equipped 43 Play a DVD 44 View Sirius Backseat TV 47 Play Video Games 49 Listen To An Audio Source On Channel 2 While a Video Is Playing On Channel 1 52 Im...

Page 42: ...s And Indicators 70 Remote Control Storage 72 Locking The Remote Control 73 Replacing The Batteries 73 Headphones Operation 74 Controls 74 Replacing The Batteries 76 Unwired Stereo Headphone Lifetime...

Page 43: ...oduct Agreement 91 Sirius Backseat TV Activation 92 System Activation 92 Satellite Antenna 93 Reception Quality 93 Remote Control Operation 94 Deactivation Signal Displays 94 3 Uconnect Multimedia Vid...

Page 44: ...the center of the overhead console behind the screen s On Caravan and Town and Country vehicles with Dual Screen Systems refer to the Dual Video Screen section for more information Screen located in...

Page 45: ...headphone transmitters turn on and playback begins For Dual Video Screen System Channel 1 on the Remote Control and Headphones refers to Screen 1 second row and Channel 2 on the Remote Control and Hea...

Page 46: ...c is recognized and displays the menu screen or starts playing the first tract 3 Ensure the VES Remote Control and the Headphone switch is on Channel 1 Using the Remote Control 1 Press the MODE button...

Page 47: ...key to display the Rear VES Controls If a channel list appears on the right side of the screen touch the HIDE LIST soft key to display the Rear VES Controls screen 3 Touch the 1 soft key and then the...

Page 48: ...in the PARK position for vehicles with automatic transmission In vehicles with manual transmission the parking brake must be engaged Touching the screen on a Touch Screen radio while a DVD is playing...

Page 49: ...ote Control 2 While looking at the video screen highlight TV by either pressing the Up Down Left Right buttons or by repeatedly pressing the MODE button then press ENTER on the Remote Control NOTE The...

Page 50: ...appears on the right side of the screen touch the HIDE LIST soft key to display the Rear VES Controls screen 3 Touch the 1 soft key and then the TV soft key in the RADIO column To exit touch the back...

Page 51: ...ged SIRIUS Backseat TV is not available in Canada Hawaii or Alaska Play Video Games Connect the video game console to the Auxiliary RCA input jacks 1 set or 2 depending on vehicle located on the back...

Page 52: ...screen highlight VES AUX 1 or 2 depending which AUX input the gaming console is plugged into by either pressing Up Down Left Right buttons or by repeatedly pressing the MODE button then press ENTER o...

Page 53: ...plate 2 Touch the Rear VES soft key to display the Rear VES Controls If a channel list is displayed press the HIDE LIST soft key to display the Rear VES Controls screen Select Ves AUX1 mode on the VES...

Page 54: ...mote Control 1 Press the MODE button on the Remote Control and the Mode Select Screen will display unless a video is playing then only a small banner will appear on the bottom of the screen 2 While lo...

Page 55: ...aceplate 2 Touch the Rear VES soft key to display the Rear VES Controls If a channel list is displayed press the HIDE LIST soft key to display the Rear VES Controls screen Select FM mode on the VES sc...

Page 56: ...ly In split screen mode the left side equates to Channel 1 and right side equates to Channel 2 Channel 2 is for audio only Selecting a video source DVD will not show the video on the screen When selec...

Page 57: ...ace plate Touch Screen 2 Insert the DVD with the label facing up The radio automatically selects the appropriate mode after the disc is recognized and displays the menu screen or starts playing the fi...

Page 58: ...side of the screen Channel Screen 2 select mode information is shown on the right side of the screen The VES will retain the last setting when turned off Using the Touch Screen Radio controls 1 Press...

Page 59: ...the top left of the screen NOTE To view a DVD on the radio press the RADIO MEDIA hard key on the radio faceplate then touch the DISC tab soft key and then the VIEW VIDEO soft key Rear VES soft key Se...

Page 60: ...the X in the upper corner will turn off the remote control screen functions Play a DVD using the VES player if equipped 1 Insert the DVD with the label facing up The VES player automatically selects...

Page 61: ...the left side of the screen Channel Screen 2 select mode information is shown on the right side of the screen The VES will retain the last setting when turned off Using the Touch Screen Radio control...

Page 62: ...key at the top left of the screen NOTE To view a DVD on the radio press the RADIO MEDIA hard key on the radio faceplate then touch the VES tab soft key and then the VIEW VIDEO soft key Rear VES soft k...

Page 63: ...e Remote Control and Headphone switch is on Channel 1 for Screen 1 or Channel 2 for Screen 2 Using the Remote Control 1 Press the MODE button on the Remote Control 2 While looking at Screen 1 or 2 hig...

Page 64: ...ey on the radio faceplate 2 Touch the Rear VES soft key to display the Rear VES Controls If a channel list is displayed touch the HIDE LIST soft key to display the Rear VES Controls screen 3 Touch the...

Page 65: ...h Screen radio screen is not available in all states provinces and the vehicle must be stopped and the shifter must be in the PARK position for vehicles with automatic transmission In vehicles with ma...

Page 66: ...ames such as Playsta tion3 and XBox360 will exceed the power limit of the vehicle s Power Inverter Refer to the Power Inverter section in your vehicle s Owner s Manual for more information Ensure the...

Page 67: ...Right buttons or by repeatedly pressing the MODE button then press ENTER on the Remote Control NOTE Channel Screen 1 select mode information is shown on the left side of the screen Channel Screen 2 s...

Page 68: ...E LIST soft key to display the Rear VES Controls screen 3 Touch the 1 or 2 soft key and then touch either AUX 1 or AUX 2 in the VES column depending which AUX input the gaming console is plugged into...

Page 69: ...will appear at the bottom of the screen 2 To listen to an audio source on Channel 1 or 2 either press Up Down Left Right on the Remote Control to highlight the desired audio source or press the MODE...

Page 70: ...urce To listen to an audio source on Channel 2 while a video is playing on Channel Screen 1 touch the 2 soft key and choose an audio source To exit touch the back arrow soft key at the top left of the...

Page 71: ...equates to Channel 1 and the right side equates to Channel 2 Selecting a video source on Channel 1 the video source will display on the second row screen or Screen 1 and can be heard on Channel 1 Sele...

Page 72: ...hannel Screen Selector Switch Indicates which channel is being controlled by the remote control When the selector switch is in the Channel 1 position the remote controls the functionality of screen Ch...

Page 73: ...dio When listening to compressed audio on a data disc PROG Up selects the next directory and PROG Down selects the previous directory When listening to a disc in a radio with a multiple disc changer P...

Page 74: ...adio modes press to select to the next station In disc modes press to advance to the next audio track or video chapter In satellite video mode press to advance to the next channel In menu modes use to...

Page 75: ...en Video Lock is active Pressing the Video Lock again or turning the ignition OFF turns Video Lock OFF and allows remote control operation of the VES Replacing The Batteries The remote control require...

Page 76: ...s If no audio is heard after increasing the volume control verify that the screen is turned on and that the channel is not muted and the headphone channel selector switch is on the desired channel If...

Page 77: ...the Remote is controlling Channel 2 and the headphones are tuned to the audio of the VES Channel 2 2 Press the MODE button on the remote control 3 If the video screen is displaying a video source suc...

Page 78: ...ranty lasts as long as you own the Product What Does This Warranty Cover Except as specified below this warranty covers any Product that in normal use is defective in workmanship or materials What Doe...

Page 79: ...ANTY OR MERCHANTABILITY OR FITNESS FOR A PARTICULAR PURPOSE If you have any questions or comments regarding your Unwired wireless headphones please phone 1 888 293 3332 or email customersupport unwire...

Page 80: ...des as long as it is not in shared mode When in shared disc or satellite video mode both the radio and the VES have control of the video functions The VES has the ability to control the following vide...

Page 81: ...4 Channel 2 Mode 5 Channel 2 Shared Status 6 Channel 2 Audio Only Mute 7 Channel 1 ENTER Button Action 8 Channel 2 ENTER Button Action 9 Clock 10 Video Lock 11 Not Available Error 12 Disc Changer Stat...

Page 82: ...the remote control s navigation buttons to navigate to the desired digit 2 When the digit is highlighted press the remote con trol s ENTER button to select the digit Repeat these steps until all digi...

Page 83: ...avigate this list using the remote control s naviga tion buttons to find the desired station press the remote control s ENTER button to tune to that station To jump through the list more quickly navig...

Page 84: ...on the screen The factory default settings are already set for optimum viewing so there is no need to change these settings under normal circum stances To change the settings press the remote control...

Page 85: ...eard verify that the headphones are turned on the ON indicator is illuminated and the headphone selector switch is on the desired channel If the headphones are turned on press the remote control s pow...

Page 86: ...me level to account for this change in level remember to lower the volume before changing the disc or to another mode Recorded Discs The VES DVD player will play CD R and CD RW discs recorded in CD Au...

Page 87: ...er for more information about burning playable discs The recommended method for labeling recordable discs CD R CD RW and DVD R is with a permanent marker Do not use adhesive labels as they may separat...

Page 88: ...and 192Kbps and the recommended fixed bit rate for WMA files is between 64 and 192Kbps Variable bit rates are also supported For both formats the recommended sample rate is either 44 1kHz or 48kHz To...

Page 89: ...the disc and attempt to play the start of the first track The DVD player may shut down during extremely hot conditions such as when the vehicle s interior tempera ture is above 120 F When this occurs...

Page 90: ...ition After selecting the digit press the remote control s Right cursor button to select the next digit Repeat this digit selection sequence for all four digits When the entire four digit code is ente...

Page 91: ...enter the correct password using the password entry method described below To play all discs without requiring a password set the DVD player s rating to Level 8 Setting the rating to Level 1 always r...

Page 92: ...s Right cursor button to select the next digit Repeat this digit selection sequence for all four digits After the four digit password is entered press the remote control s ENTER button If the passwor...

Page 93: ...s displayed Using the remote control s Up and Down cursor buttons select the new rating level and then press the remote control s ENTER button to accept the change Product Agreement This product incor...

Page 94: ...llite Radio SIRIUS Backseat TV offers three video channels for family entertainment directly from its satellites and broadcasting studios NOTE SIRIUS Backseat TV is not available in Canada Hawaii or A...

Page 95: ...ntenna To ensure optimum reception on vehicles available with a luggage rack do not place items on the roof around the rooftop antenna location Metal objects placed within the line of sight of the ant...

Page 96: ...from the radio unit only in the front seat Audio Headphones Turn the headphone switch on a red light will indicate that audio is playing through the headphones Select IR1 for second row screen select...

Page 97: ...is an after sales video receiver MOPAR it will be necessary to call SIRIUS and re activate the SIRIUS subscription Call SIRIUS to active video service with the phone number on the screen Have the ESN...

Page 98: ......

Page 99: ...Voice Command CONTENTS Voice Command If Equipped 98 Voice Command Operation 98 Commands 99 Voice Training 102 4...

Page 100: ...be kept on the roadway ahead Failure to do so may result in an accident causing serious injury or death When you press the button you will hear a beep The beep is your signal to give a command NOTE If...

Page 101: ...not recognize one of your commands you will be prompted to repeat it To hear the first available Menu press the button and say Help or Main Menu Commands Voice Command understands two types of command...

Page 102: ...ct the previous station Radio Menu to switch to the radio menu Main Menu to switch to the main menu Radio FM To switch to the FM band say FM or Radio FM In this mode you may say the following commands...

Page 103: ...ck Main Menu to switch to the main menu Memo To switch to the voice recorder mode say Memo In this mode you may say the following commands New Memo to record a new memo During the recording you may pr...

Page 104: ...For users experiencing difficulty with the system recog nizing their voice commands or numbers Uconnect Phone Voice Training feature may be used 1 Press the button say System Setup and once you are in...

Page 105: ...INDEX 5...

Page 106: ...Cellular Phone 8 General Information 38 Hands Free Phone Uconnect 8 Phone Cellular 8 Phone Hands Free Uconnect 8 Uconnect Hands Free Phone 8 Voice Recognition System VR 98 104 INDEX...

Page 107: ......

Page 108: ...Printed in U S A 10UCN 226 ENG AB Chrysler Group LLC 2nd Edition...

Reviews: